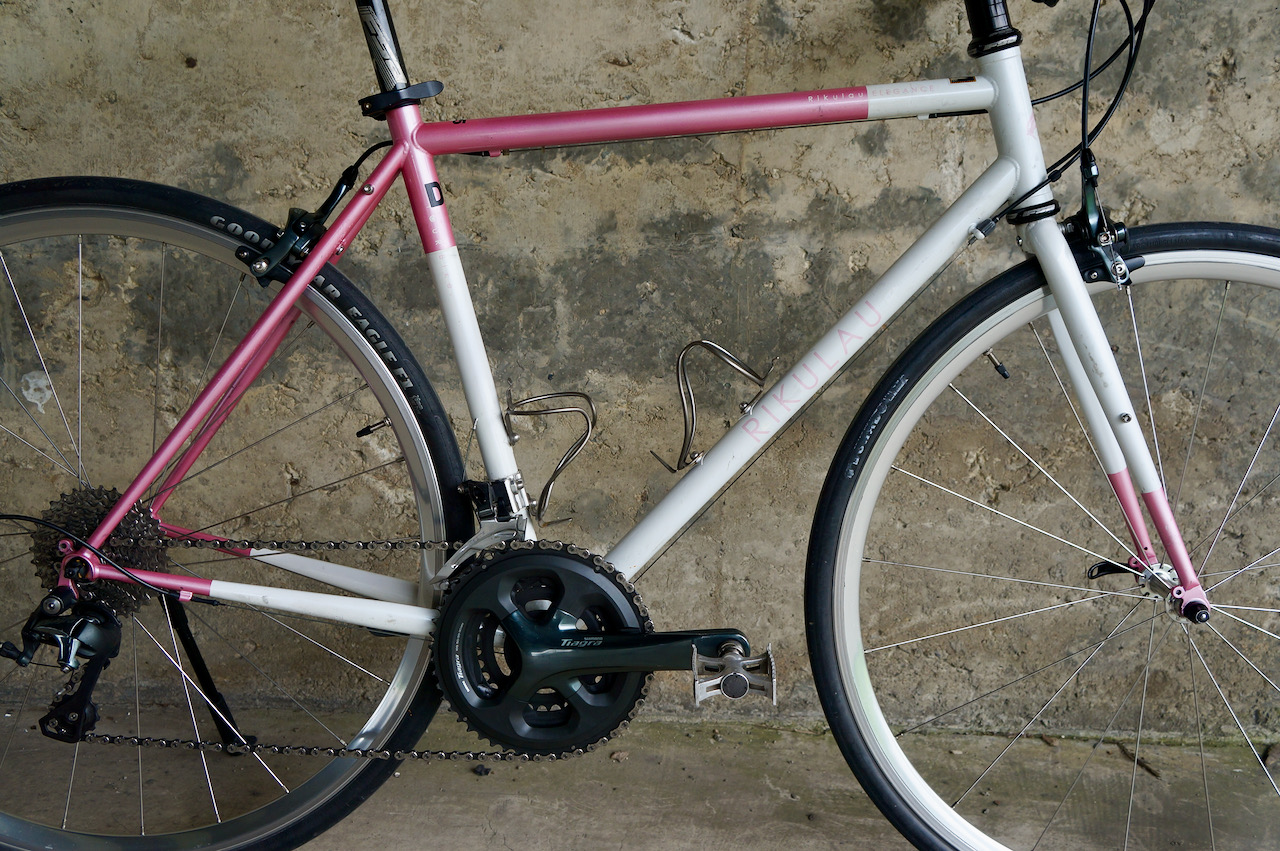
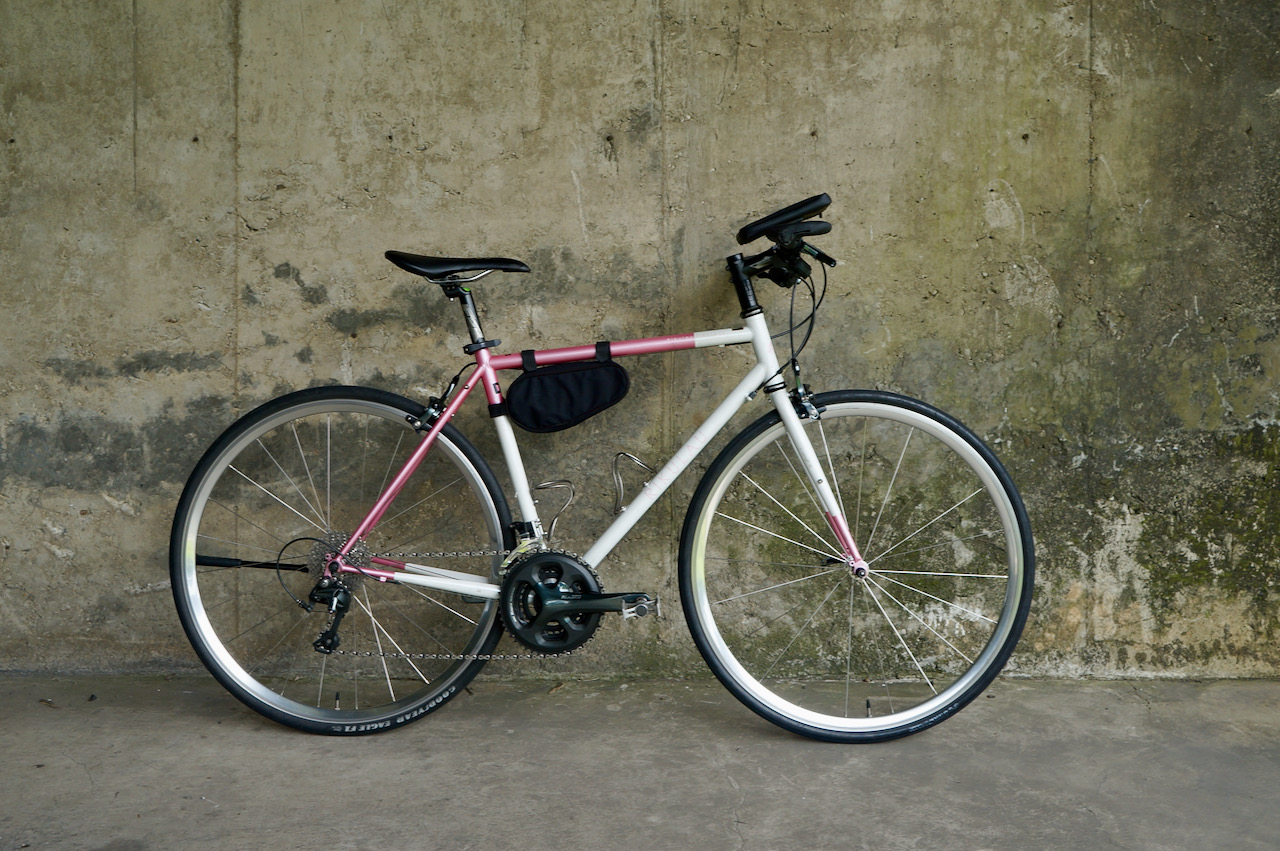
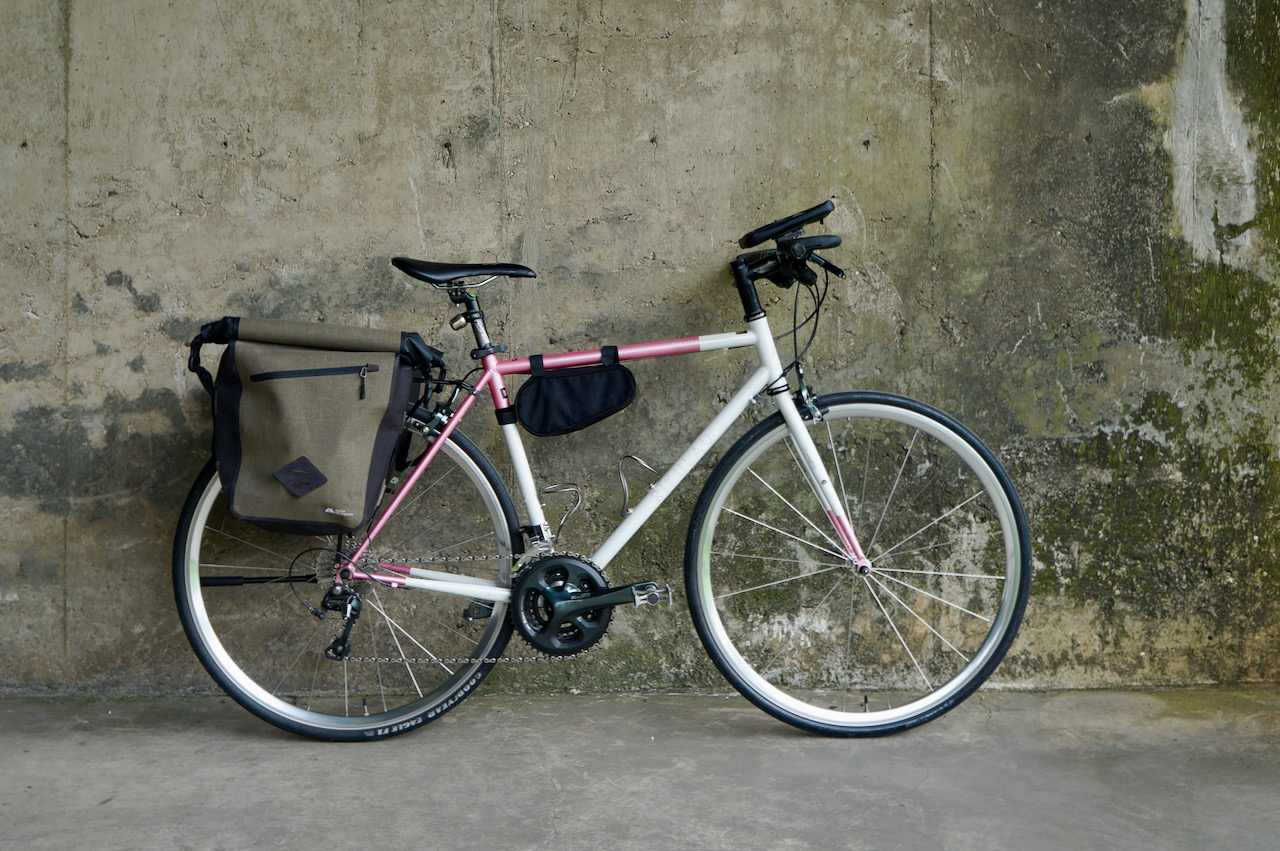
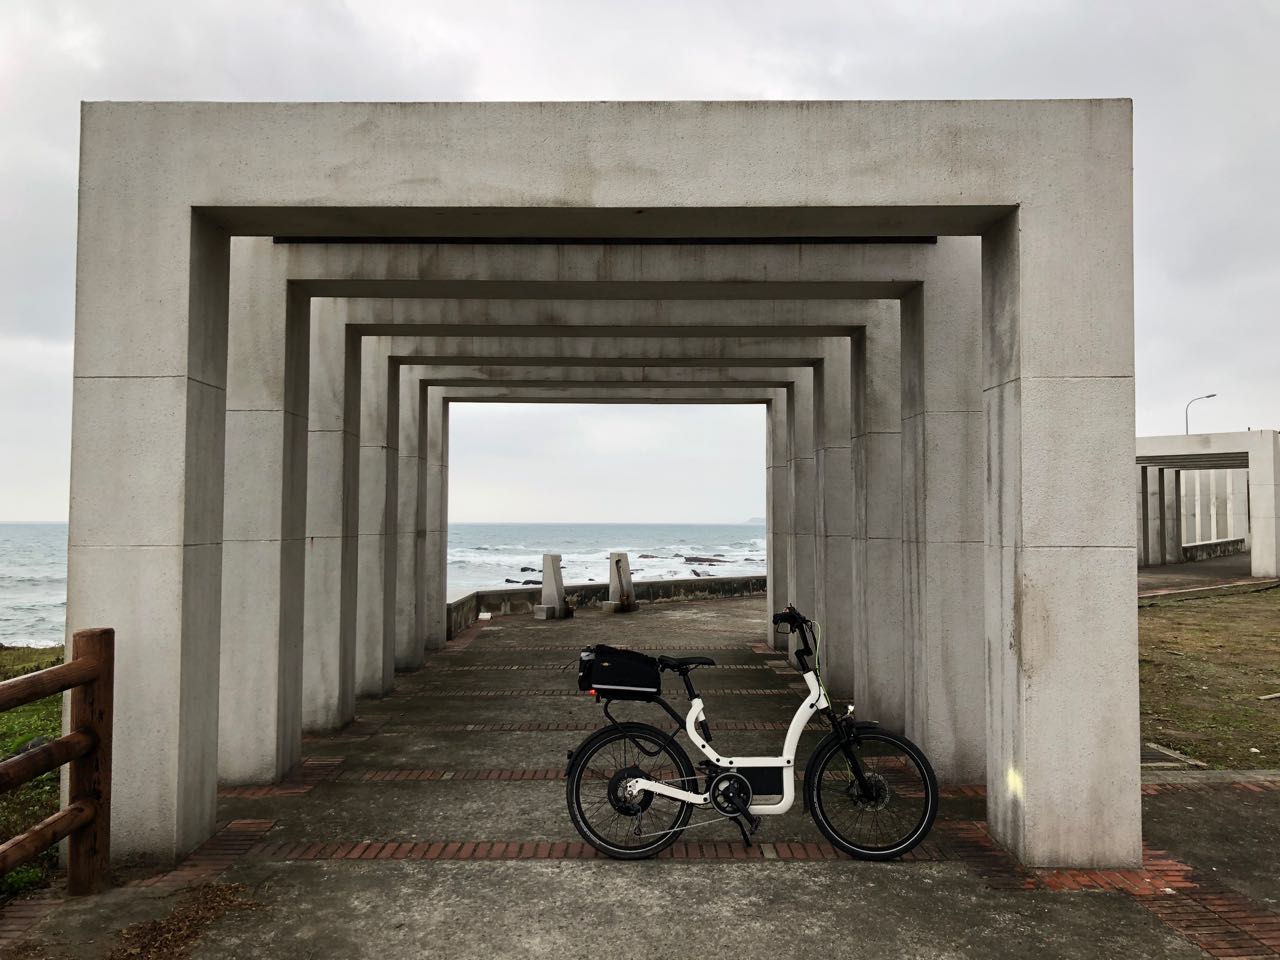
Audax Hercules from Rikulau, a flat bar road bike, is the most popular model in our fleet for multi-day cycling trips in Taiwan. I have been using one for more than a year now mainly to explore cycling routes in Taiwan, and also very intensively in Nov 2020 for a 360 km within 20 hour challenge that goes from from Taipei to Kaohsiung.
Here is an introduction of some of the features of Audax Hercules.
The frame is made of Rikulau’s Hercules steel tubeset, which belongs to the 4130 Chromoly family. Chromoly steel is light and strong. While it flexes well and absorbs unpleasant shocks and vibrations, it maintains its forms, making the bike durable and easily remain at its peak performance even after numerous, prolonged heavy uses.
According to Rikulau, The raw material of the Hercules steel tubeset is from the renowned Nippon Steel (Japan). Precision extrusion, heat treatment and all other processes are done in Taiwan to assure the precision level required by Rikulau is achieved.
The frame size available in our fleet ranges from XXS to XL with effective top tube length from 495mm to 570mm. If your height is 150cm or more than 185cm, you will find a bike with the correct size for you.
The geometry of the Audax series is optimized for comfortable long distance rides, and our fleet of Audax Hercules is specifically configured to adapt to the different road surfaces and terrains in Taiwan, which makes them ideal for exploring the island.
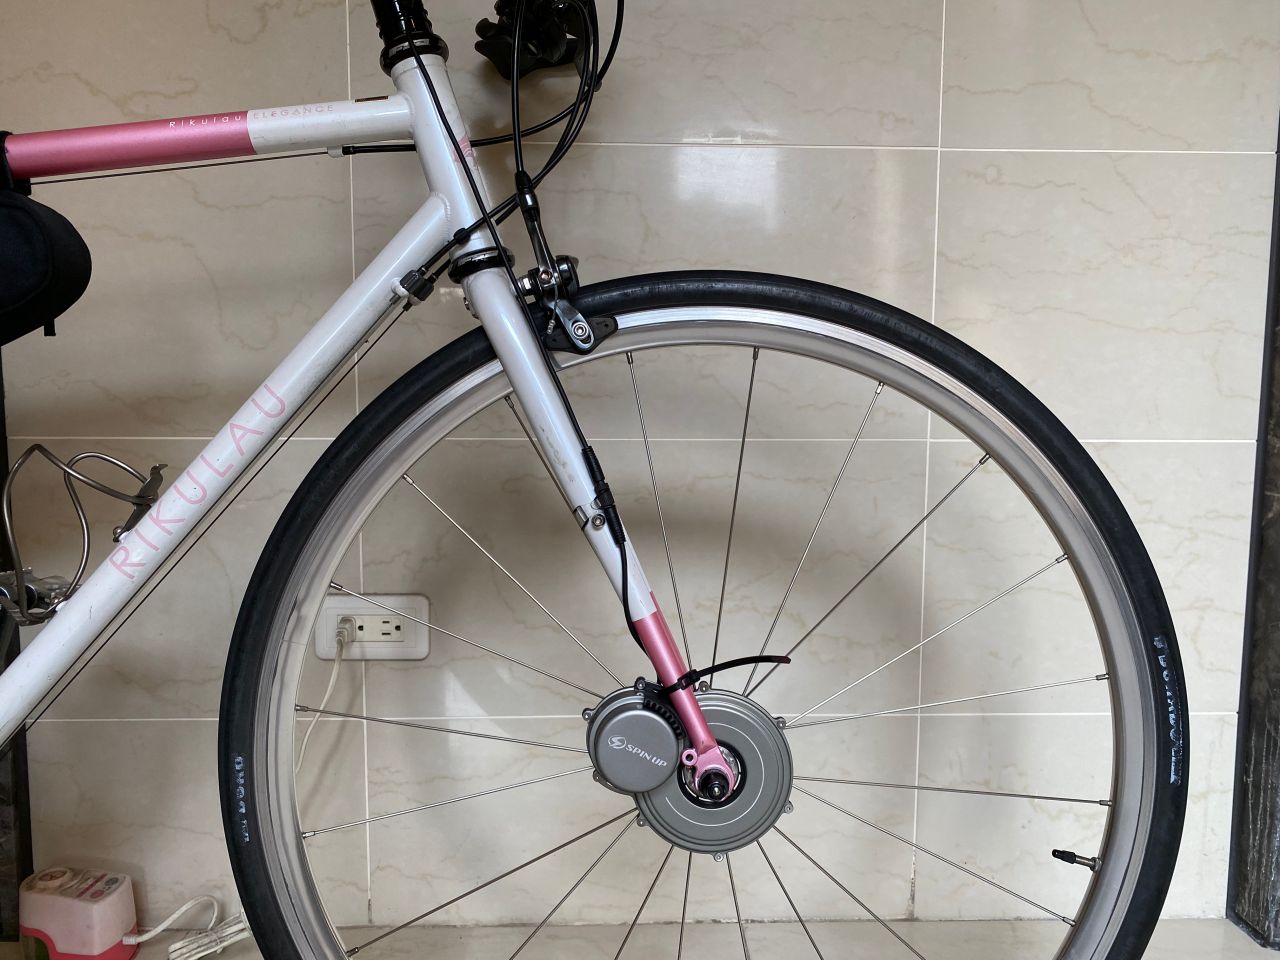
Wheelset
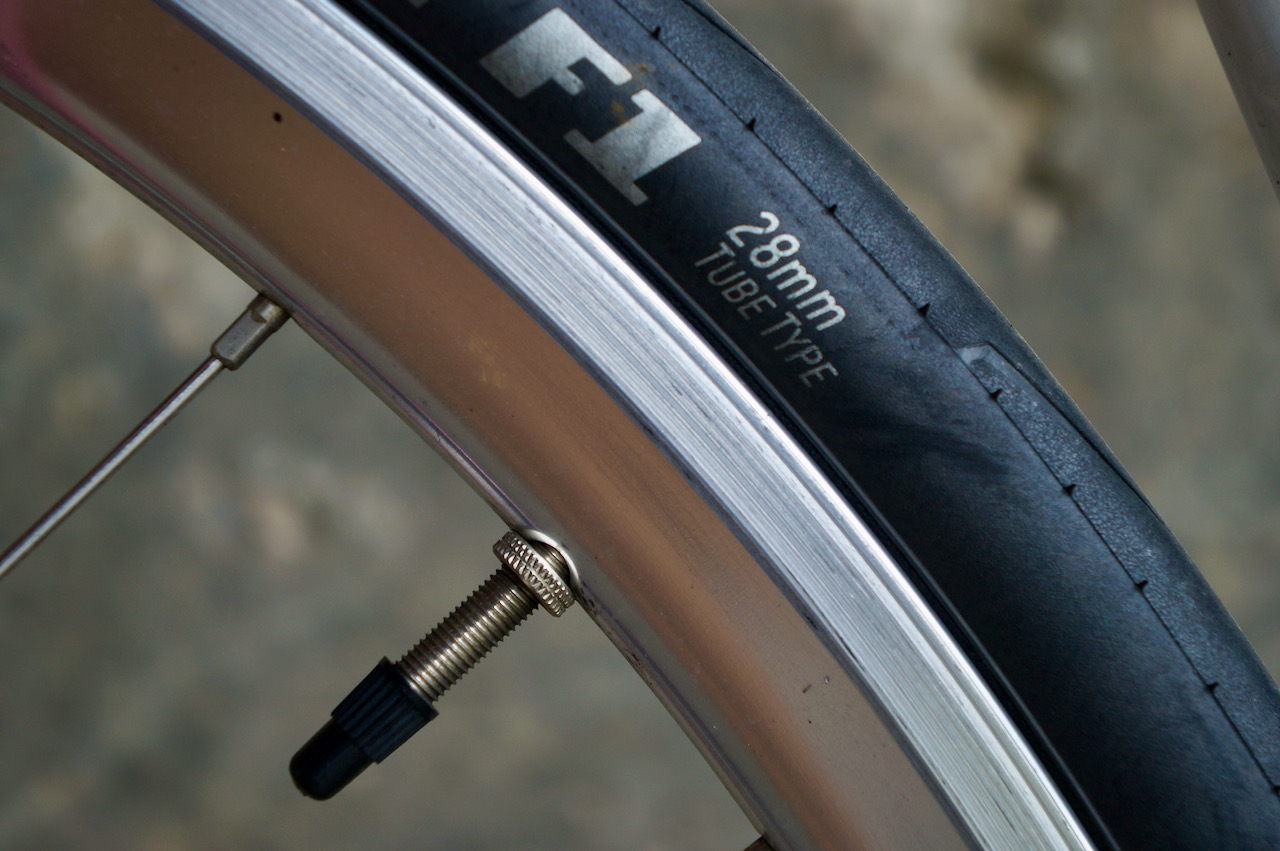
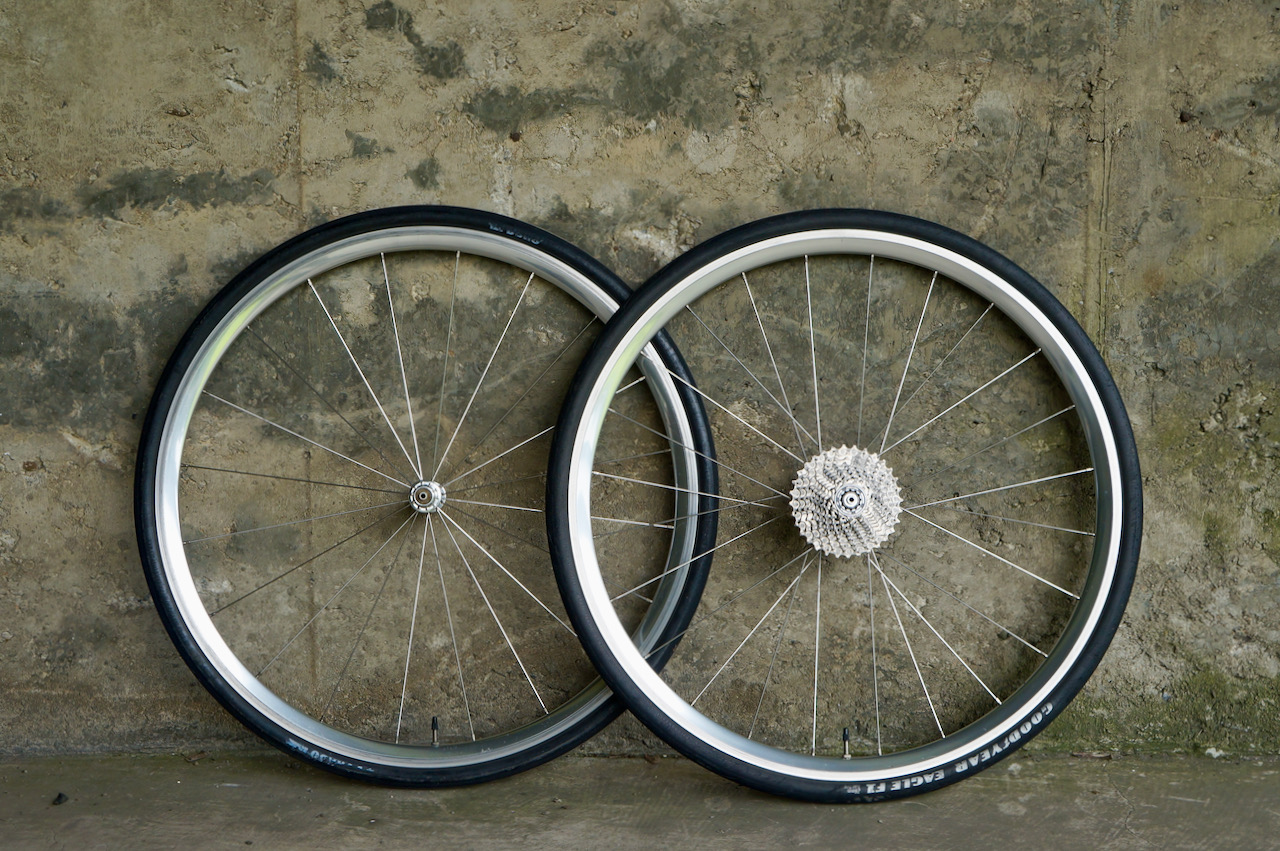
The 700c wheelset is strong and can carry around 100kg of loading. The tyre width of 25/28c enables the bike to run efficiently on most cycling routes in Taiwan, mainly consisting of intracity and intercity roads and designated bike trails. They are usually paved with asphalt or cement, both perfect matches for road bikes. But some segments may get damaged because of weather or heavy uses, and are not always repaved in time. There are also segments of roads that are decorated with wood stripes or bricks, making them rather bumpy. That’s why we err on the wider side of the tyre width.
We use clincher tyres (with inner tubes) for easier and quicker roadside fixes in the case of punctures. Replacement tools and spare tubes are included in our rental package. But we hardly have any clients returning with punctured tubes because those tyres are puncture resistant.
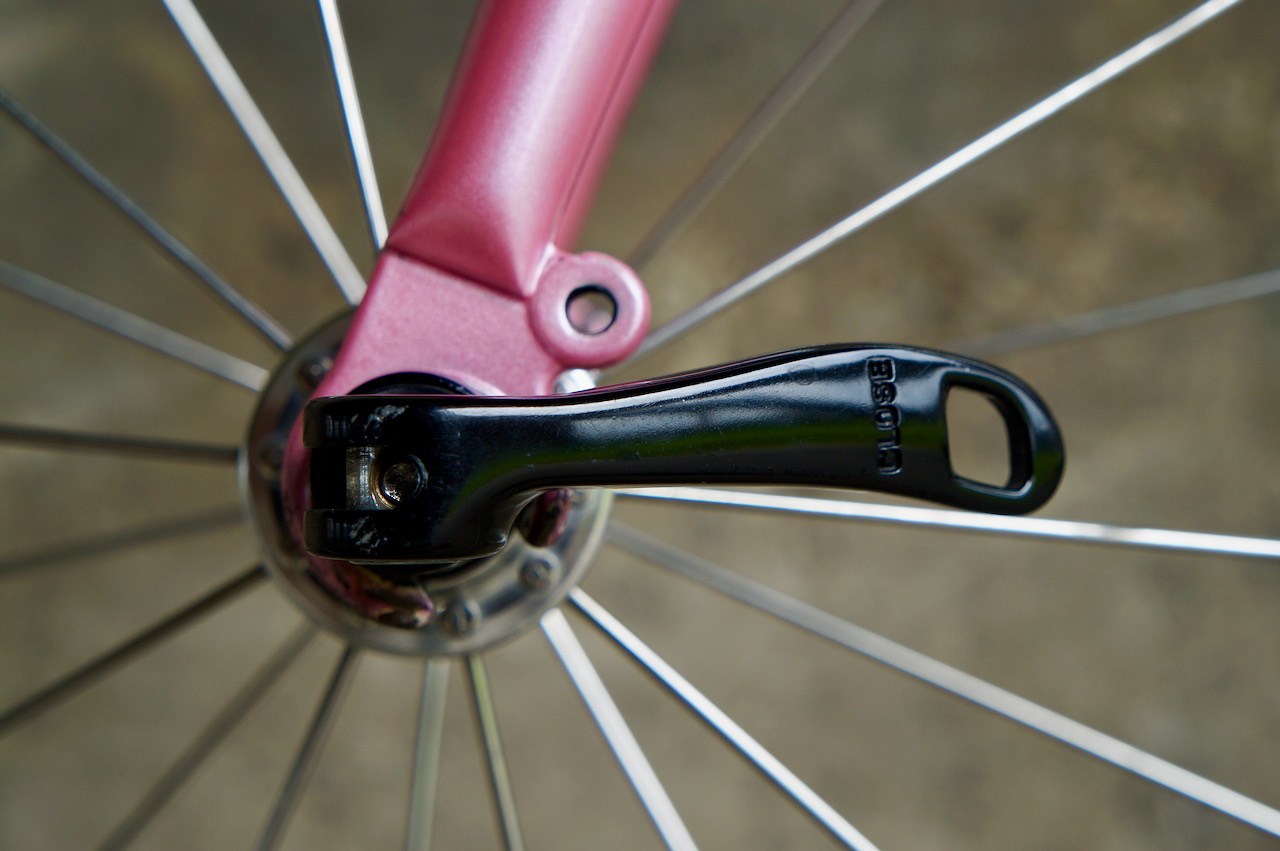
The wheelsets are attached to the bike with quick release skewers so that you can remove the wheels and bag your bikes easily when boarding public transportation in Taiwan.
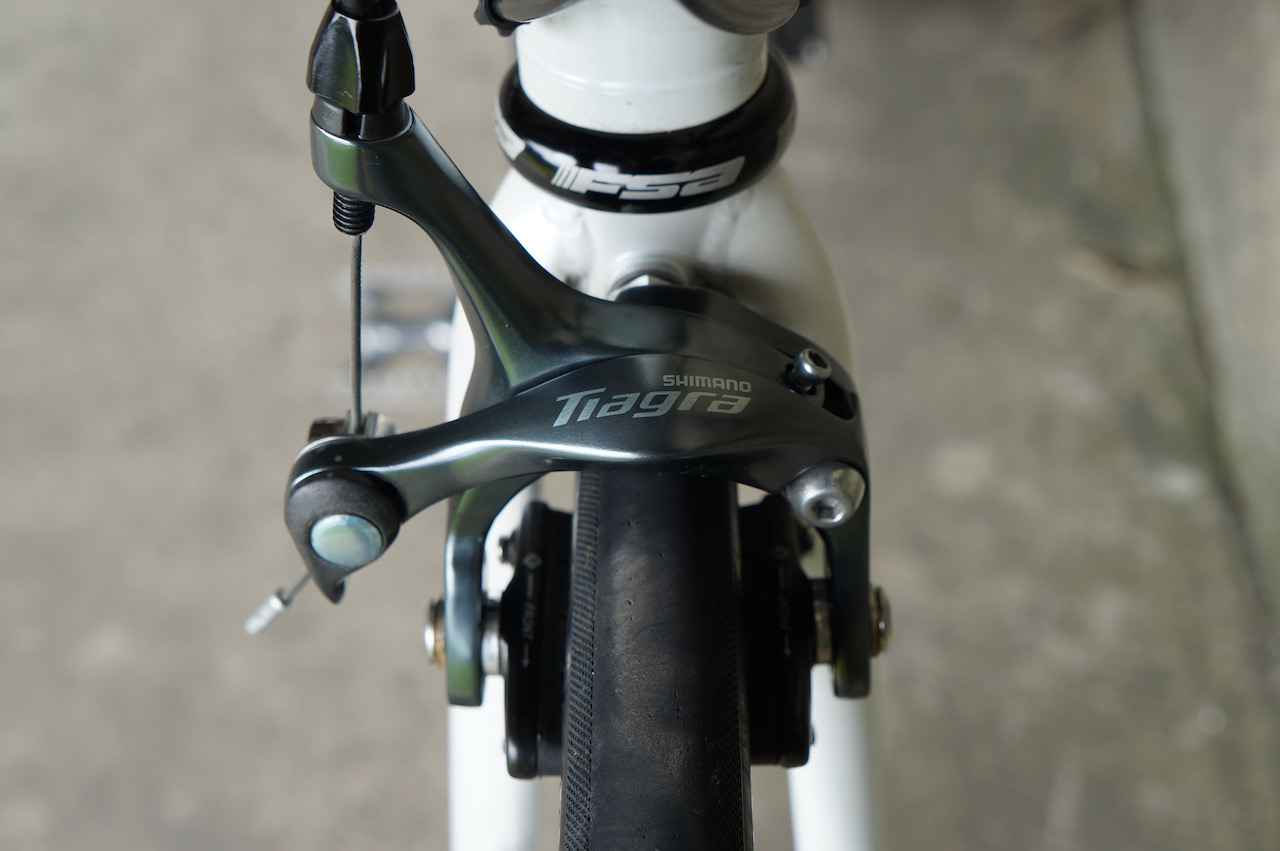
Groupset
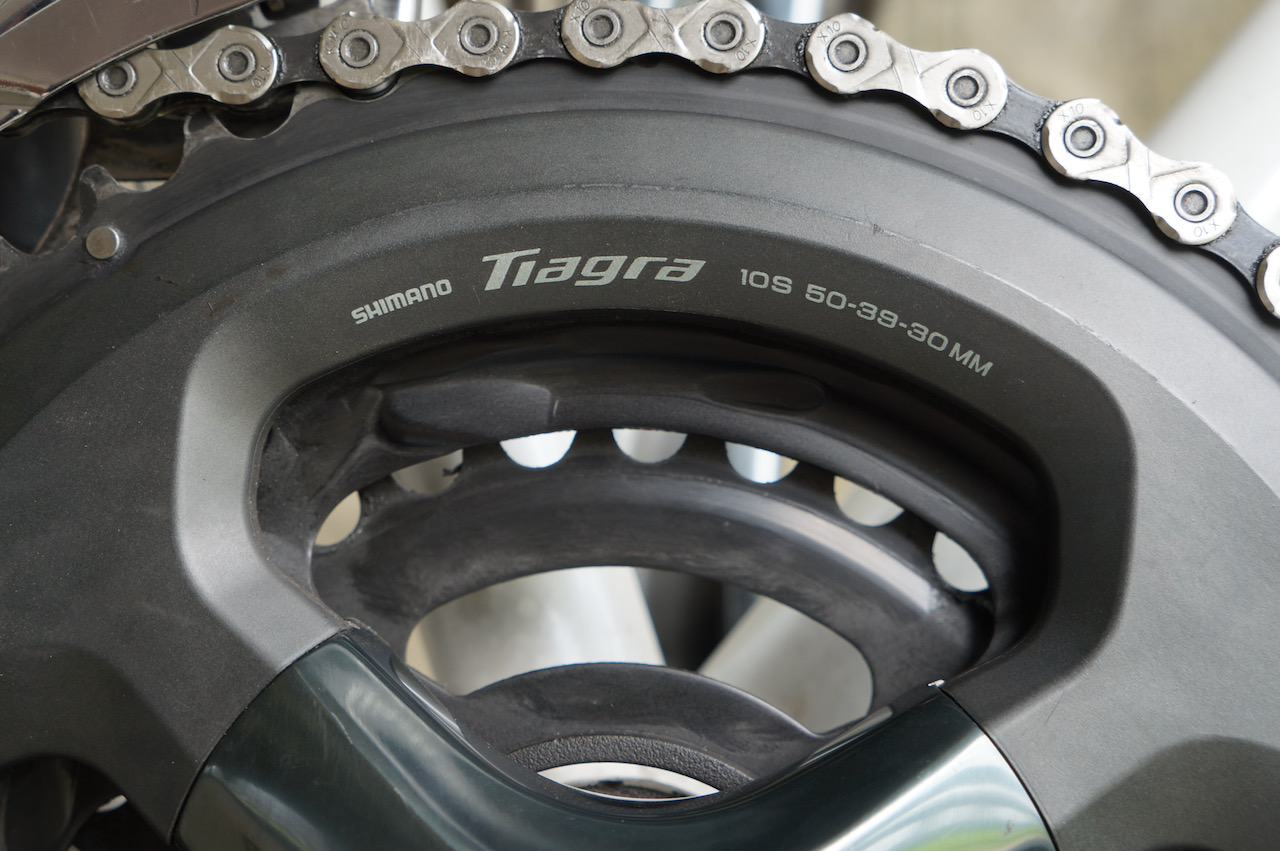
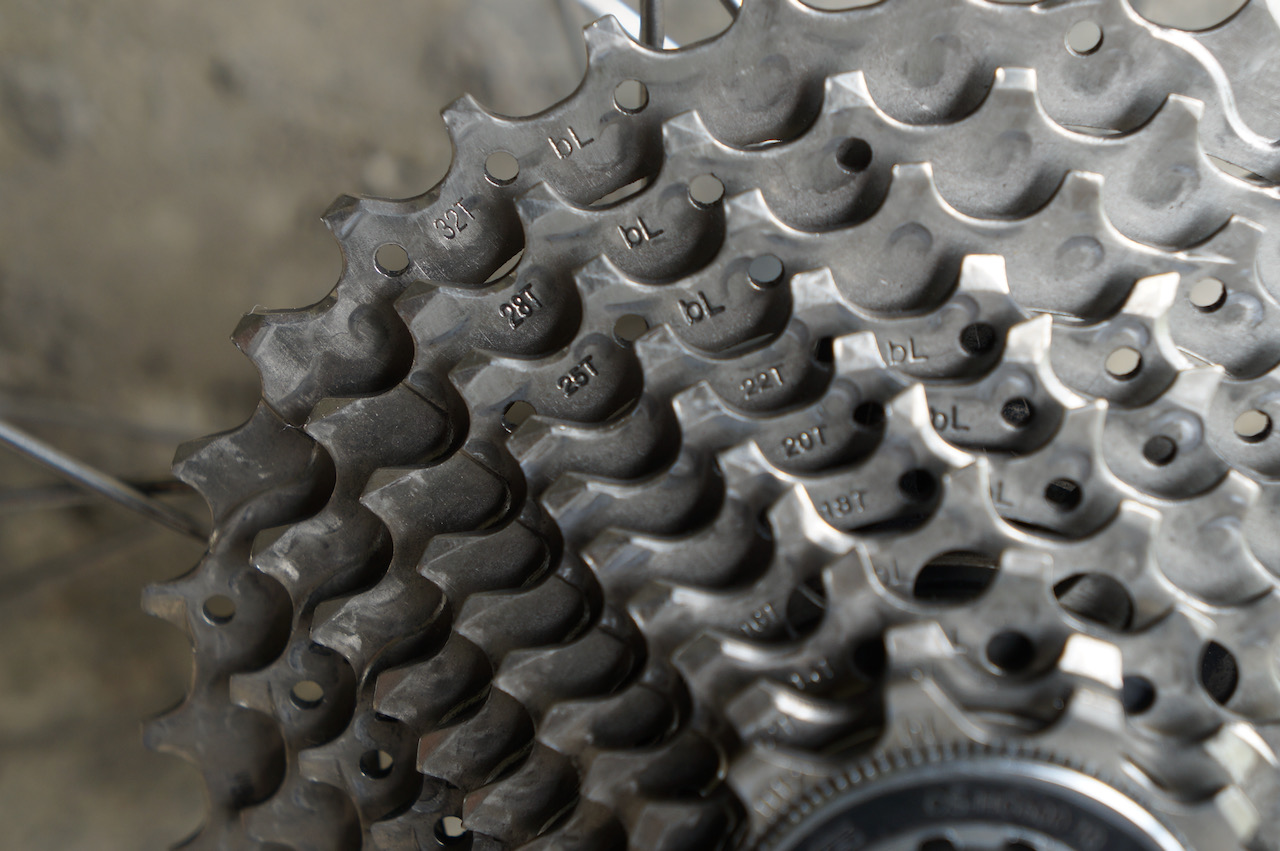
Audax Hercules comes with Shimano Tiagra, a mid-range groupset made for endurance, sports and fitness, or Apex, its SRAM equivalence. The compact chainring on the bike (50/34, front) runs with a 11/32 cassette (rear) instead of the 11/28 cassette found on most road bikes. The 32-teeth sprocket at the rear wheel gives you more leverage to climb steeper slopes or to press against the head wind. When it is set to the gear combination of 50 teeth with 11 teeth, for each turn you made on the crankset, you turn the rear wheel by 4.54 turns and a normal fit person can usually pedal at the speed of 60 turns per minute (cadence). The groupset and the wheelset will then make you travel at 34.95km/h. Of course, you could pedal faster to race with the tail wind or add some more speed when you are diving down from the hills.
Terrain
Gear Setting
Chainring (front)
Cassette Sprocket (rear)
Gear Ratio
Hilly
Lowest Gear
30-tooth for 3x crankset
32-tooth
0.9375
Hilly
Lowest Gear
34-tooth for 2x crankset
32-tooth
1.06
Flat
Highest Gear
50-tooth
11-tooth
4.54
Here’s the maths:
50/11 (gear ratio) X 2.136 (tyre circumference) X 60 (Cadence RPM) X60 (convert to hour) = 34,952 metre/hour
With 2 chainrings and 10 speeds at the cassette, you have 20 combinations of speed to choose from. Some of the bikes in our fleet come with three chainrings (50/39/30), which gives you an even wider range of gear ratio and more choices of speeds (30).
After each use, the bikes are sent back to the workshop of our partner Rikulau, manufacturer of the bikes, for thorough cleaning, oiling and tuning to keep them at their peak performance.
One of our customers commented on our bikes:
Honestly the bikes were way better than we had expected! You guys maintained the Tiagra groupset like a charm, I had never had such crisp shifting experience on rental bikes 🙂
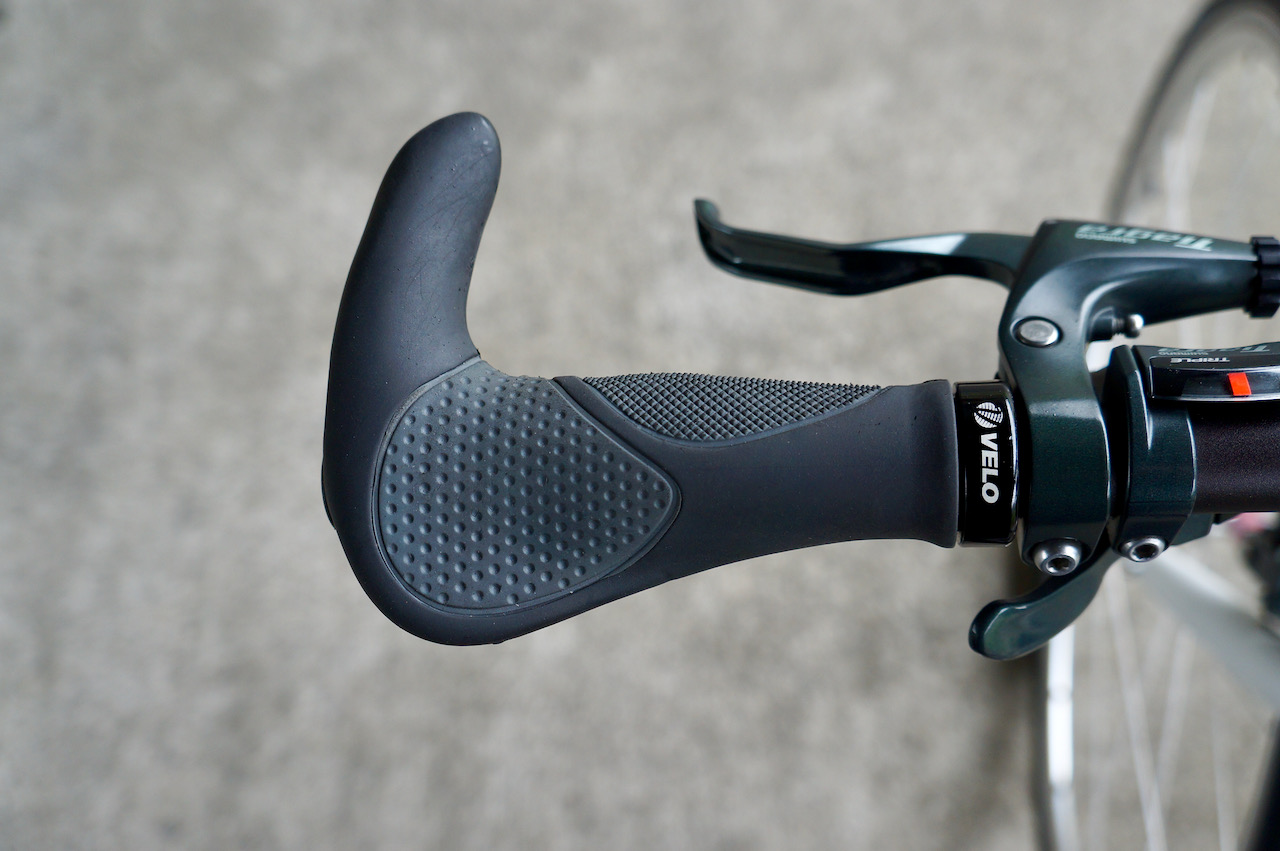
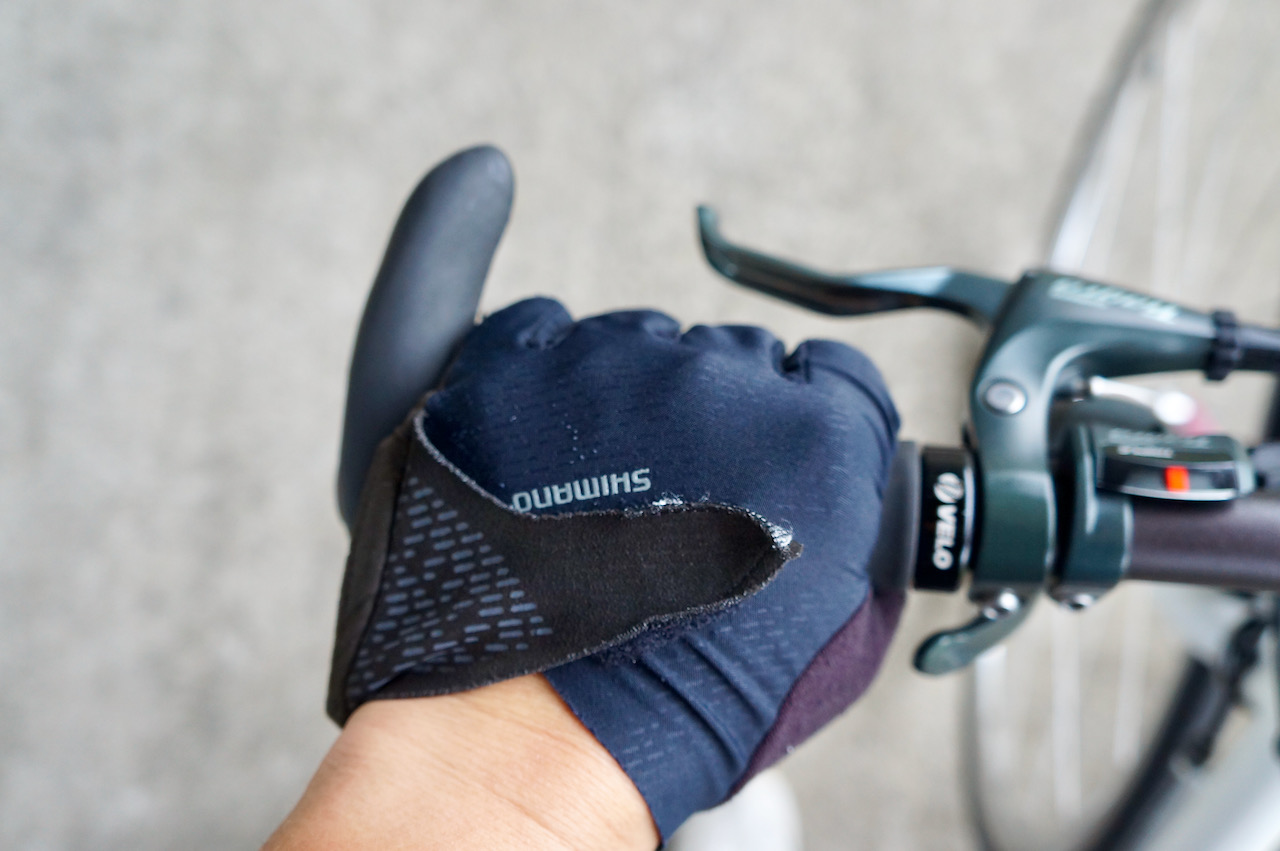
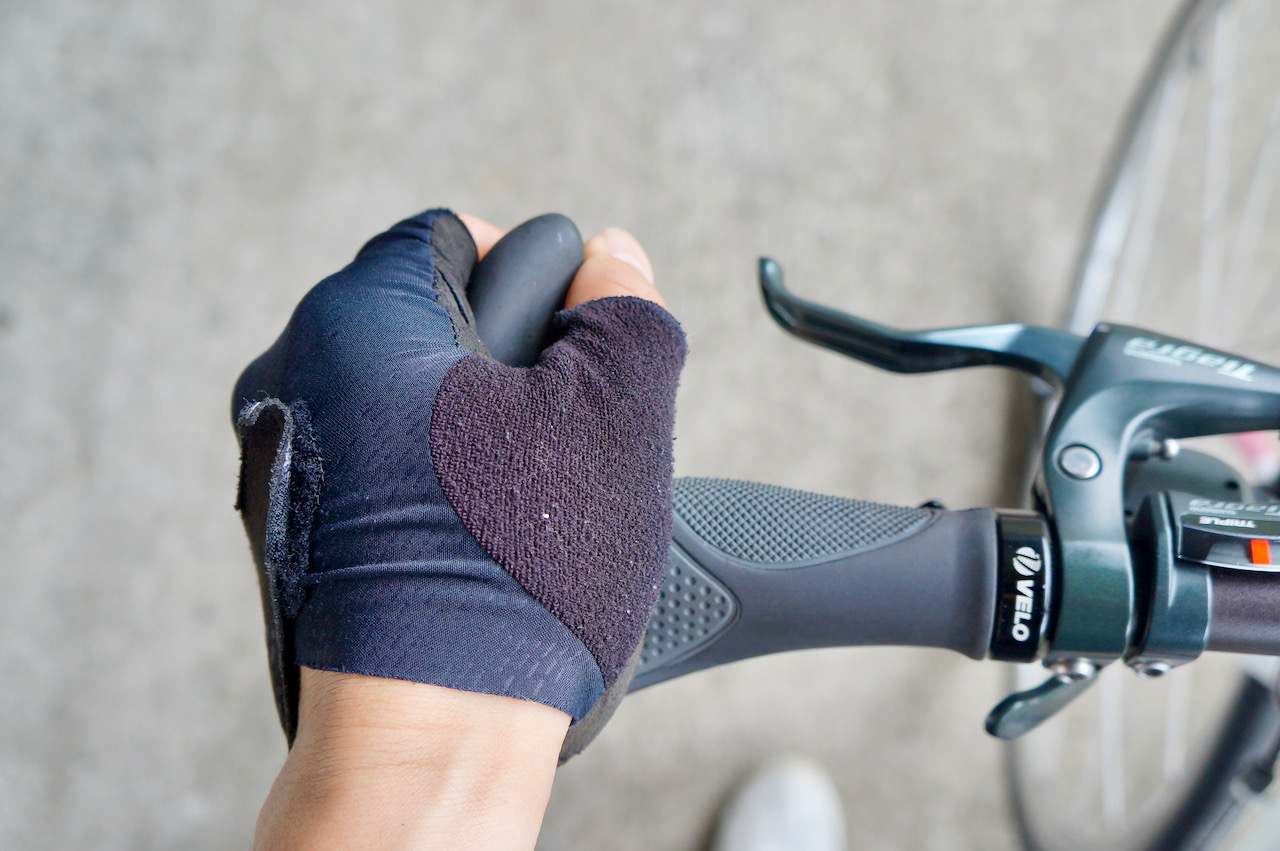
Handlebar Grips
The Velo ergonomic grips have a broad surface to provide comfortable support to your hands. The “L” shaped grip gives you one extra position to hold the handlebar so that you can relax your wrists by rotating between different positions during long rides.
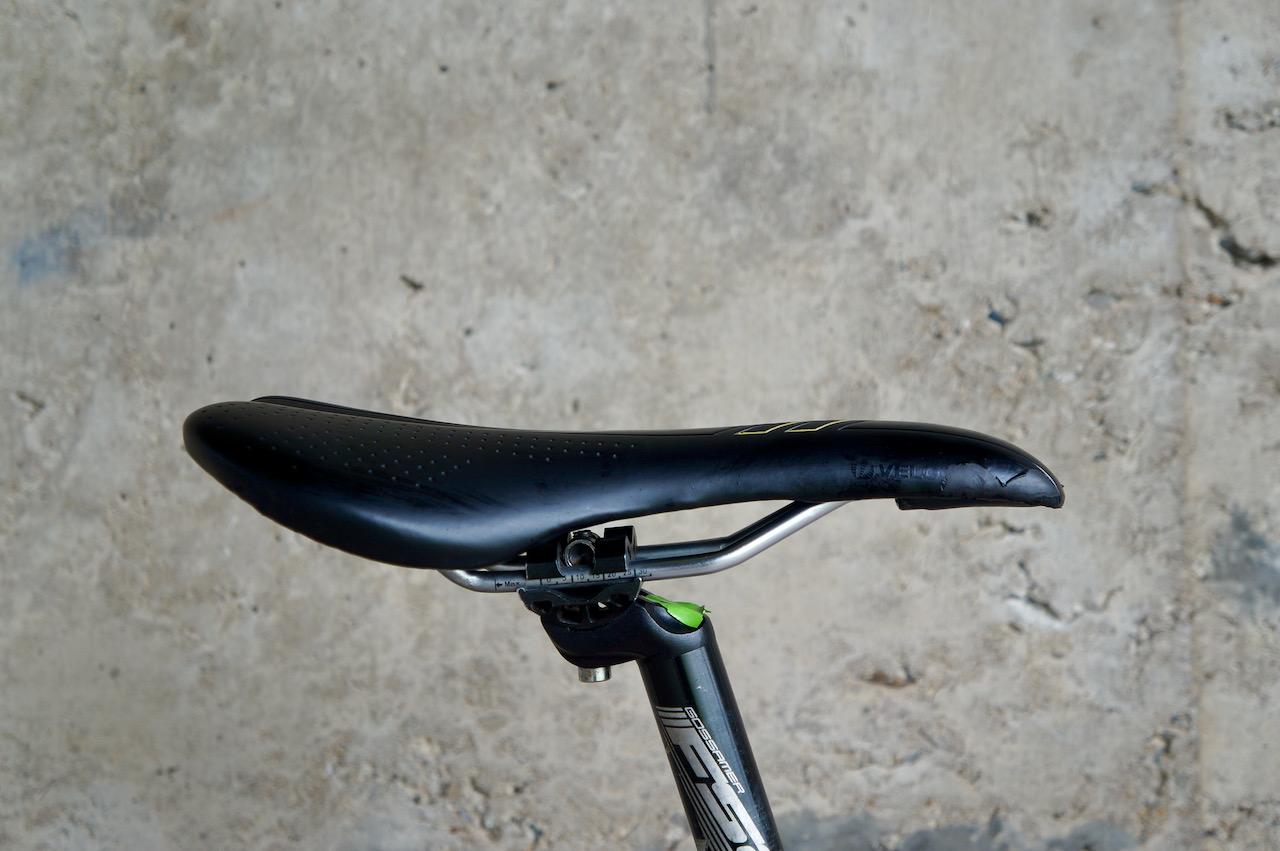
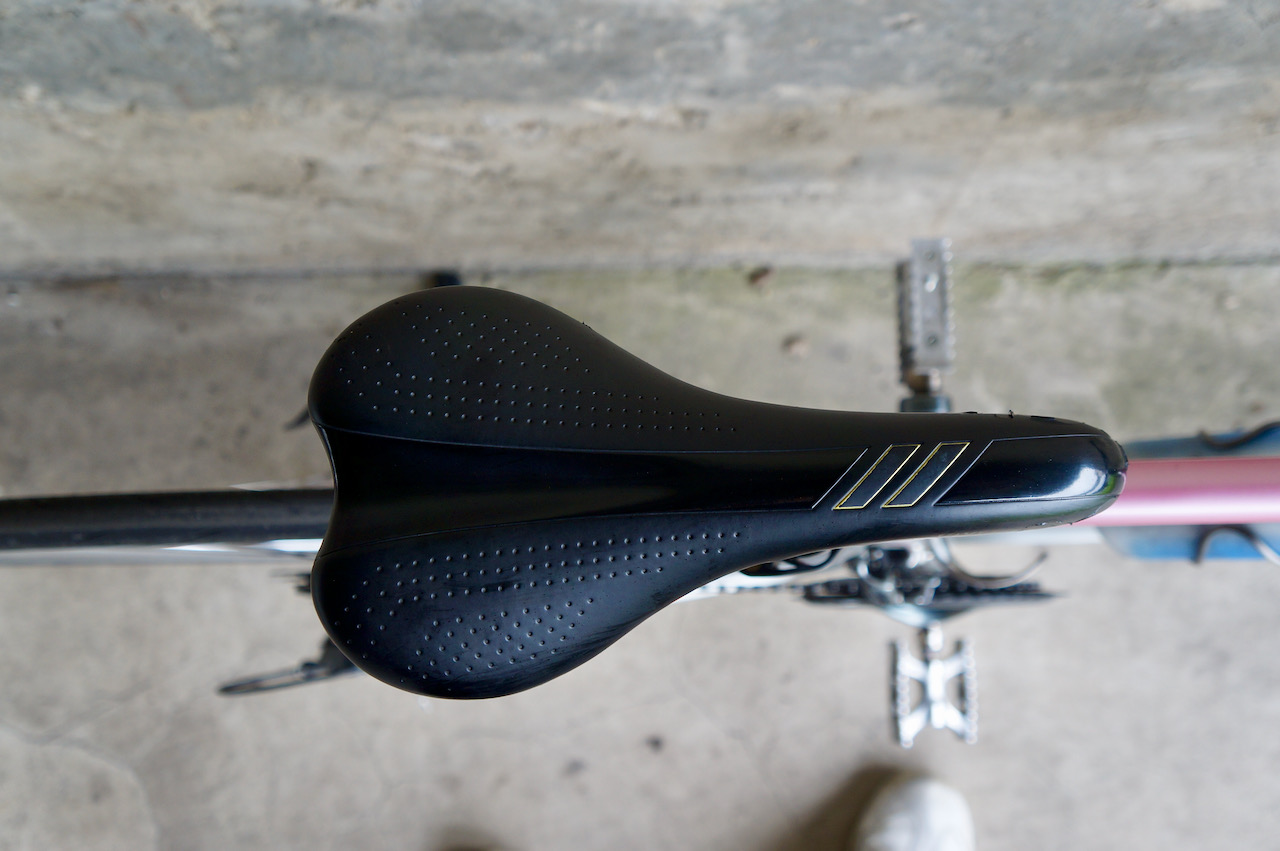
Saddle
The road bike saddles that come with Audax Hercules have narrow noses to avoid chafing when pedalling for hours. The saddle position can be fine tuned to support your seat bone properly. As mentioned in the beginning of this review, I had spent close to 20 hours on an Audex Hercules in a 360km challenge and my butt did not complain.
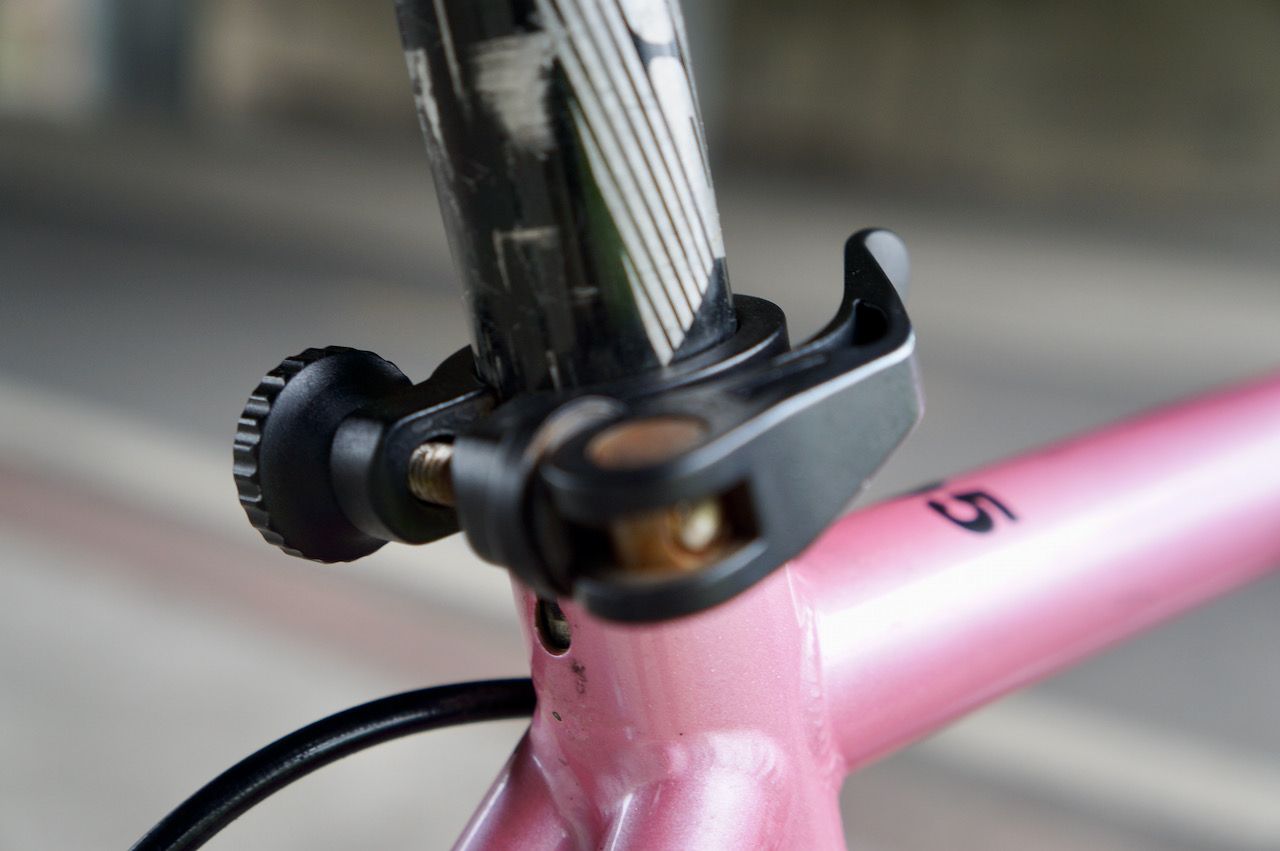
There is a quick release on the seat post clamp for you to adjust the height on the fly. There is also a thumb screw on the other side to adjust the pressure of the quick release so that you can make sure the desired height is firmly secured.
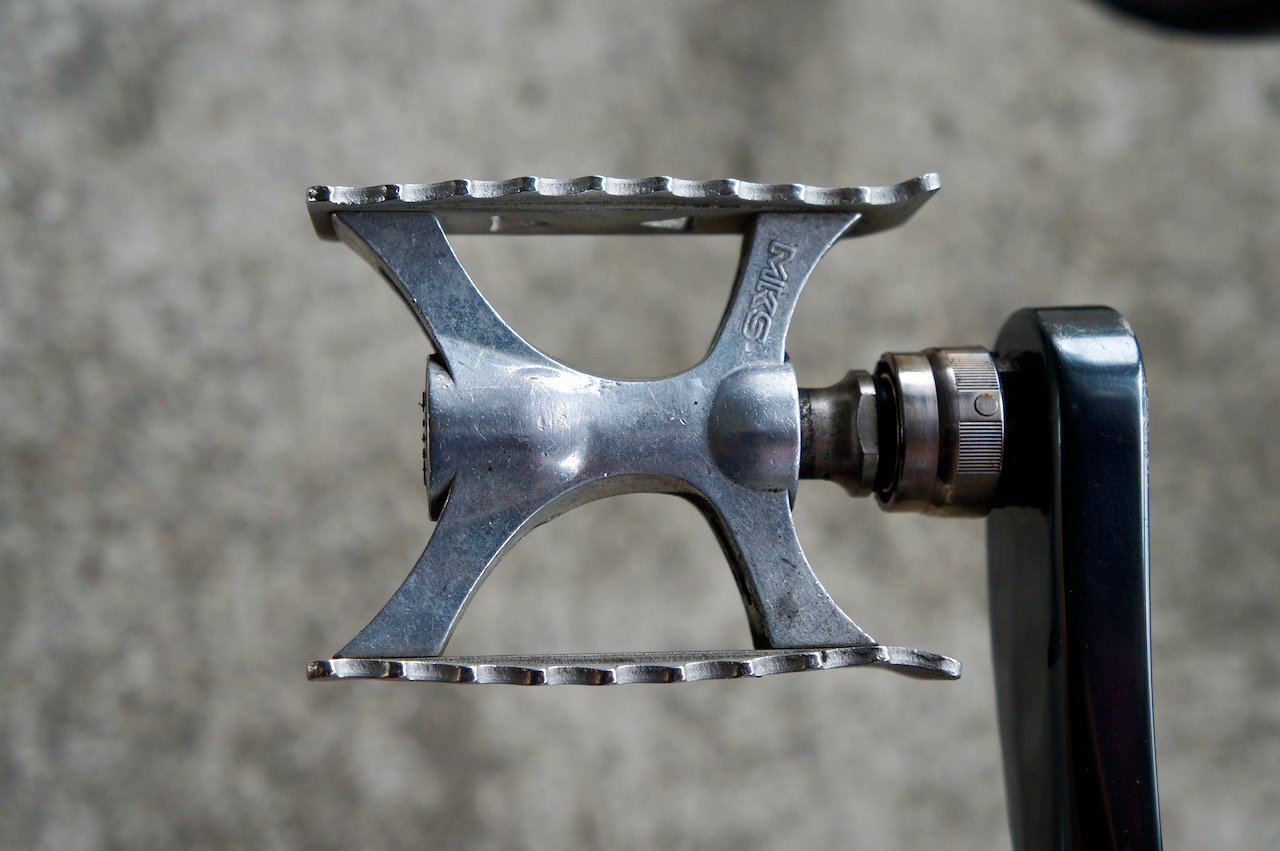
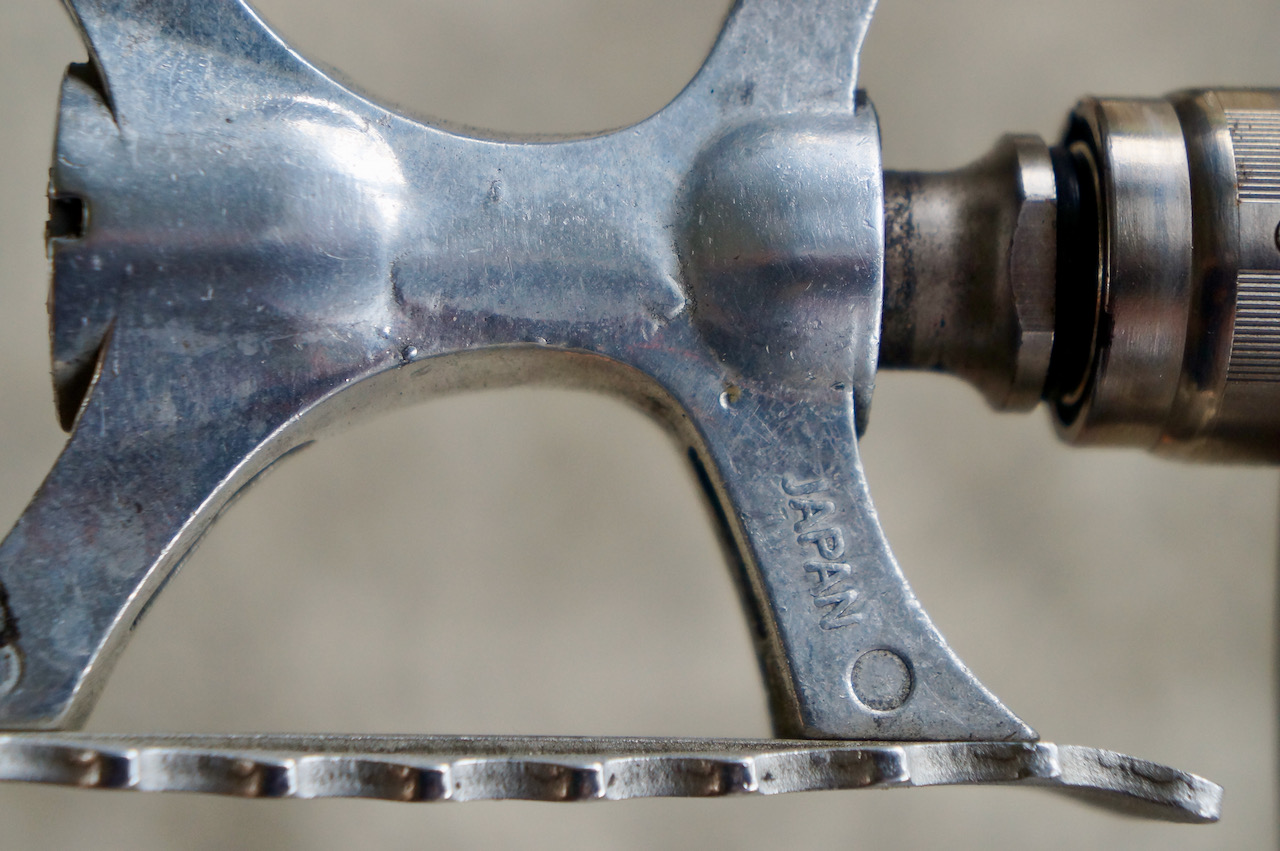
Pedal
The pedals found on our Audax Hercules are made-in-Japan Touring lite ezy superior from MKS. According to the official website, it “features MKS’s High-Polished Cup and Cone bearing system for smooth rotation and serviceability, combined with a directional wave shape tooth profile on the step plates to keep your foot from slipping without the need for straps or toe-clips”.
If you prefer, you can also bring your own clipless pedals.
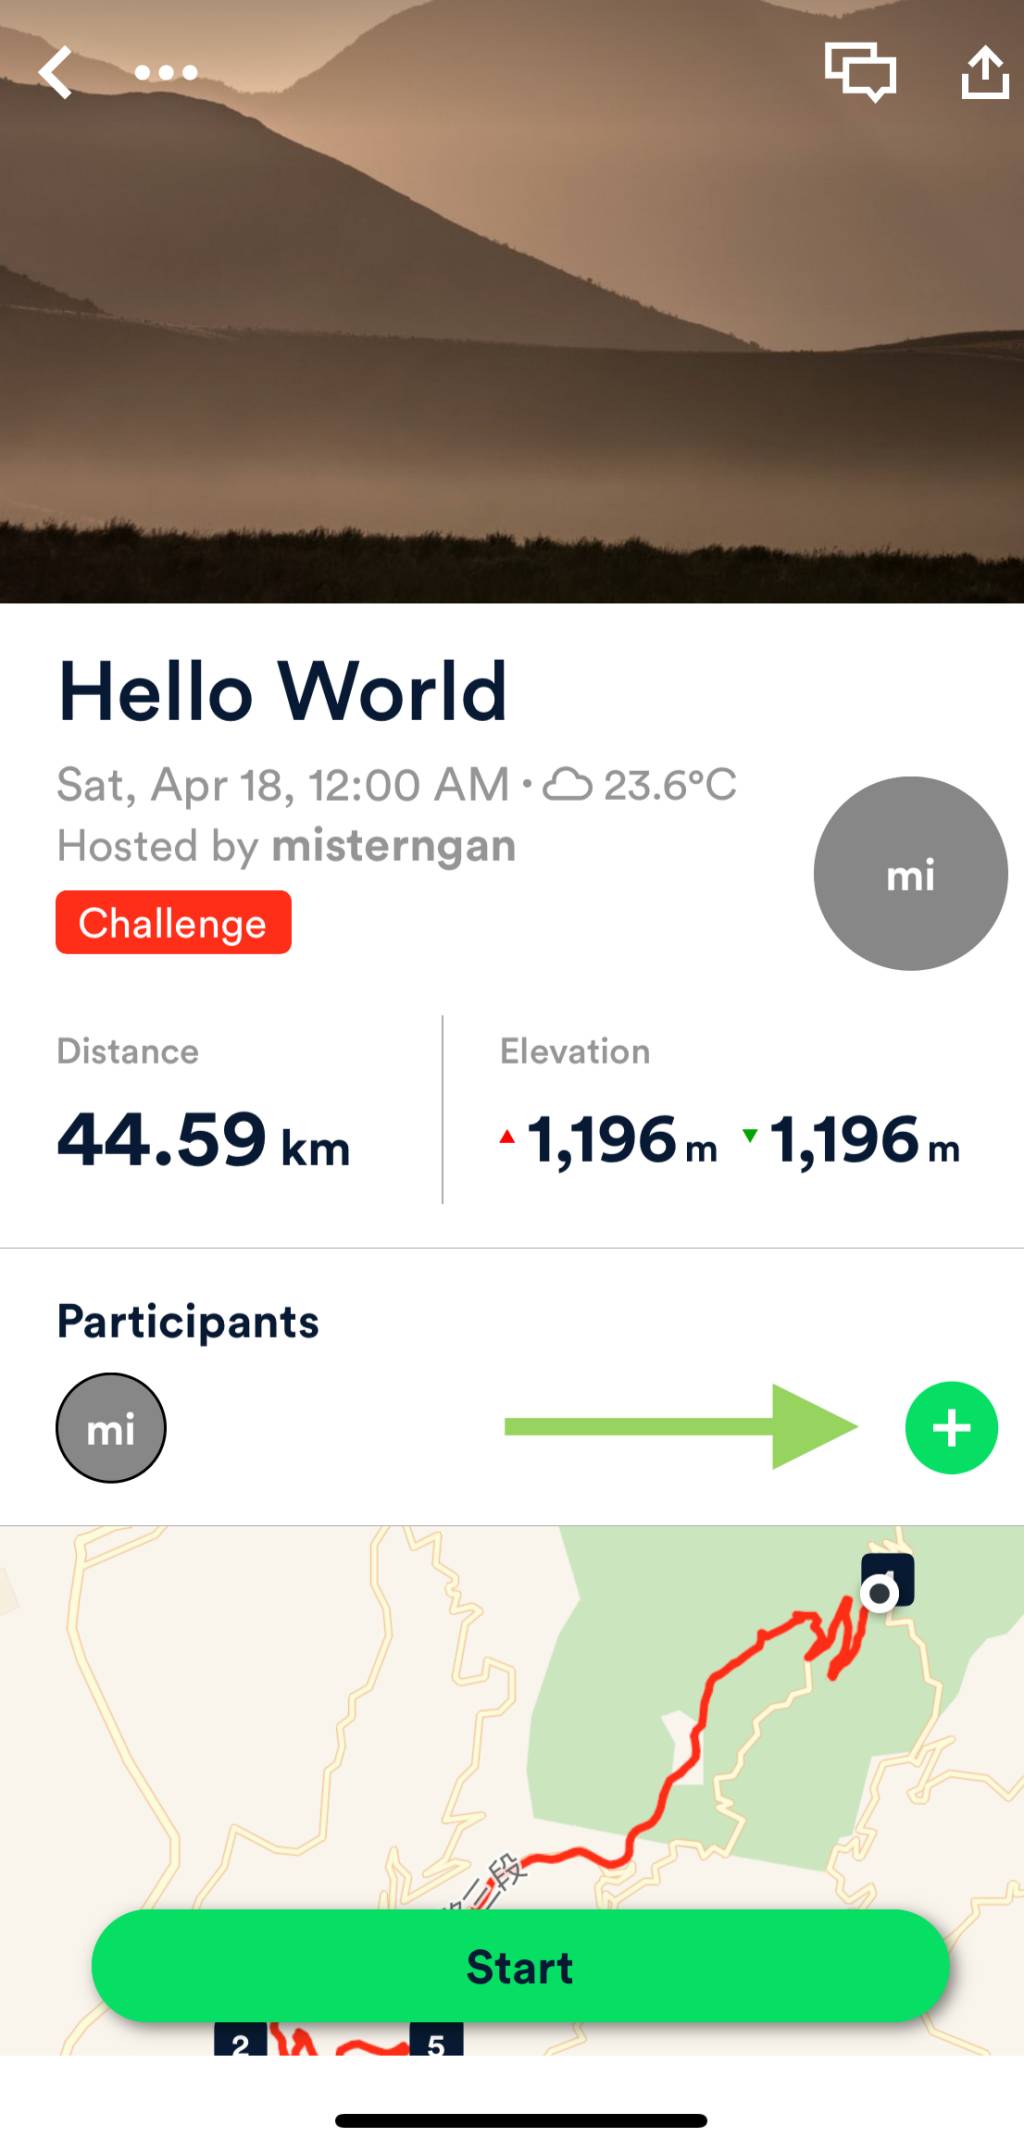
A versatile bike made for Taiwan
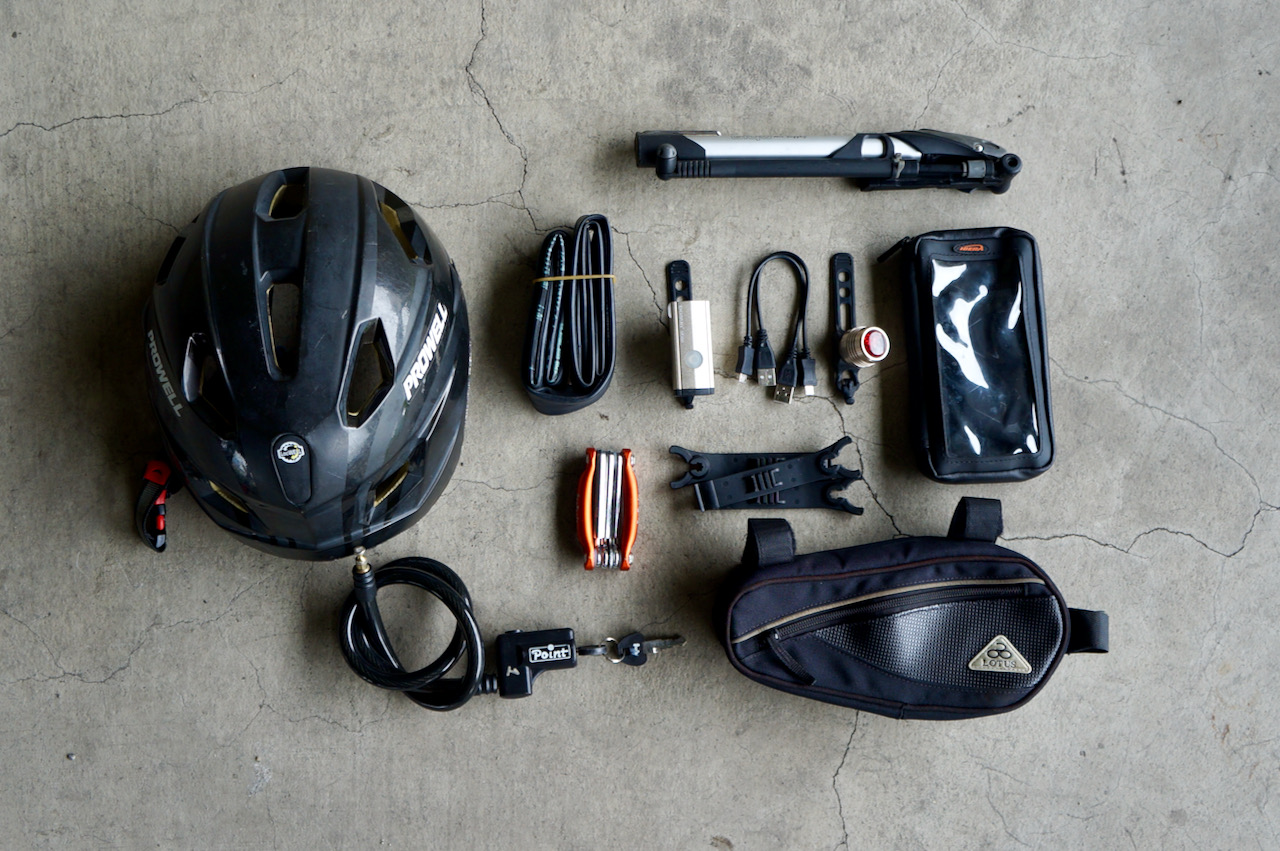
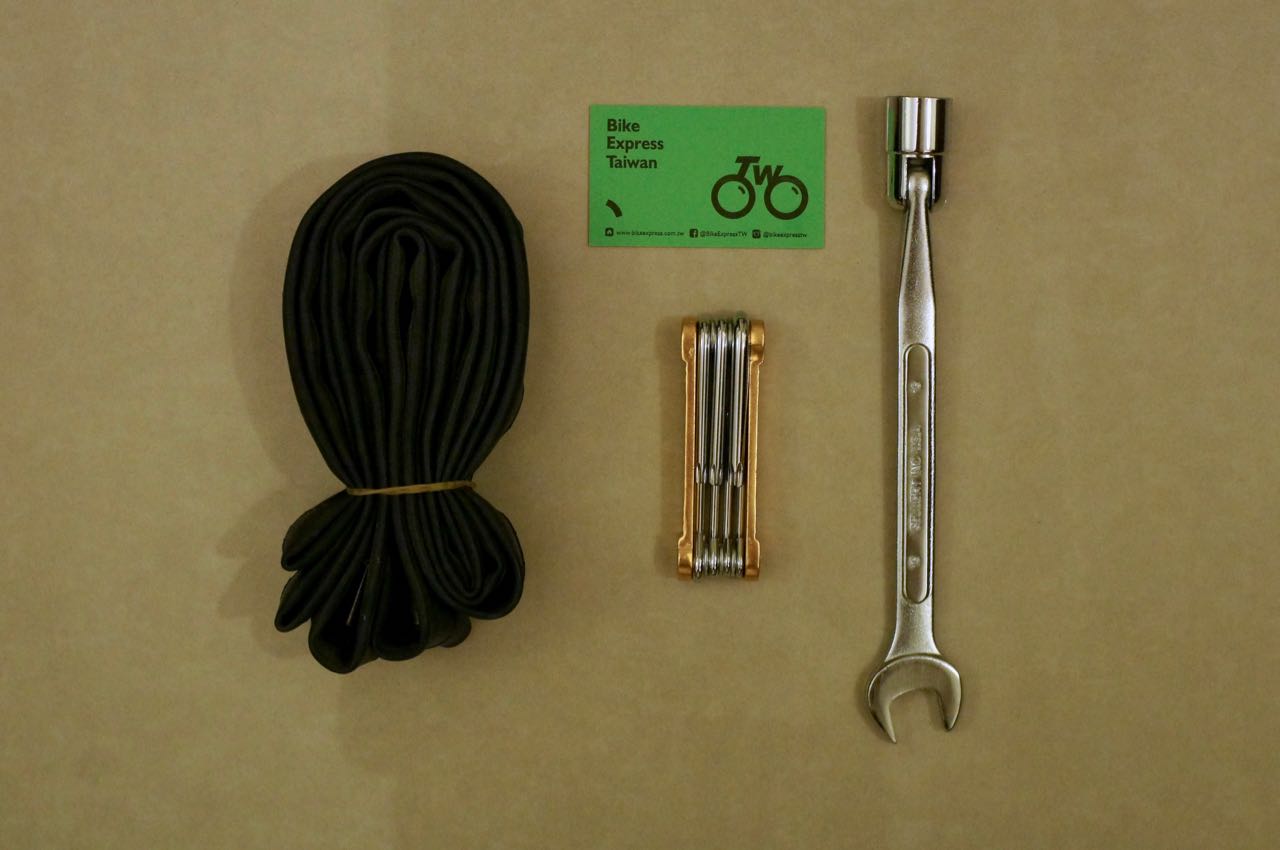
With the aforementioned built and configuration, Audax Hercules is a good looking, versatile bike that is easy to manage for beginners and works brilliantly for more experienced cyclists. It also stays in good shape during your multi-day cycling trips. We provide a smartphone case, a repair tool kit for inner tube replacement, an optional pannier with a pair of saddle bags.
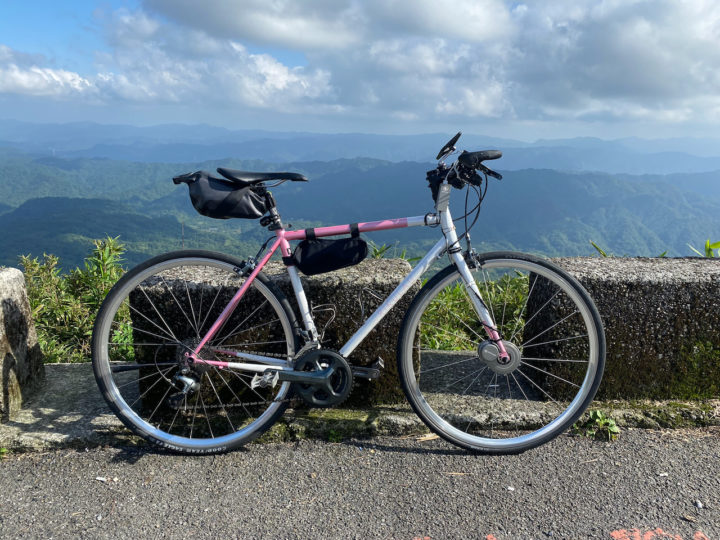
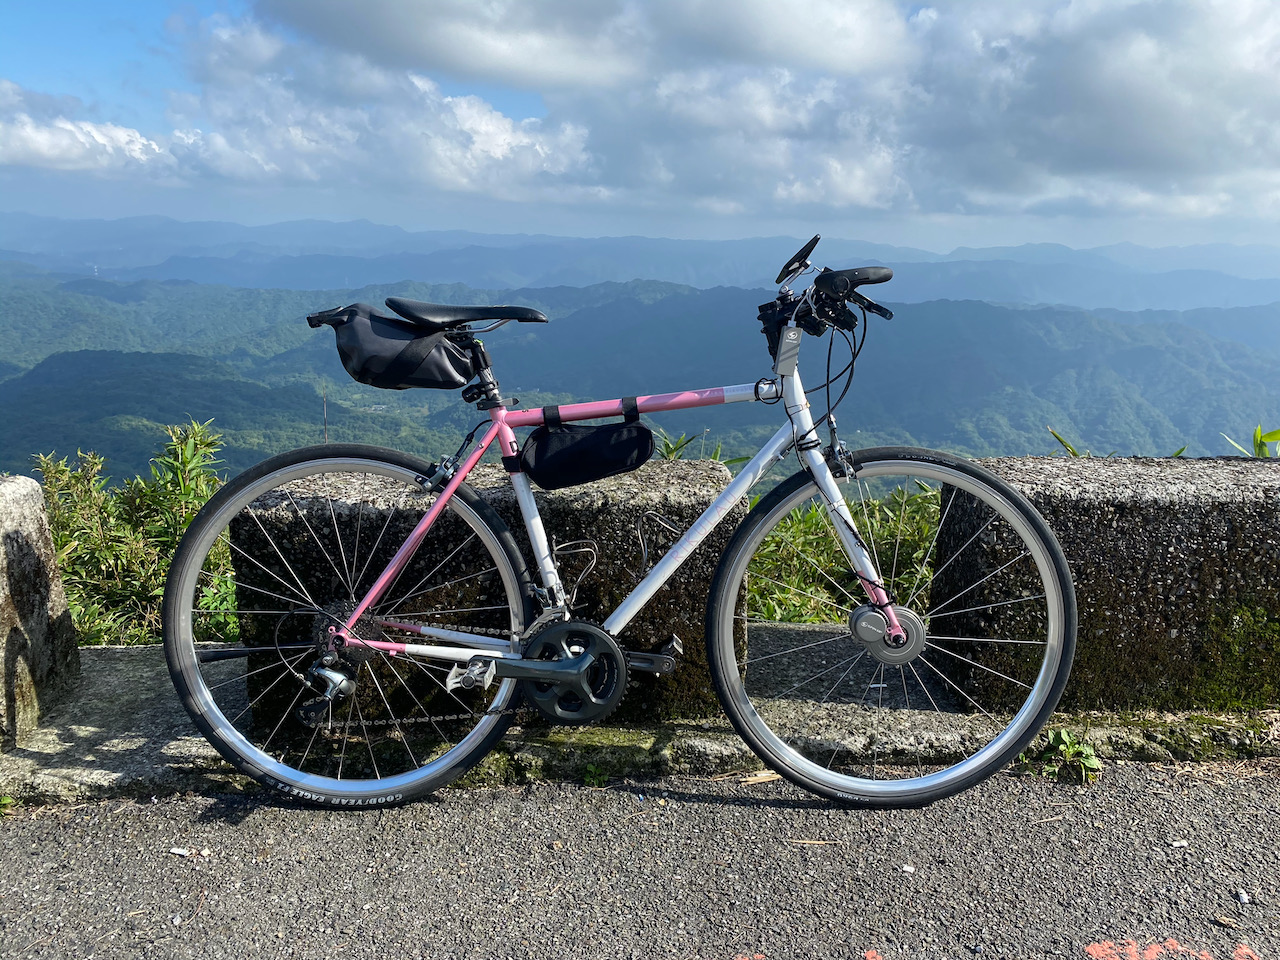
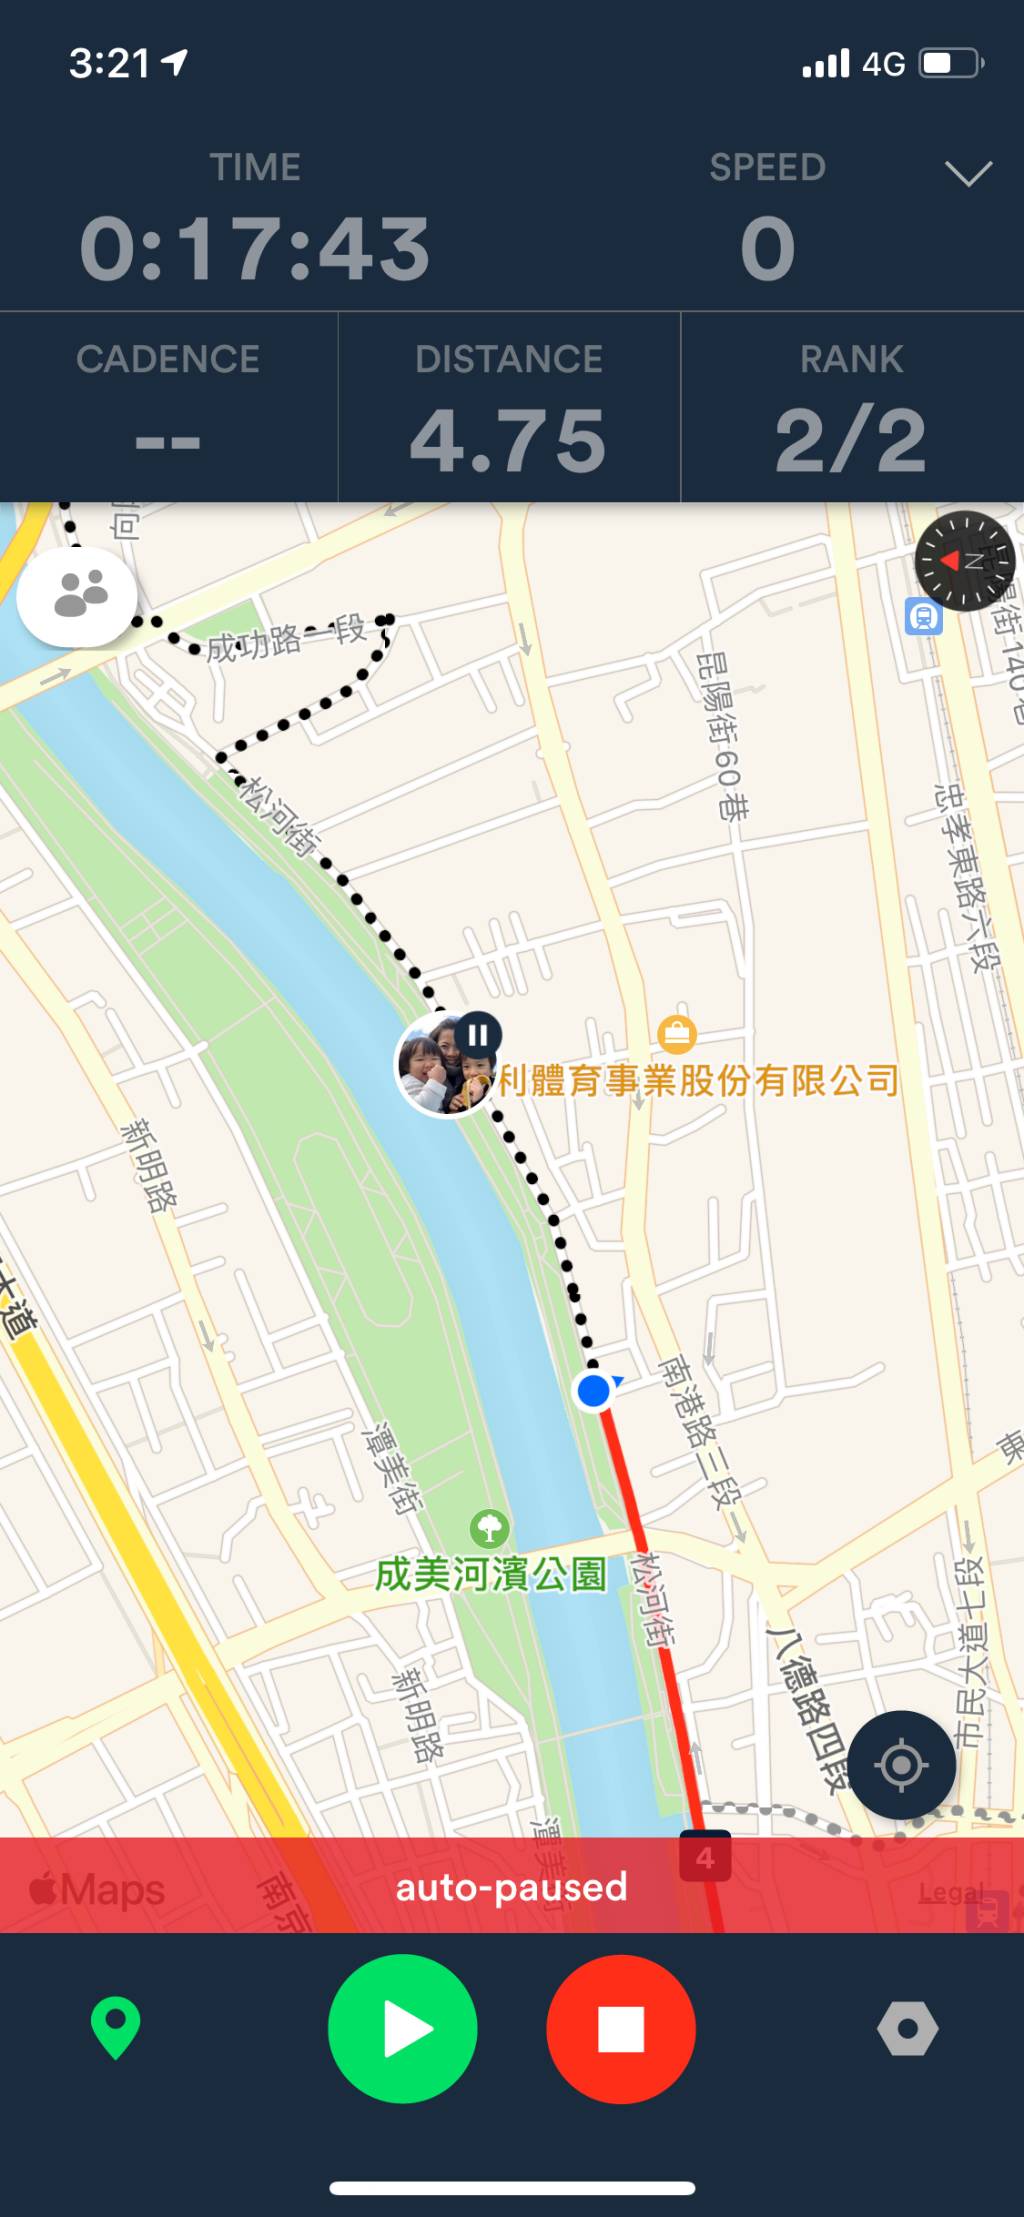
We have customers hiring the bike for leisure rides on the Riverside Bikeways in Taipei, for exploration of small townships in the rural areas, for the classic route of around-the-island, for sprinting along the coastlines, for bikepacking in the Huadong Valley, for climbing the mountains and enjoying the tranquilizing dive from the tops… you name it. Audax Hercules have proved to be a great companion for all of them. Here are some examples of the configuration and the accessories with the the bike.
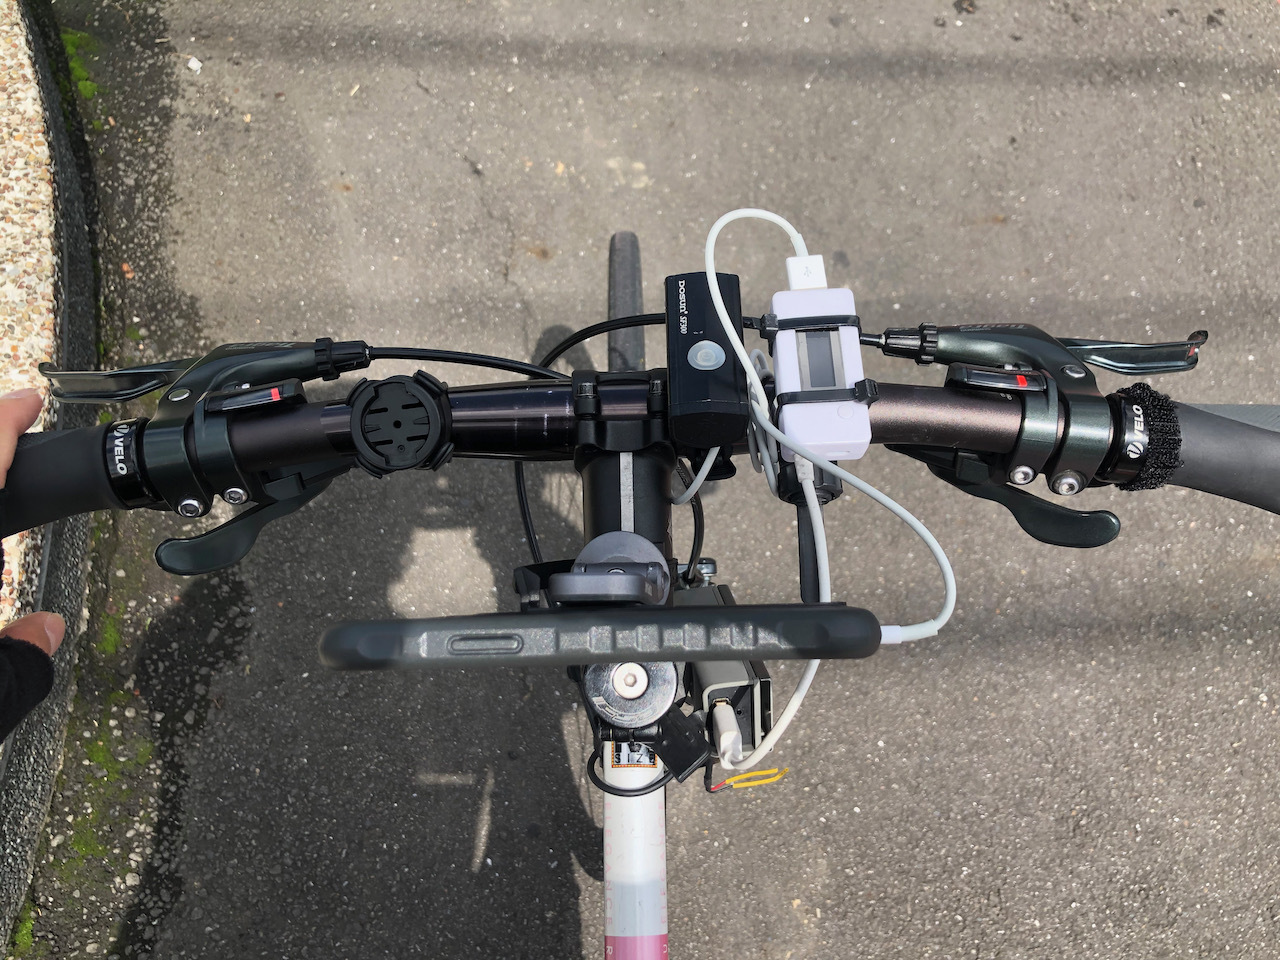
The bike dynamo with its Intelligent Power Management System (IPMS) can pump out a stable 1A current from its 5V USB port when the speed of the bike reaches 15-17km/hour. I have done some field tests to find out its charging performance with an iPhone 11 Pro in different scenarios, including when the phone is in Airplane mode with no Apps running, when the phone is in Non-Airplane mode with no Apps running, when the phone is in Non-Airplane mode and used for navigation and tracking, and when the route involves some climbing. I also did a test with a USB wall charger for comparison. At the end of this post, I will share some tips on how to get the most from the Dynamo for charging.
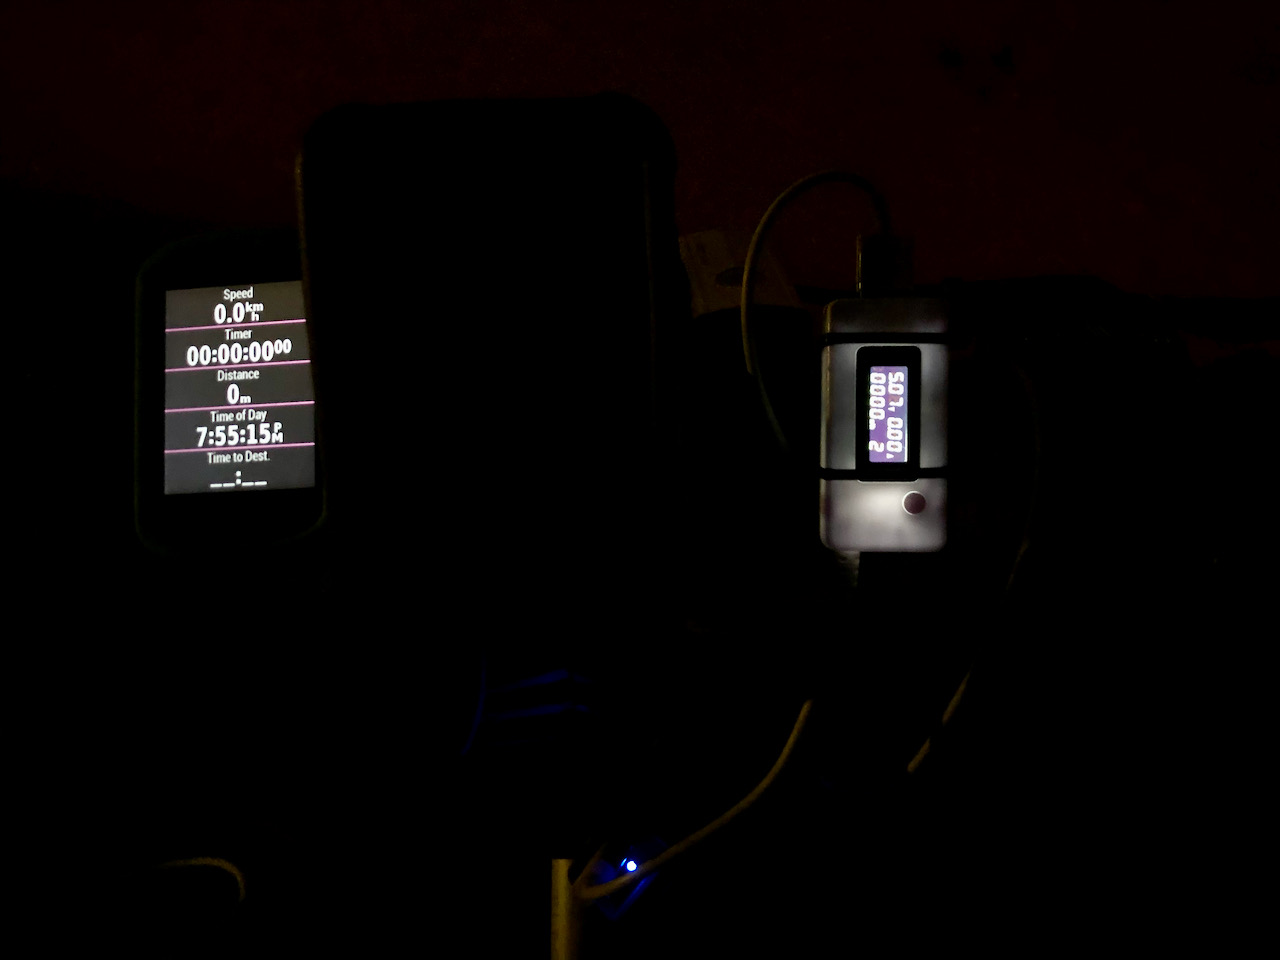
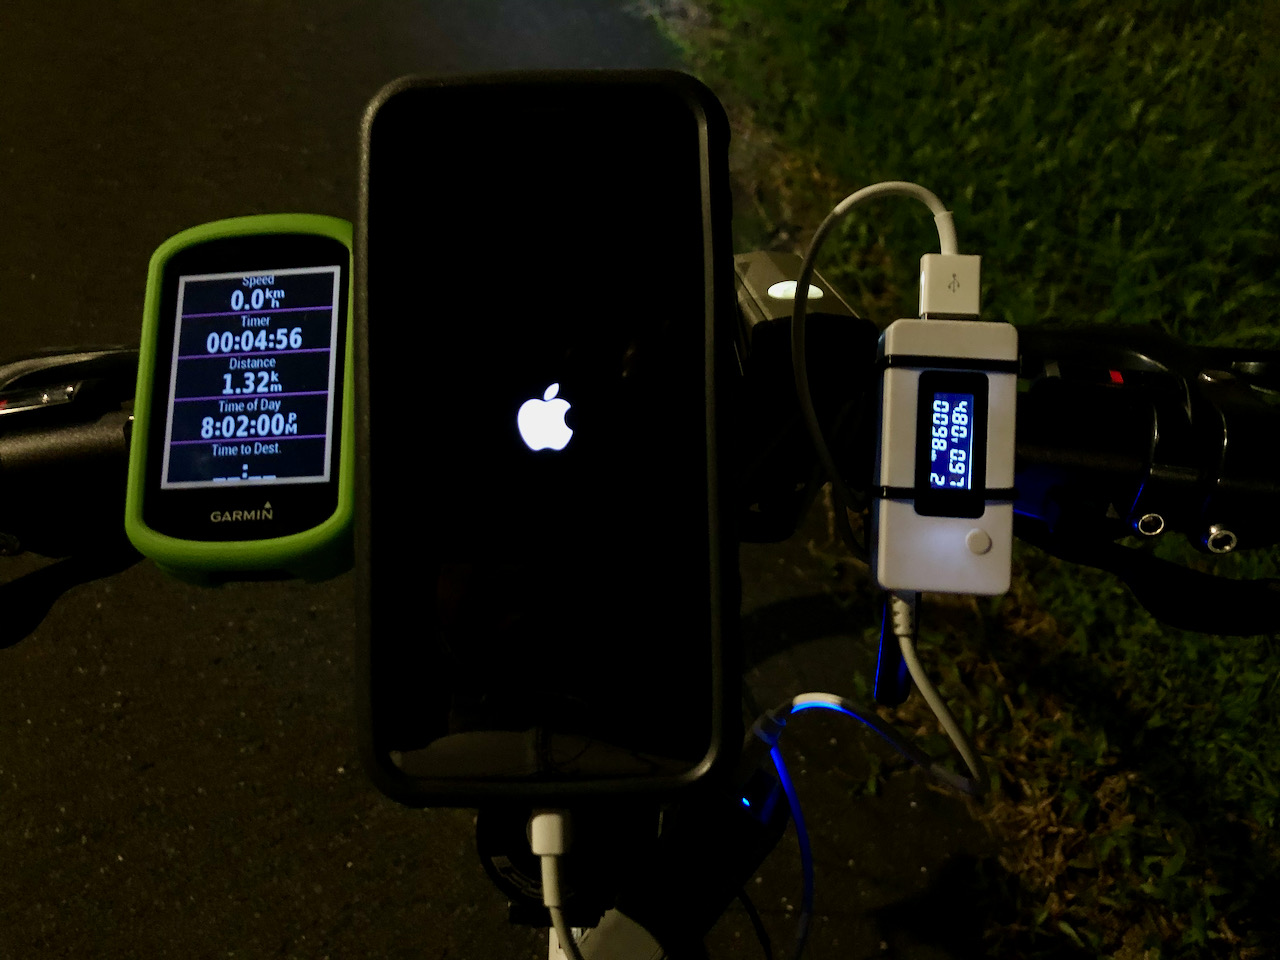
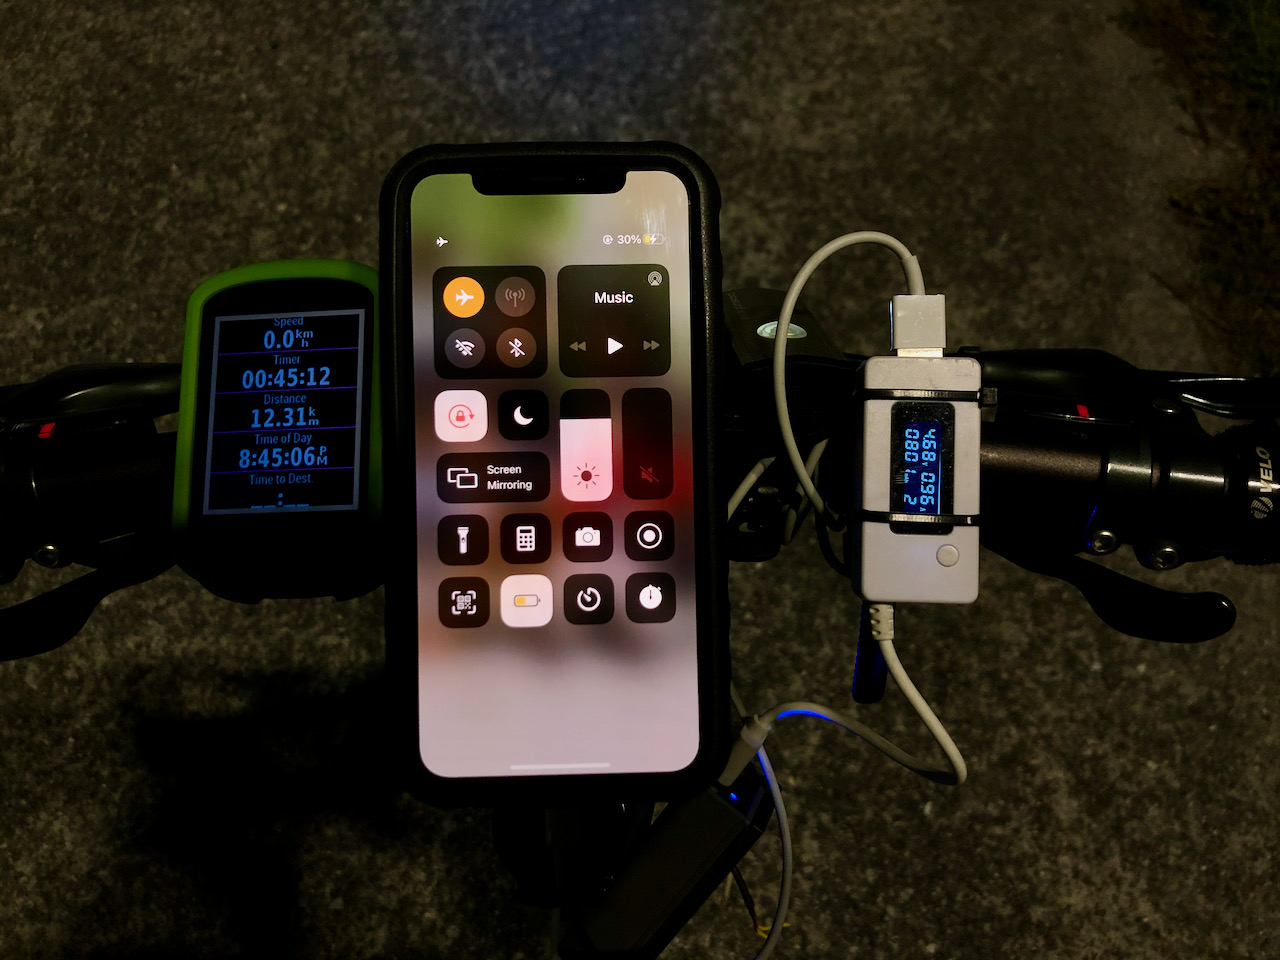
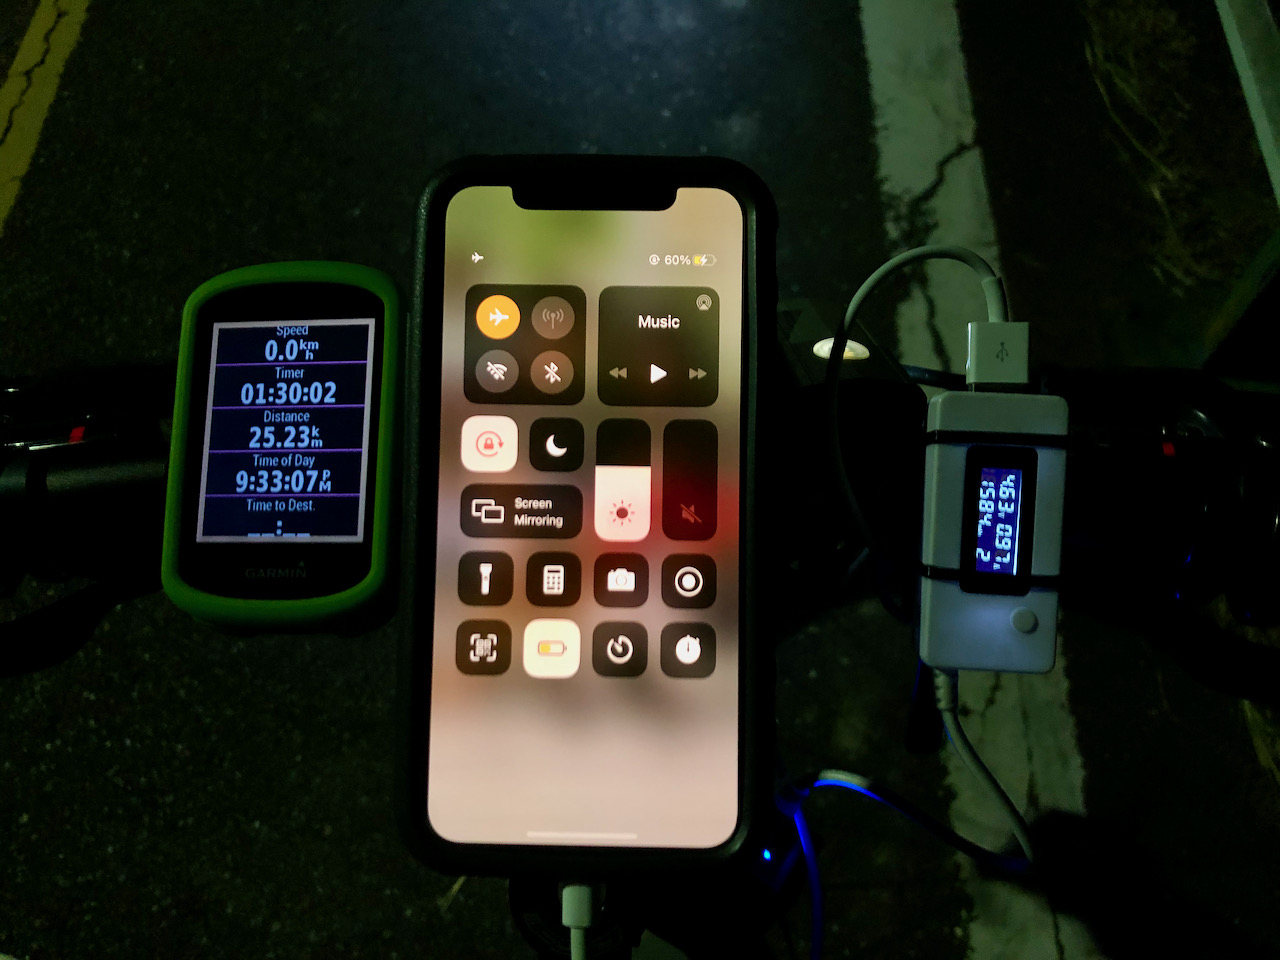
Test Set Up
Here is my setup for the test:
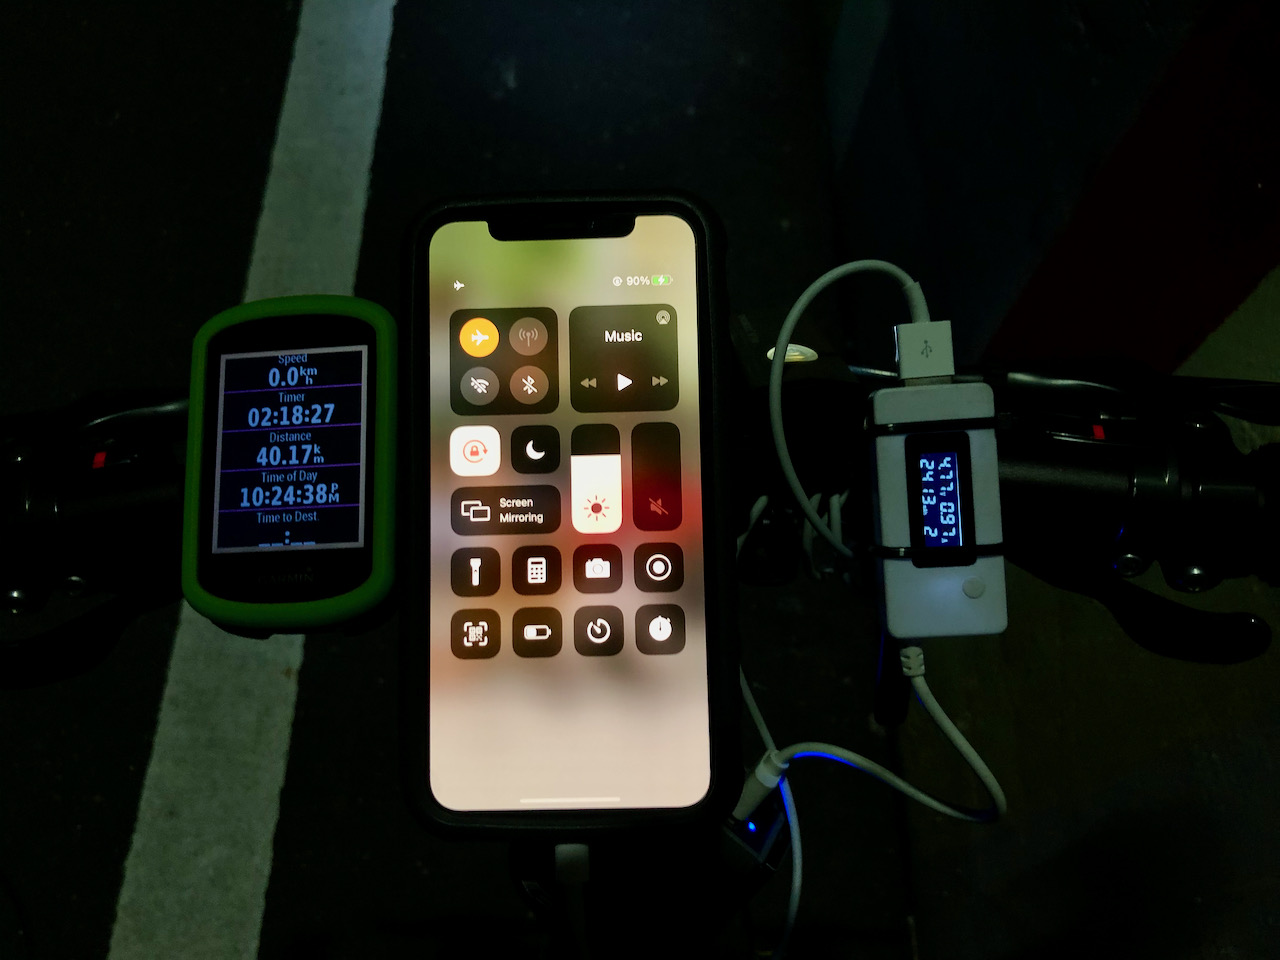
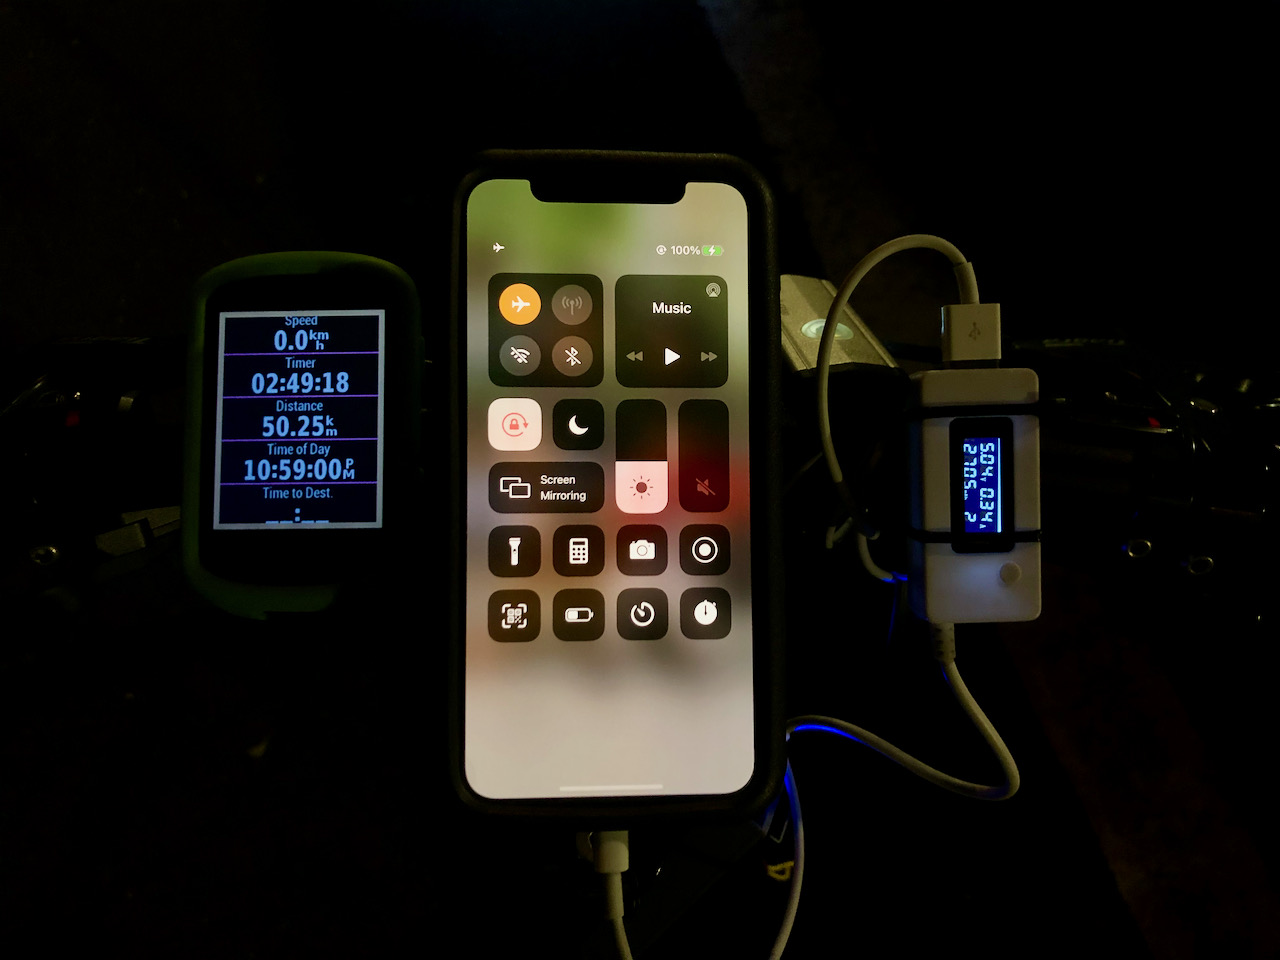
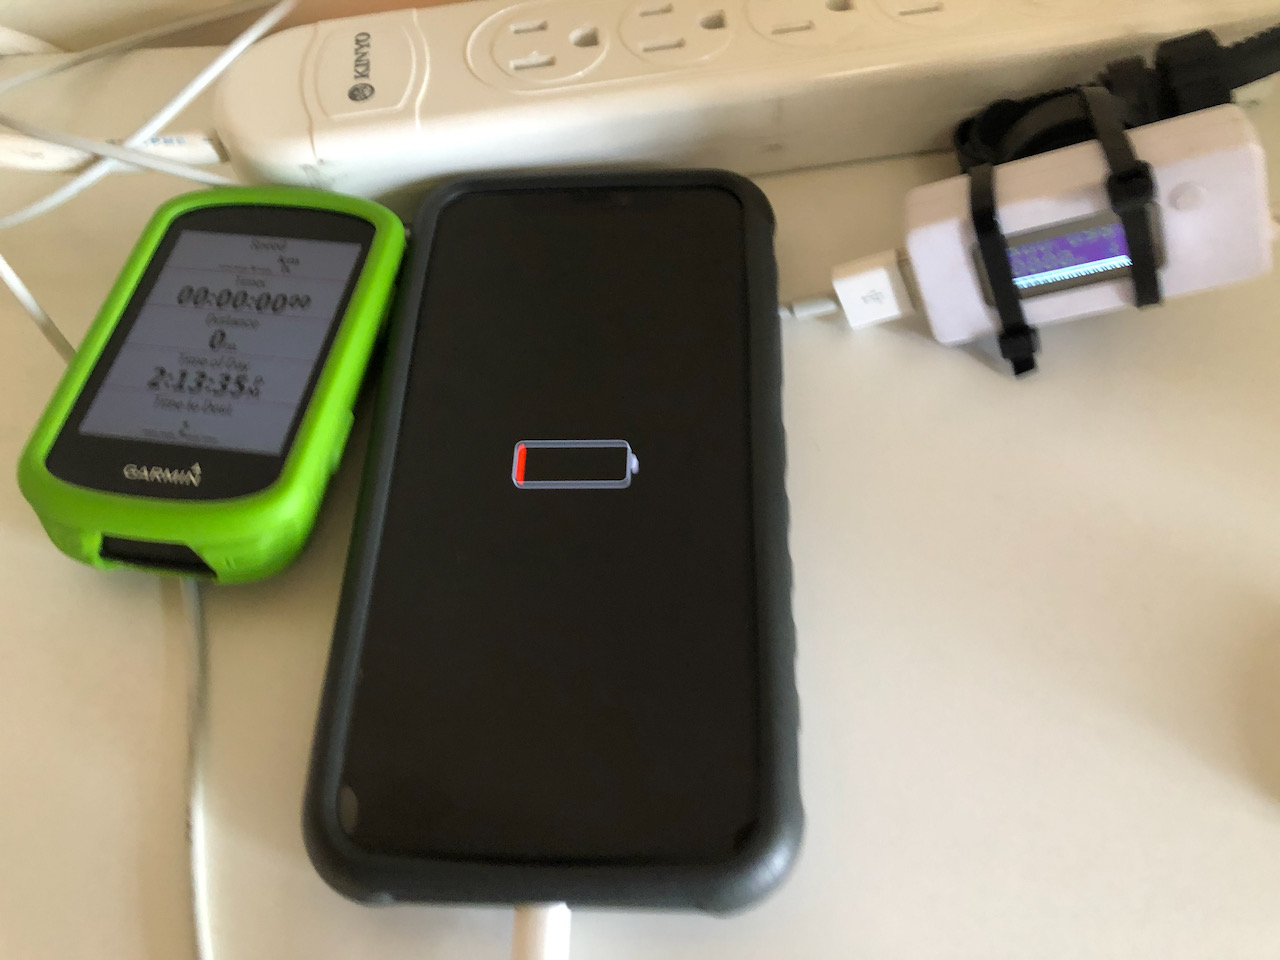
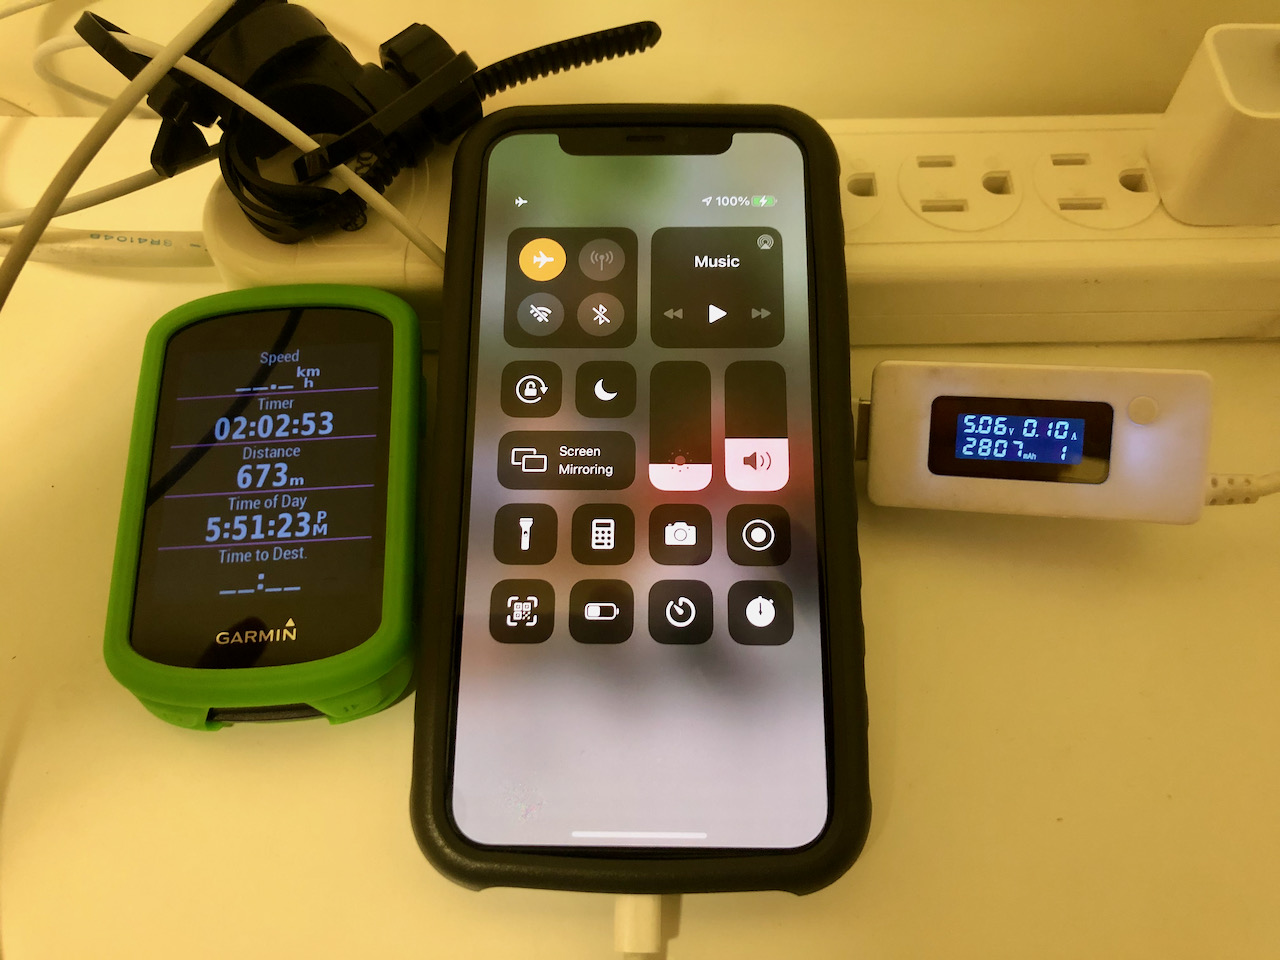
My iPhone 11 Pro mounted on the handle bar
A bike meter on the left to monitor my speed and to record the timestamp of the data collected
A USB power meter to monitor the charging current, voltage and energy fed to the phone
How long does it take to charge an iPhone 11 Pro from flat to full with a SPIN UP F12W-Pro?
I did the test by draining all the power from my iPhone’s battery and charging it with the bike dynamo whilst cycling on the Taipei Riverside Bikeways at the speed of around 17km/h. When the phone was booted up, it was automatically set to Low Power mode. I then put it on Airplane mode so that the test result wouldn’t be affected by the conditions of the mobile cellular network especially when the cell phone is moving, like my distance from the base station, how frequent the phone needs to switch over to the next base station, and are there any barriers between the phone and the base station, etc. When the battery level had reached 80%, the iOS was automatically switched back from Low Power mode to Normal mode.
Turned out it took a bit more than 3 hours to charge an iPhone 11 Pro from flat to full. Here is the full record.
Table 1: iPhone in Low Power, Airplane mode charged by SPIN UP F12W-Pro
Record Time
Time Elapsed / Total Time Elapsed
Meter Reading (mAh)
Battery Level (%)
19:55
0:00 / 0:00
0
0
20:45
0:50 / 0:50
801
30
21:33
0:48 / 1:38
1584
60
22:24
00:51 / 2:29
2413
90
22:59
0:35 / 3:04
2705
100
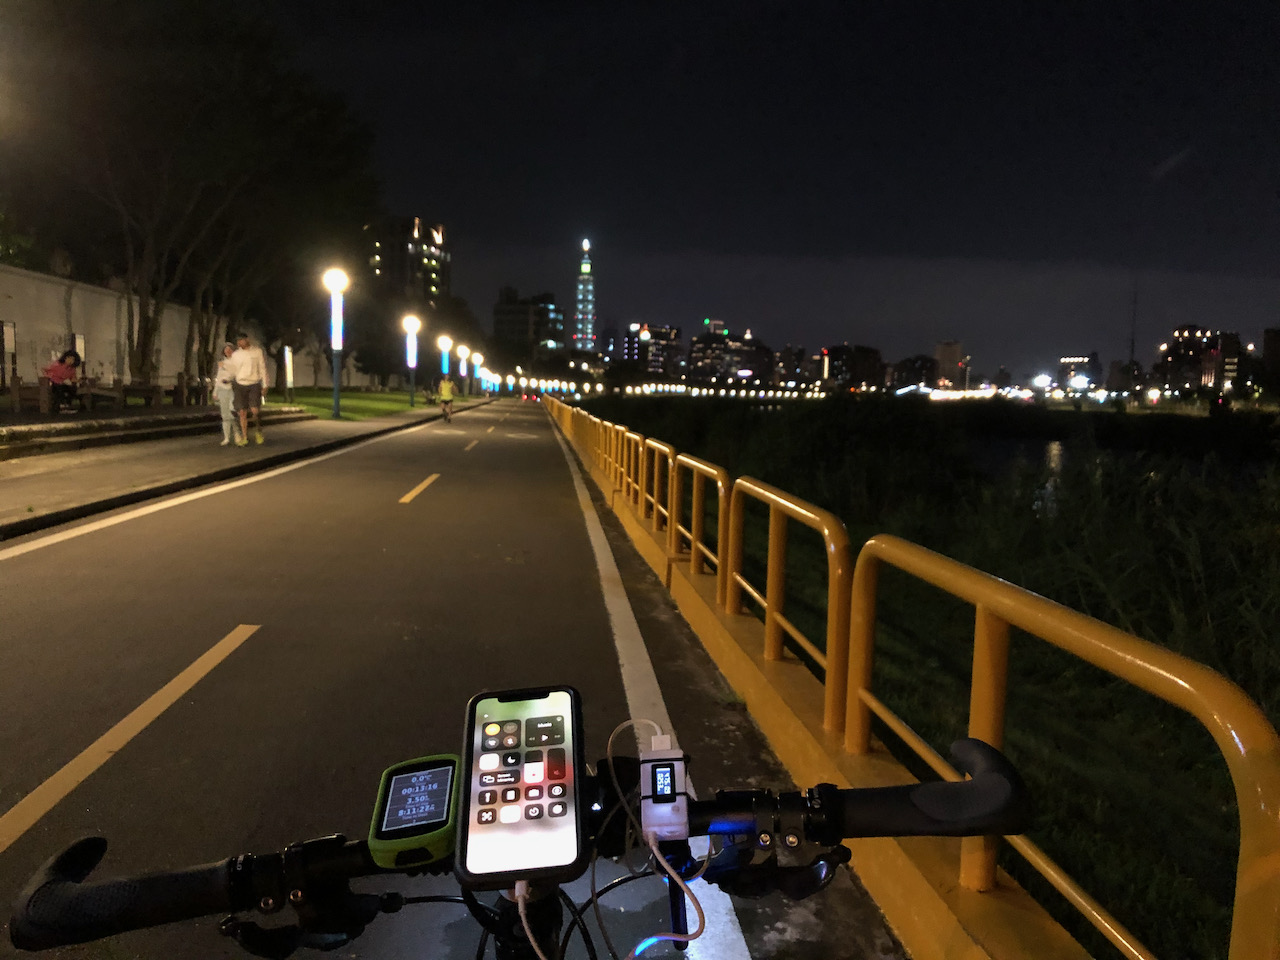
Charging an iPhone from flat to full with a Spin Up F12W-pro by cycling at the flat Riverside Bikeway in TaipeiThe Taipei Riverside Bikeway in the evening
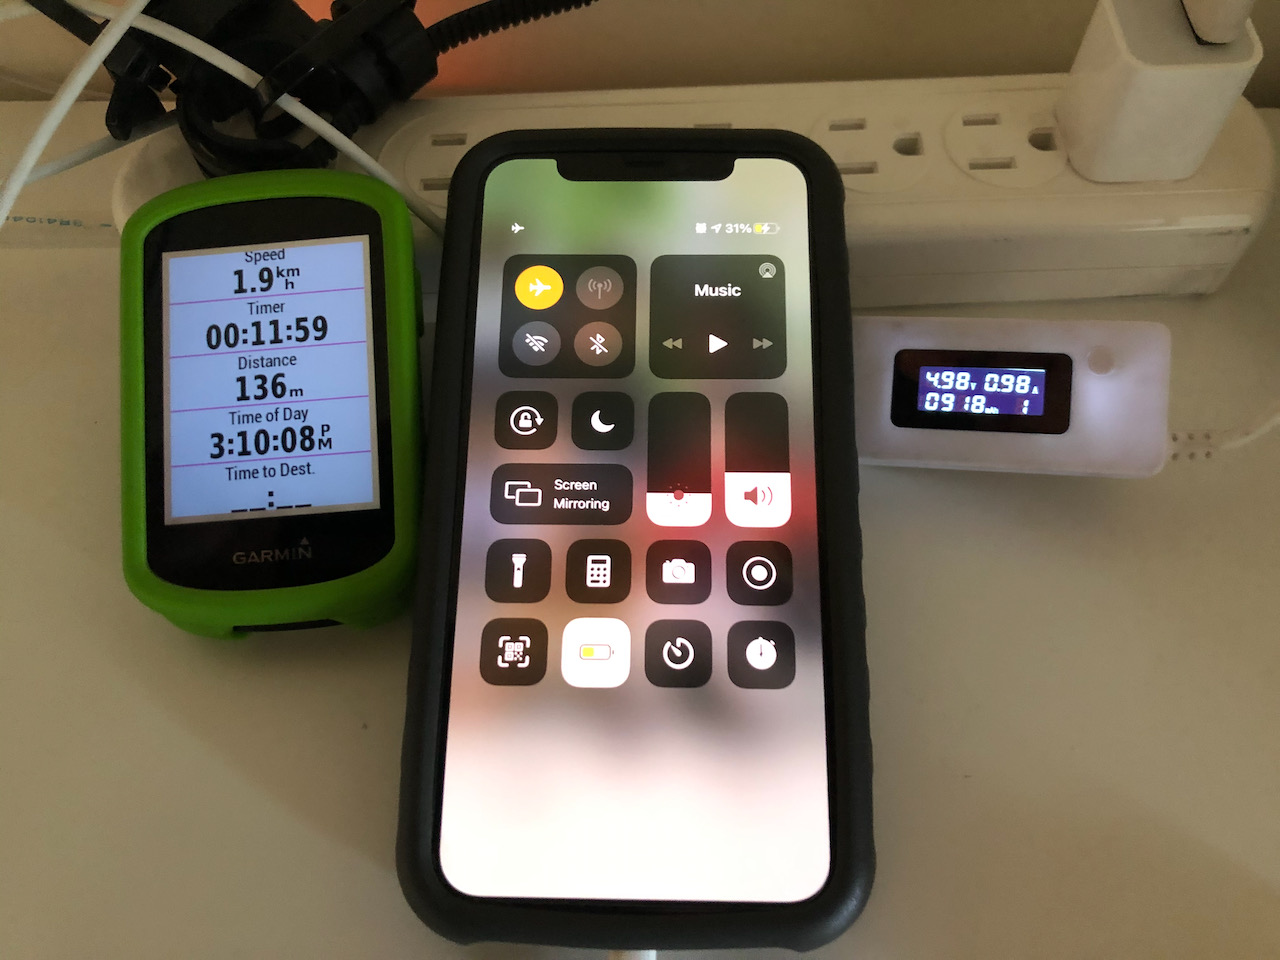
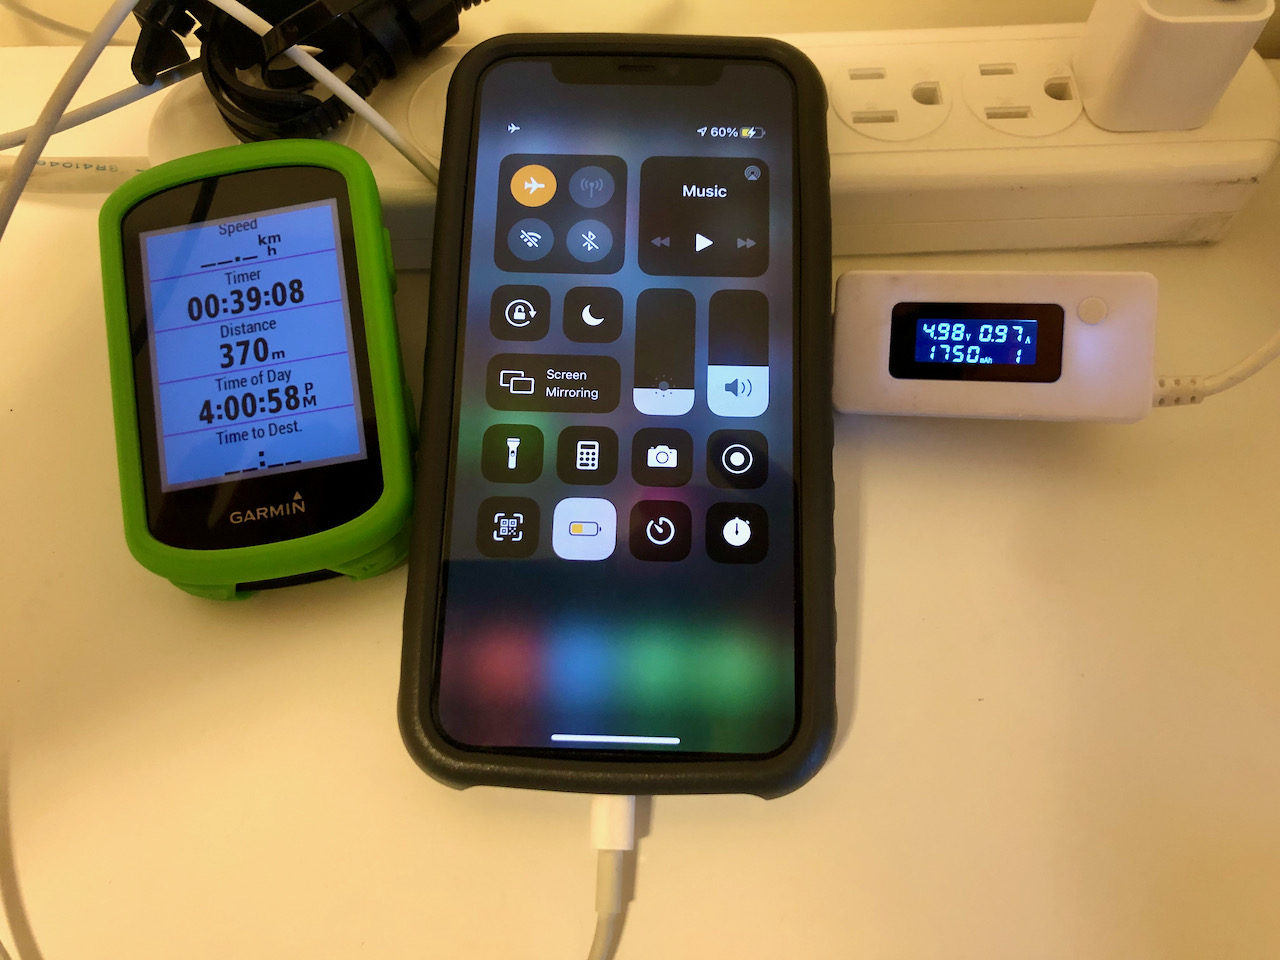
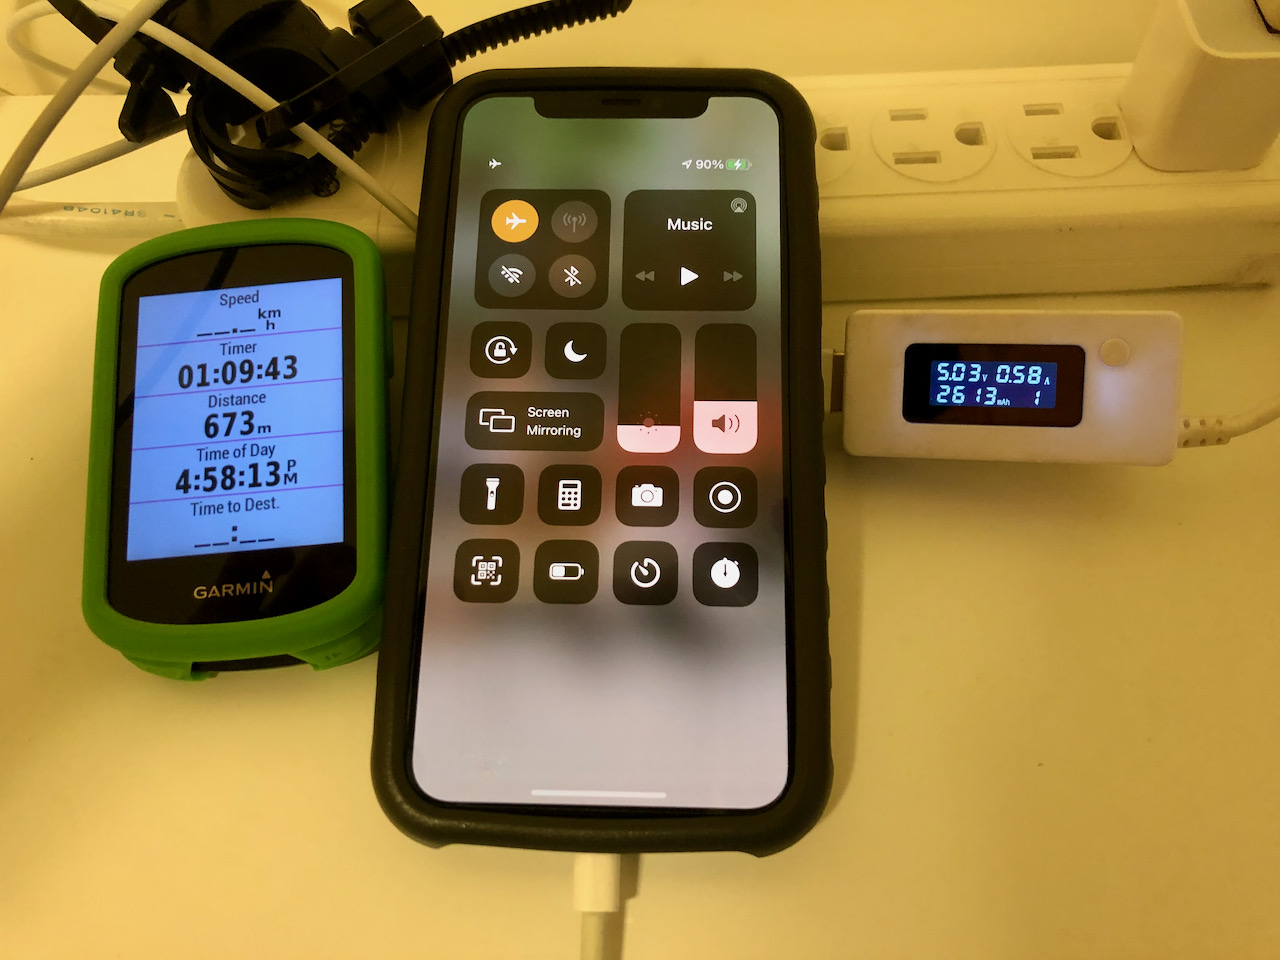
You may have noticed that the voltage of the USB meter is around 4.6V-4.7V in the pictures. It is because I needed to stop cycling to take pictures. When the bike is not moving, the USB port will be powered solely by the dynamo set’s built-in reservoir battery. When it is moving at an average speed of 16km/h, the reading will be slightly more than 5V.
I have done another test with the iPhone put on Low Power, Non-Airplane mode. The result shows that it took 4 hours and 13 minutes and needed 3420 mAh (as compared to 2705mAh in the Airplane Mode test) to bring the battery level to 100%. It is because when the wireless systems, including Wifi, Bluetooth and cellular network, are ON in the non-airplane mode, the iPhone consumes more energy. Also when the iPhone is on the move, it moves from cell to cell covered by different base stations of the cellular network systems. That means it needs to talk to the network more frequently to negotiate for a new base station for connection, which will in turn require more energy.
Table 2: iPhone in Low Power, Non-Airplane mode charged by SPIN UP F12W-Pro
Record Time
Time Elapsed / Total Time Elapsed
Meter Reading (mAh)
Battery Level (%)
18:27
0:00 / 0:00
0
0
19:30
1:03 / 1:03
1005
30
20:34
1:04 / 2:07
2048
61
21:40
1:06 / 3:13
3078
90
22:40
1:00 / 4:13
3420
100
How is it compared to a 1A USB wall charger?
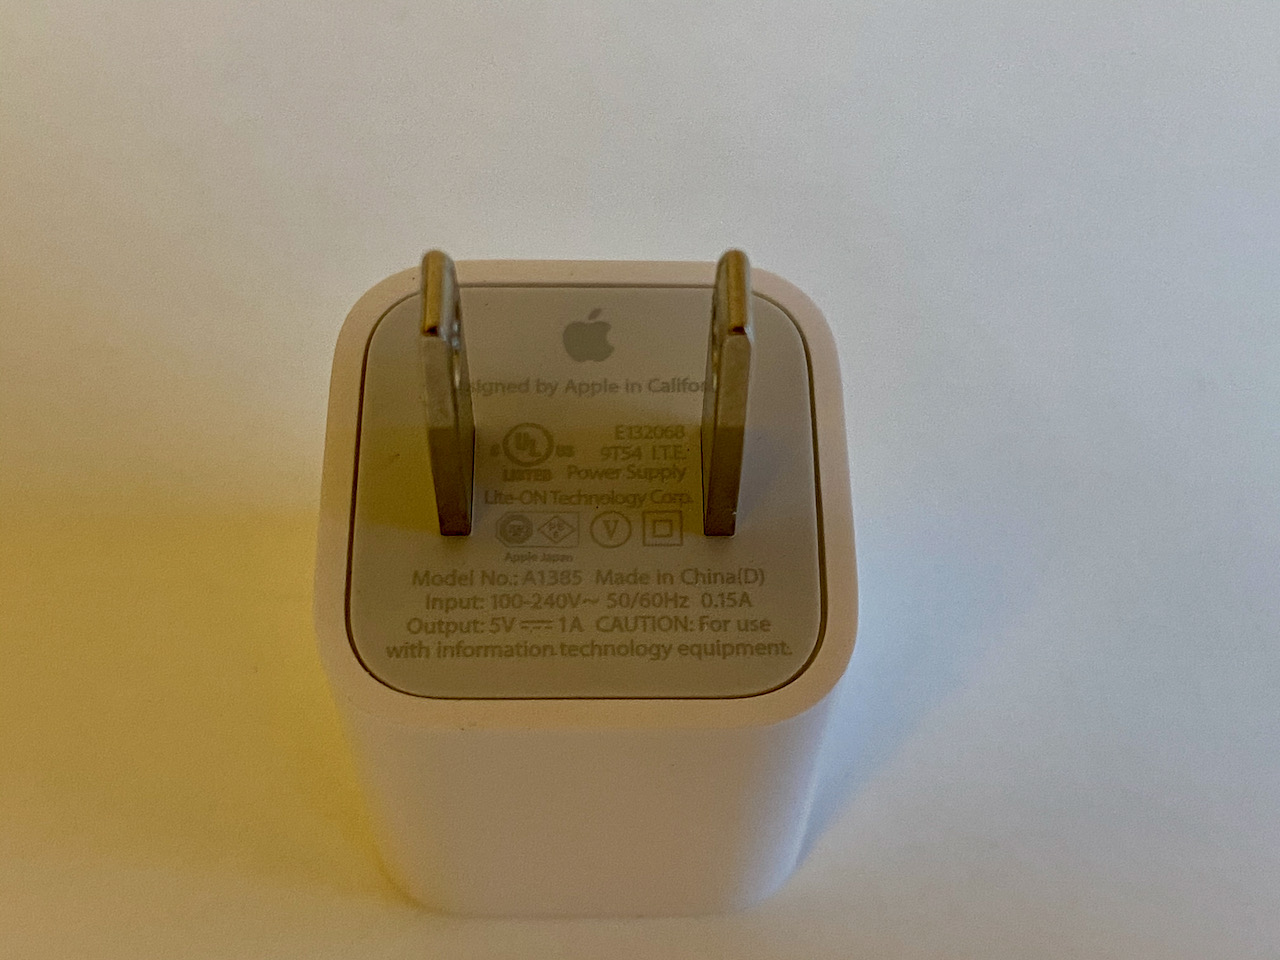
The 1A USB wall charger from Apple for the test
In order to make a comparison, I used this 1A USB wall charger from Apple to charge the same iPhone with a drained battery. Same as the previous test, I manually put the phone to Airplane mode after it booted up at Low Power mode. And again, the iOS was automatically switched back to Normal mode when the battery level had reached 80%. Here is the full record.
Table 3: iPhone in Low Power, Airplane mode charged by Apple 1A USB wall charger
Record Time
Time Elapsed / Total Time Elapsed
Meter Reading (mAh)
Battery Level (%)
14:13
0:00 / 0:00
0
0
15:10
0:57 / 0:57
918
31
16:00
0:50 / 1:47
1750
60
16:58
0:58 / 2:45
2613
90
17:51
0:53 / 3:38
2807
100
Charging an iPhone from flat to full with an 1A USB wall charger from Apple
As you can see, to charge my iPhone 11 Pro from flat to full, it took the USB wall charger 3 hours 34 minutes, more than the time required for SPIN UP F12W-Pro, which is 3 hours and 4 minutes. It also appears that more energy (2807mAh vs 2705mAh) is required for the wall charger to fully charge the battery.
Conclusion: When the bike is traveling at an average speed of 17km/h, the SPIN UP F12W-Pro is able to serve as a stable power source and charge my iPhone from flat to full within the time range of a 1A USB wall charger from Apple.
How about when the iPhone is running some Apps?
On a September morning, I cycled on the Riverside Bikeways with my iPhone connected to the SPIN UP F12W-pro. Strava and Google Maps were launched to track my activity and for navigation. The screen was on the whole time with brightness level at around 80% for the first hour. At 9:53 when I started cycling, the battery level was 17%. About an hour later at 10:57, the battery level reached 27%. The reading on my USB meter was 1007mAh. That means, even when the iPhone was in heavy use, SPIN UP F12W-Pro could still raise the battery level by 10% in an hour. From a previous experiment as shown in Table 2, we’ve learned that the dynamo can raise the battery level by 30% in one hour when the iPhone is ON and standby (Low Power, Non-Airplane mode). So, we can deduce that about two thirds of the charging power was consumed by the two apps and the screen.
Then, I left the two apps on but kept the screen off and cycled for another hour. At 11:59, the battery level was 56% (gained by 29%). It shows that when the two apps were running with the screen off, they consumed much less energy.
Table 4: iPhone in Normal, Non-Airplane mode charged by SPIN UP F12W-Pro, with Apps running
Record Time
Time Elapsed / Total Time Elapsed
Meter Reading (mAh)
Battery Level (%)
Battery Level Gained (%)
Apps
Screen
09:53
0:00 / 0:00
0
17
–
Strava, Google Maps
ON the whole time with 80% brightness
10:57
1:04 / 1:04
1007
27
10%
Strava, Google Maps
ON the whole time with 80% brightness
11:59
1:02 / 2:06
2015
56
29%
Strava, Google Maps
OFF most of the time and ON occasionally
Conclusion: The SPIN UP F12W-Pro’s stable 1A output can raise the battery level even when the Phone is in heavy use.
How about when we are not cycling on a flat road?
On the flat Riverside Bikeway, the Spin Up F12W pro is capable of charging my iPhone 11 from flat to 90% in 2:49 and to 100% in 3:04. The performance is just like an 1A Apple USB wall charger. It could also power the iPhone when it is running Apps and at the same time put more energy into the iPhone’s battery.
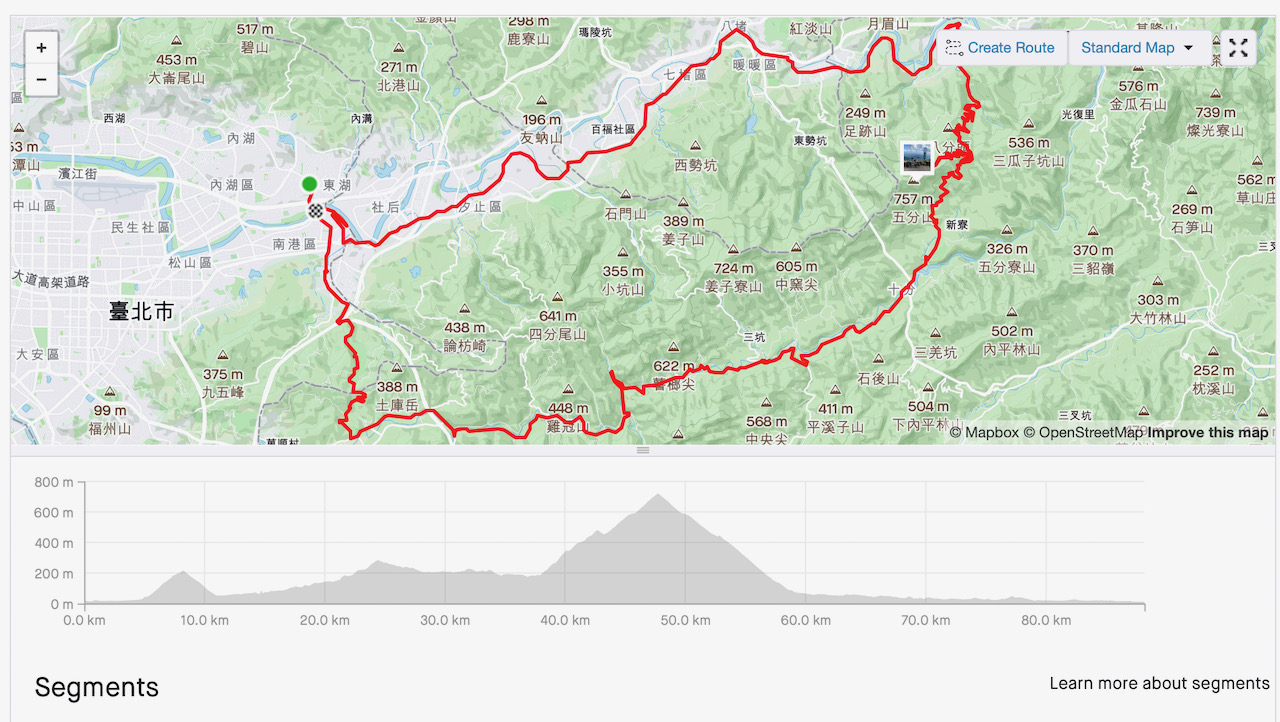
How about when we are cycling on hilly routes? To find out, I plotted a 88km route with three 3 peaks (211m, 283m and 721m) to see how it goes. During the cycling trip, I used my phone the way I normally do and charged it with the Dynamo while I was cycling.
Table 5: iPhone in Normal, Non-Airplane mode charged by SPIN UP F12W-Pro, at different activity levels
Record Time
Meter Reading (mAh)
Battery Level (%)
Activities
9:39
0
9
Start Cycling
10:08
293
17
After a short urban ride and a short breakfast break
10:34
667
25
First climb, reached the first peak (211m)
10:39
740
26
Descended from the first peak
11:51
1739
52
After the second climb, long but mild
12:49
1739
41
Lunch break
13:10
2017
49
Right before the third climb
15:01
2299
38
After the third climb, reached the top and took lots of pictures
15:26
2643
48
Descended from the top
17:15
3975
77
Return leg, 27km of intracity cycling
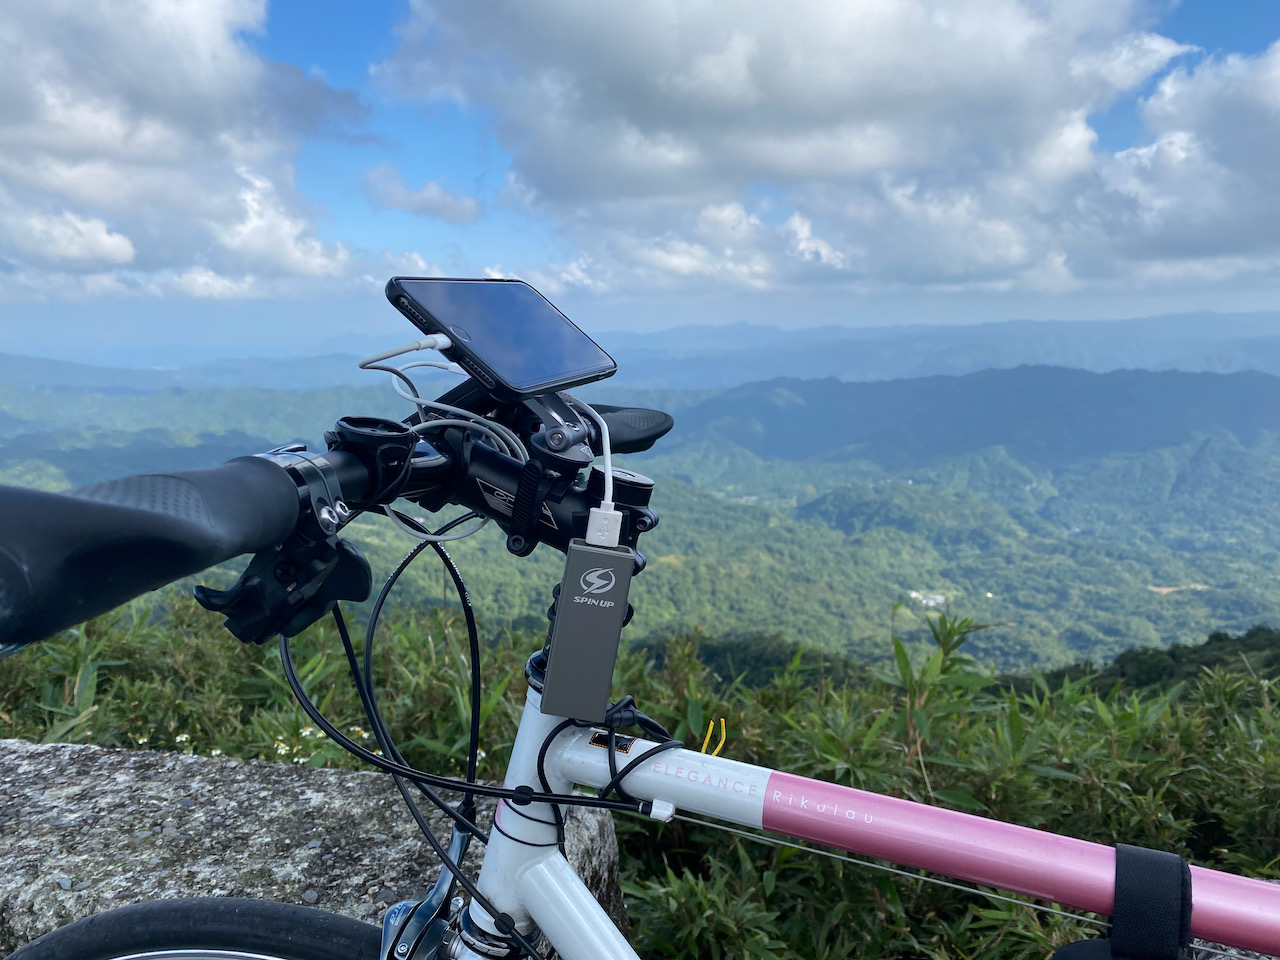
During the first climb, the charging light was ON the whole time even when my speed dropped below 10km/h. The second climb was long and mild. My speed was well above 15km/h and the battery level was raised by 26%. The third climb was even longer and steeper. I gained 540m to the Wufenshan Meteorological Radar Observatory at the elevation of 721m. The charging light was OFF most of the time because of my low speed. I also spent a long time taking lots of pictures with my iPhone at the top. So, even though I managed to put 282mAh energy into the battery, the battery level dropped to 38%.
My 27km return leg was a flat, intracity ride mainly along Provincial Highway 5A. When I was home, the readings were 3975mAh on the meter and 77% on my iPhone battery.
I went out for a 88km hilly route with the battery level at 9% and was home with a battery level of 77%. I no longer need to worry about draining my smartphones’ battery when I have a SPIN UP F12W-Pro.
How to Get the Most Out of a SPIN UP F12W-Pro?
While the SPIN UP F12W-Pro is designed to work in various harsh conditions, it may not be the same for our smartphones. We will need to take good care of our smartphones when they are being used in an outdoor environment so that they can take in the maximum power from the dynamo.
Charge the Hungry Device First
One tip about battery charging is, when the battery level is close to full, it will take a lot more time to fill up the remaining capacity. As shown in our previous experiments, the average time needed to charge the phone from 90% to 100% is much longer. So, if the battery level of the phone has already reached 90% or so and you have another phone with lower battery level, it’s probably wiser to charge the other phone instead. You will make better use of your charging time and the Dynamo.
Keep the Phone Cool
Lithium ion batteries are meant to be charged at cool temperatures. We need to keep our smartphones in well ventilated places and avoid long exposure to direct sunlight in order to prolong the life of the lithium ion batteries within. The handlebar or the stem is usually a good place for the smartphone because we can use it while cycling and sunlight is often blocked by our body. It can also be kept cool by the apparent wind. However, if during summer and my shadow is not covering the phone, I would often tilt the phone until only one of its edges is facing the sun, so as to minimize the impact of direct sunlight. It helps to keep my smartphone as cool as possible.
Tilt the phone Upward to minimize the impact of the sun light.
A Bright Screen is also a Heat Source
The screen, when turned on, is another heat source especially when it’s being used in broad daylight, because the brightness level of the screen will be maxed out for clearer display. It also means more energy is being consumed by the screen and more heat being generated. So, when it’s hot, keep the screen off as much as possible.
There were times when I had to cycle under the heat in the Summer days of Taipei. I set my iPhone with only its edge facing the sun and its screen turned off. The charging current was at 1A, meaning that the phone was still able to be charged with maximum power available. Then once I received and finished a quick phone call during one of these rides, the USB meter showed that the charging current dropped. When the screen was off, the charging current almost dropped to zero and the screen felt hot to the touch. The phone must be overheated so that it couldn’t be charged. After I found shelter and wiped the screen with a piece of wet cloth to cool it down, the charging current resumed to normal.
There were also a couple times when I cycled with my phone facing upward and the screen turned on for navigation under the heating sun. The current shown on the meter was around 0.5A even when I was travelling at the minimum required speed. The battery level was not rising. The screen was hot because it was heating up by itself and the sun at the same time. This made the phone too hot to be charged. But why was the phone still accepting the current from the Dynamo? And why was the battery level not dropping either? My conclusion is the phone must be tapping the power source for immediate consumption, like powering the screen. Therefore for those who need to use their phone while cycling, they can still preserve the energy in the battery if they use a Dynamo.
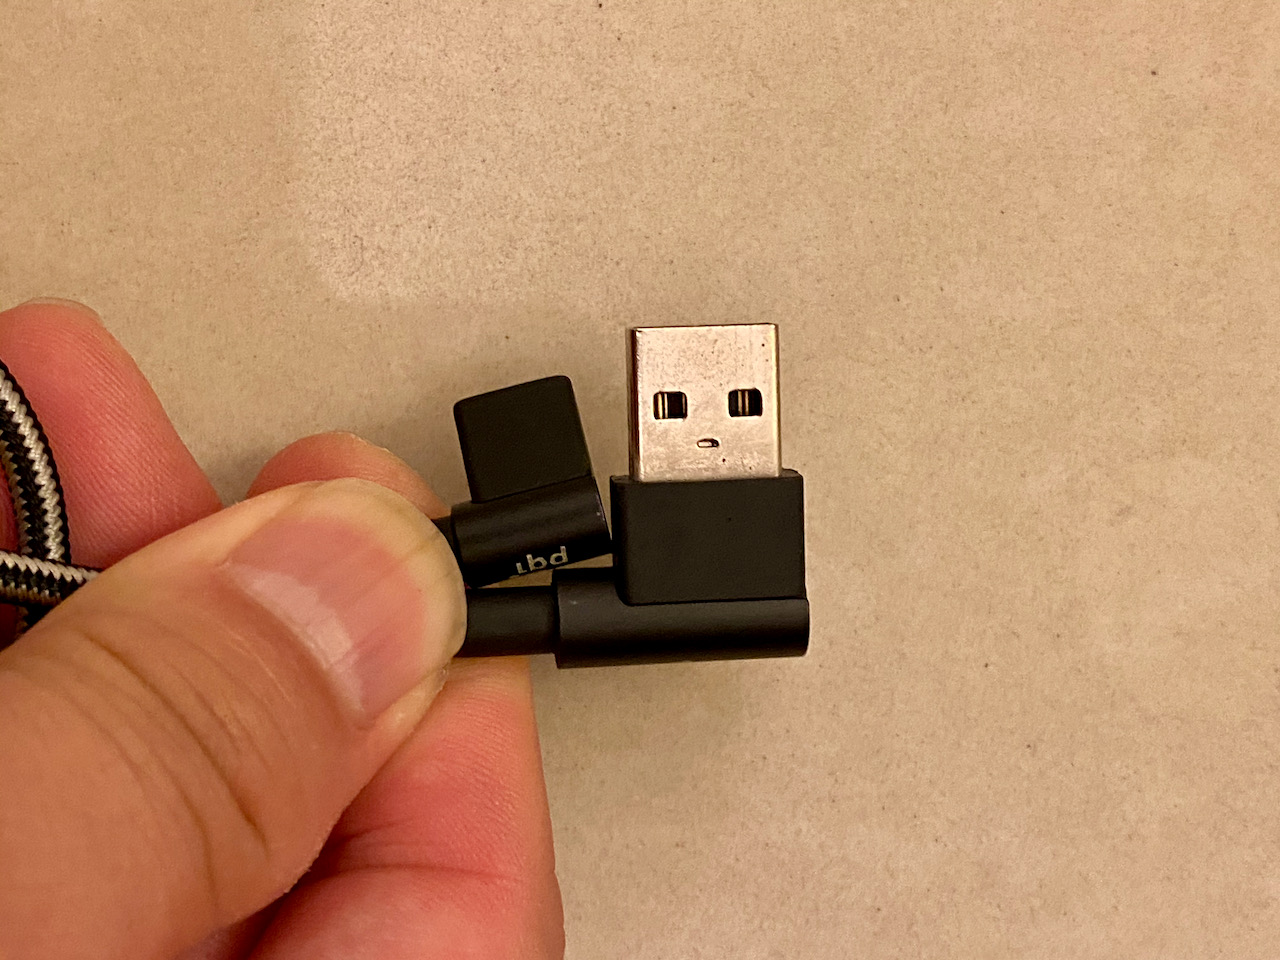
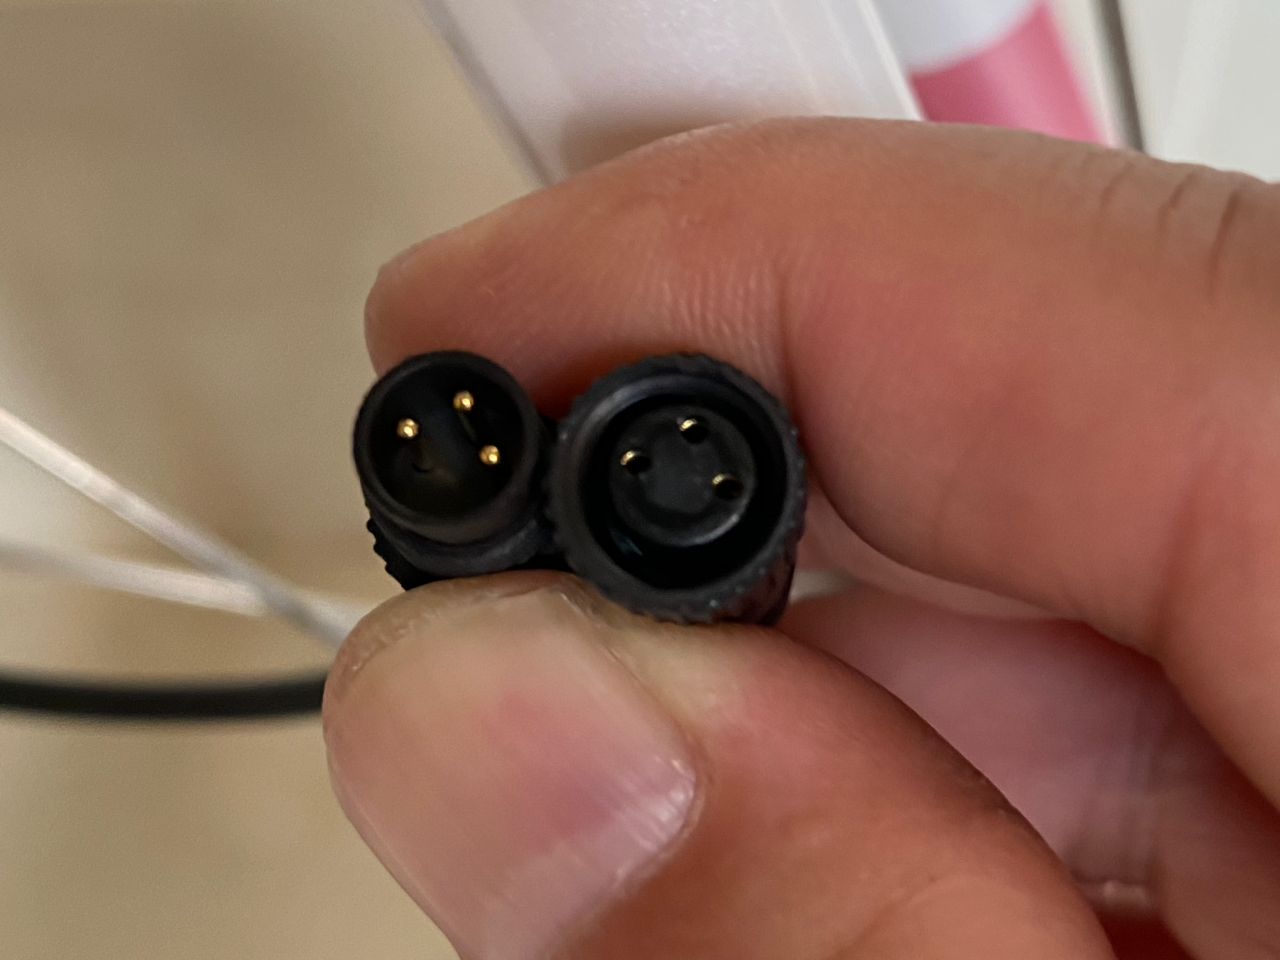
Use a Clean Connector To Maximize Charging Performance
Another possible issue that would hinder the charging process is the oxidized pins of the connector. I had once used the lightning connector shown in the picture. Even when the charging status was ON, the current was not stable and fluctuated between 0.5A to 1A. Therefore it’s important to use a clean connector for maximum charging performance.
Oxidized pins would hinder charging performance.
Keep the Connectors Dry
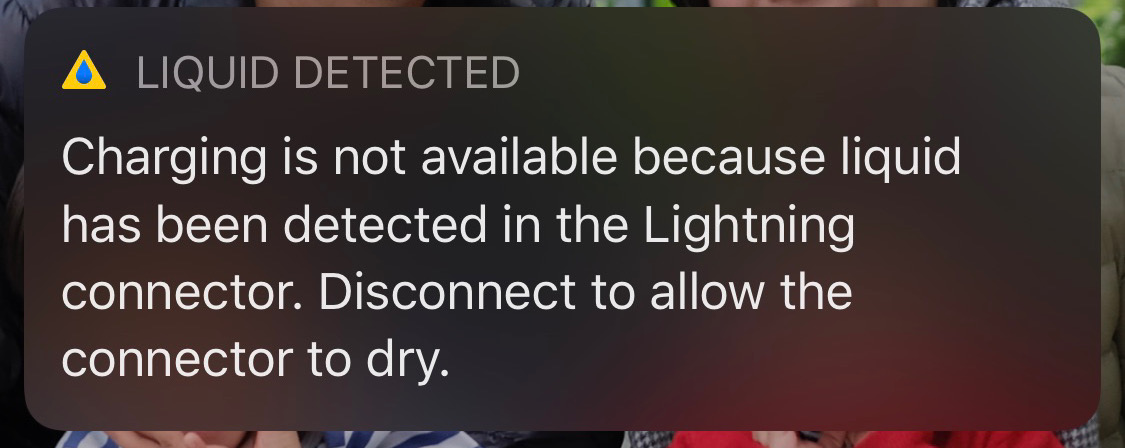
The SPIN UP F12W-Pro dynamo set (including the dynamo on the wheel and the USB charging unit) is water resistant with a rating of IPX4. I have cycled with the dynamo set in heavy rains several times. I have also washed my bike with the dynamo installed on the wheel but the USB charger unit removed. So far no harm has been done and the dynamo set is working totally fine. On the other hand, my iPhone is water and dust resistant with a rating of IP68. However, it is not supposed to be charged when it is wet. It can even tell when the lightning connector is wet and subsequently suspend the charging process. So, when you are out cycling in the rain, it may be a good idea to charge your phone in a waterproof bag and make sure it is dry.
System Message from iOS telling the user to dry the connector before charging
More Room For the Connectors
I used to mount my iPhone on the centre of the handlebar. Once I had the lightning connector bumped against the stem when I rolled over an uneven road surface at high speed. That’s how I got a broken lightning cable as shown in the picture. The lesson is: make sure you have enough room for the connector or tilt the phone horizontally.
In this post I am going to show you how to install the SPIN UP F12W-PRO Bicycle USB Charger Dynamo. It is pretty easy and the box comes with detailed instructions and necessary tools. What I want to share with you are some little tricks that will make the process even easier.
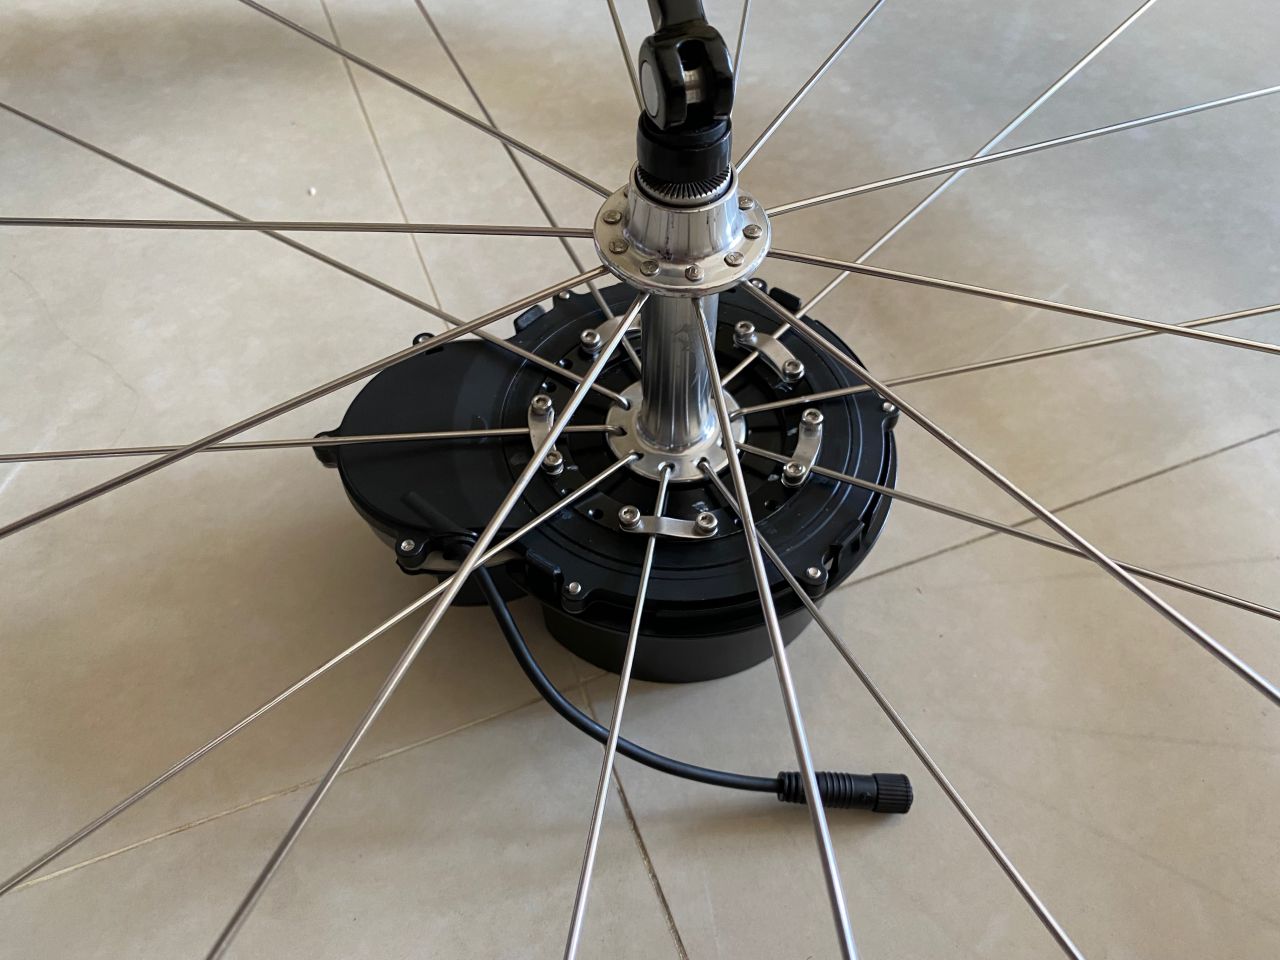
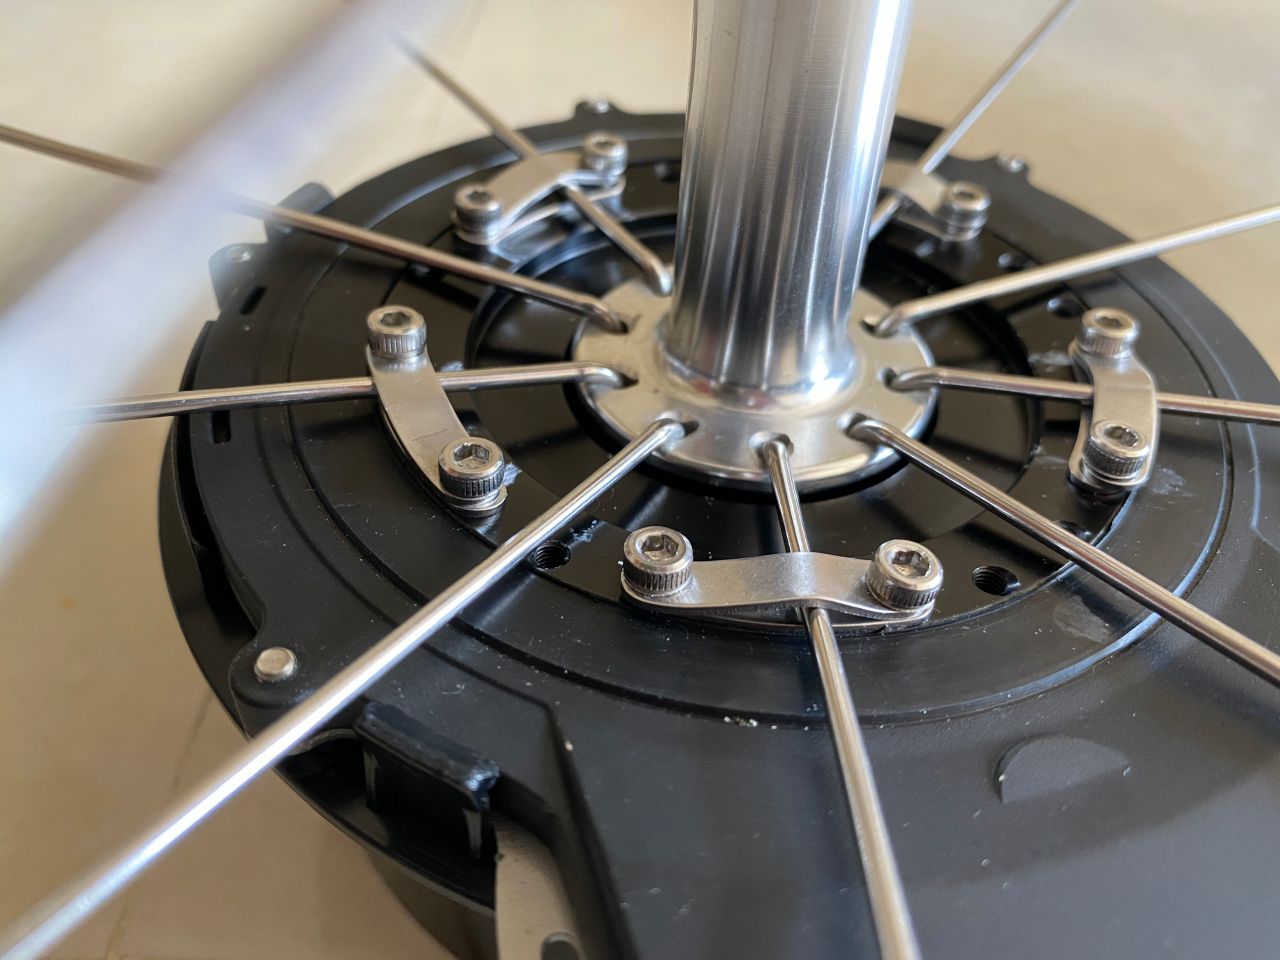
My wheel comes with radial spokes. I will suggest you wash the wheel and let it dry completely before installing the SPIN UP Dynamo.
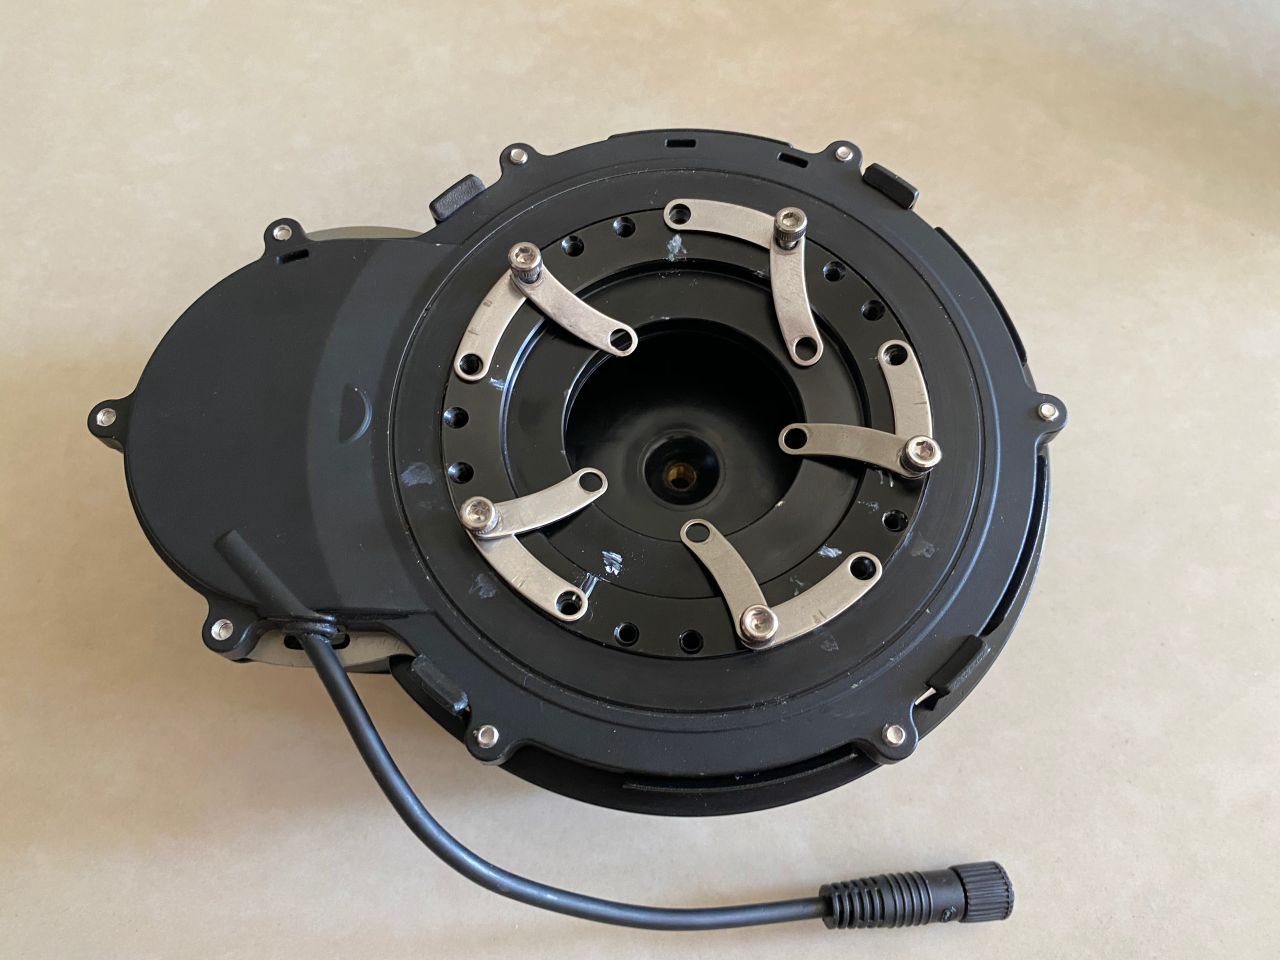
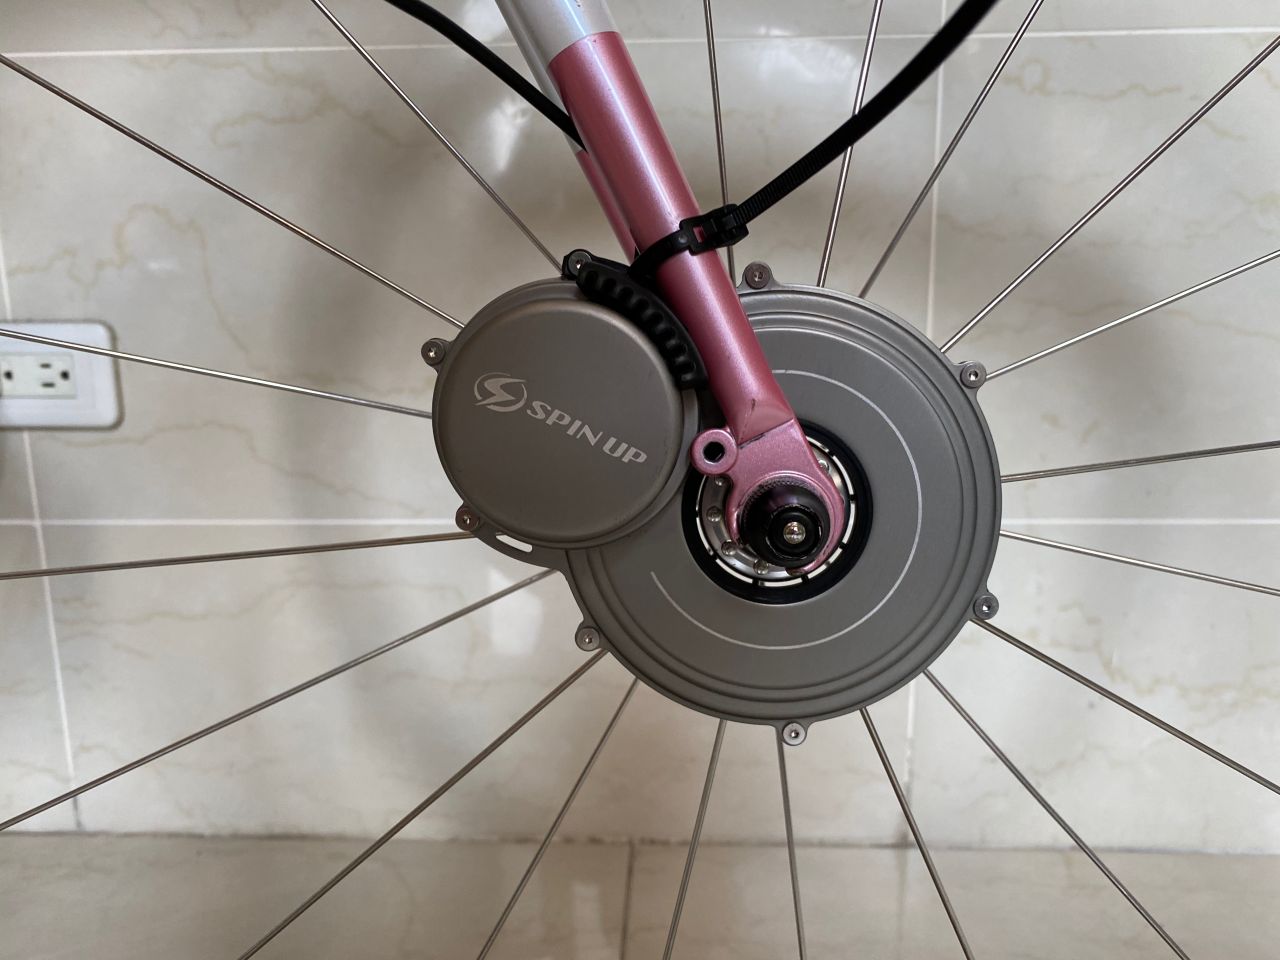
After completing the first part of the installation process, we should have the Dynamo securely mounted to the wheel with the little stripes holding the spokes. There should be at least 3 spokes being held, and spaced evenly, to the moving ring of the Dynamo. In my case, there are 10 spokes on each side of the wheel. 3 spokes should be enough but I have used 5. When rolling over the rumble stripes, the bike will usually rattle very violently. I want to make sure the Dynamo is secured.
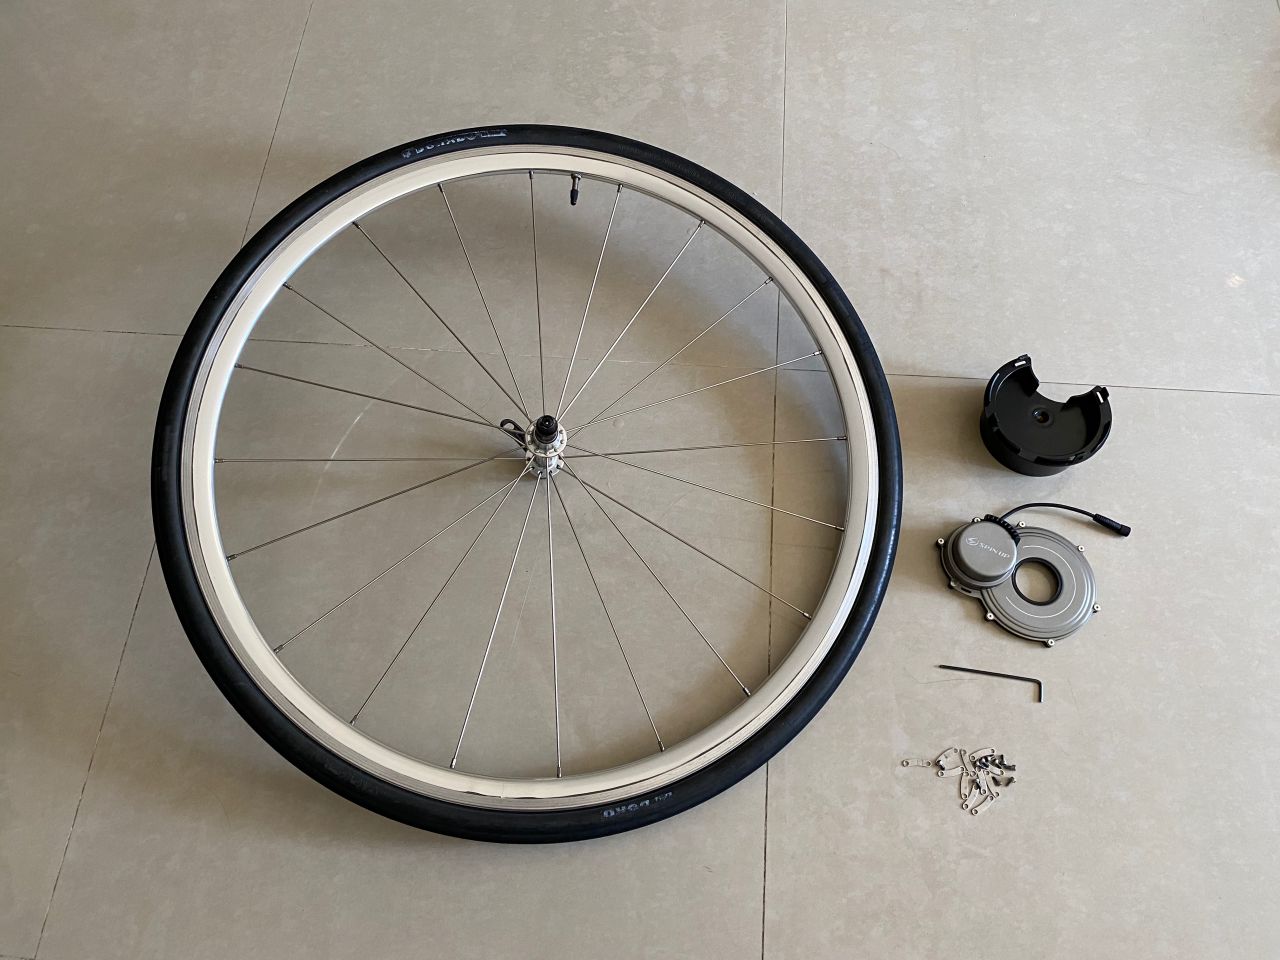
Step 1. Get your wheel, Dynamo, and tools ready
Step2. Attached the Dynamo to the black stand holder. It will ensure the wheel and the Dynamo lay stably on a flat surface while we work on the screws. It also makes sure the Dynamo’s ring is attached to the centre of the wheel.
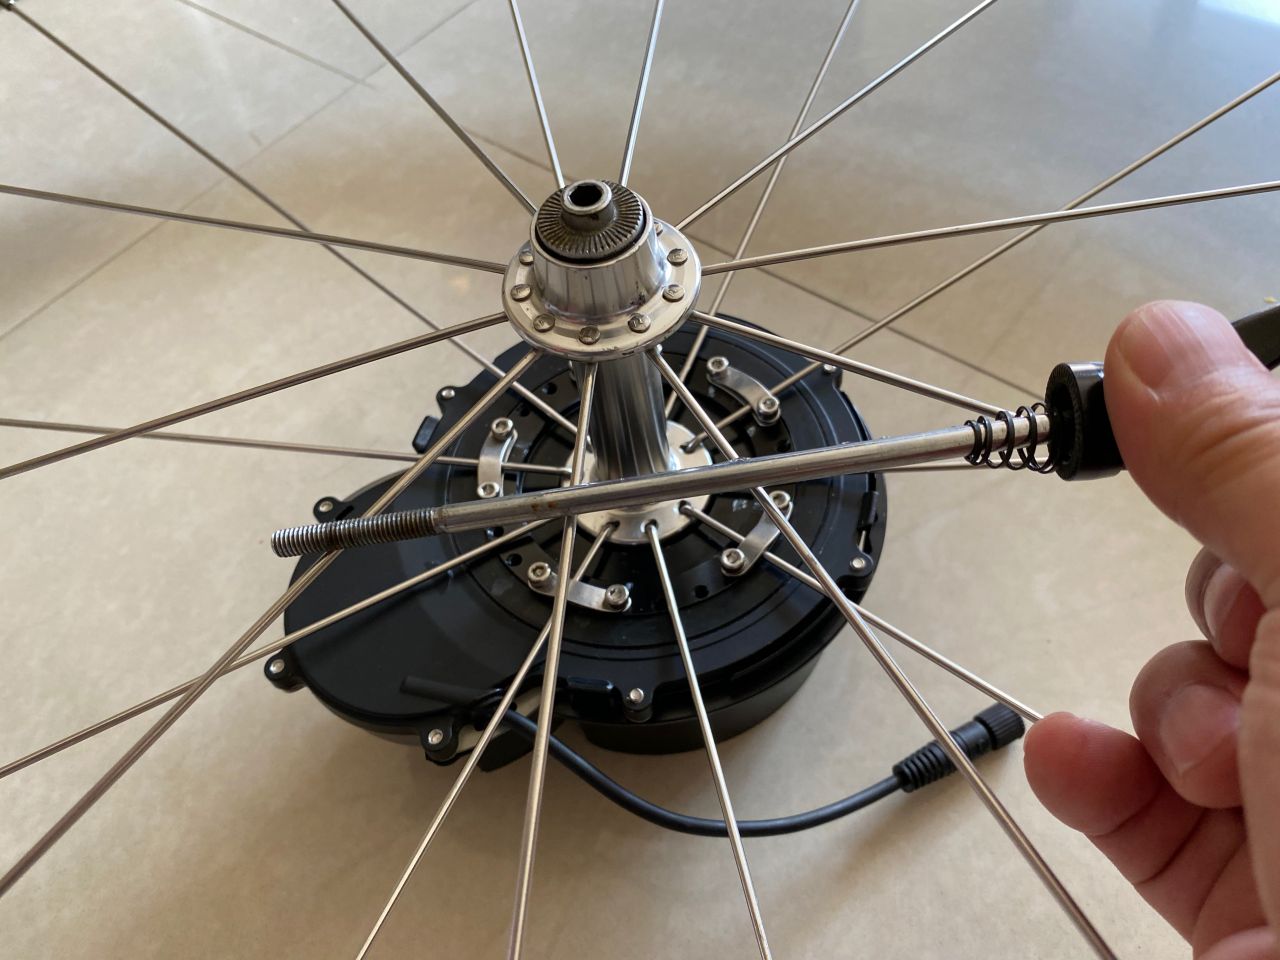
Step3. Remove the quick release cap and conical spring completely from the skewer. Keep the conical spring and the cap in a safe place.
Step4. Attached the Dynamo to the wheel. Screw gently the skewer into the black stand holder.
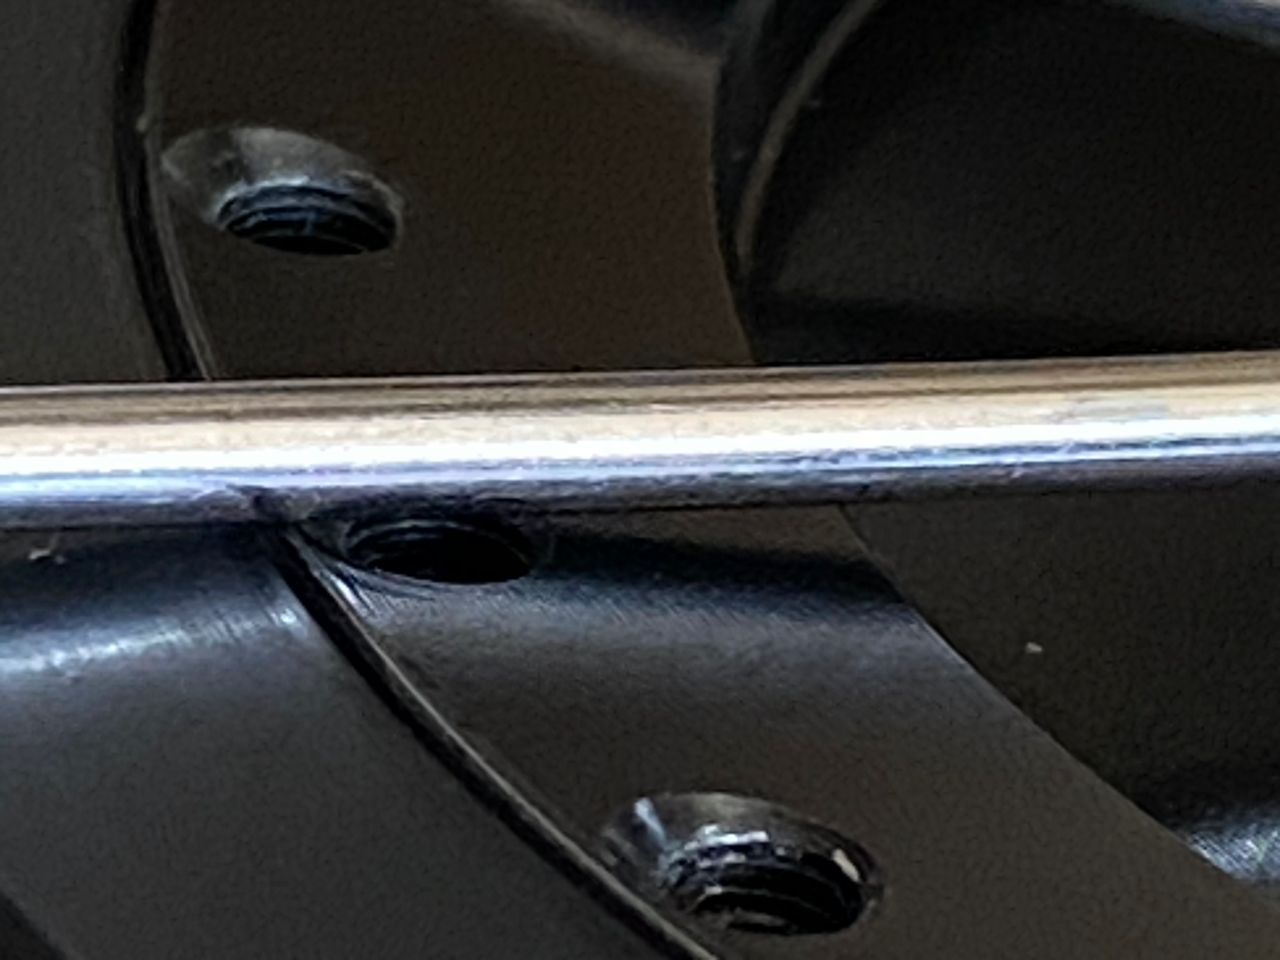
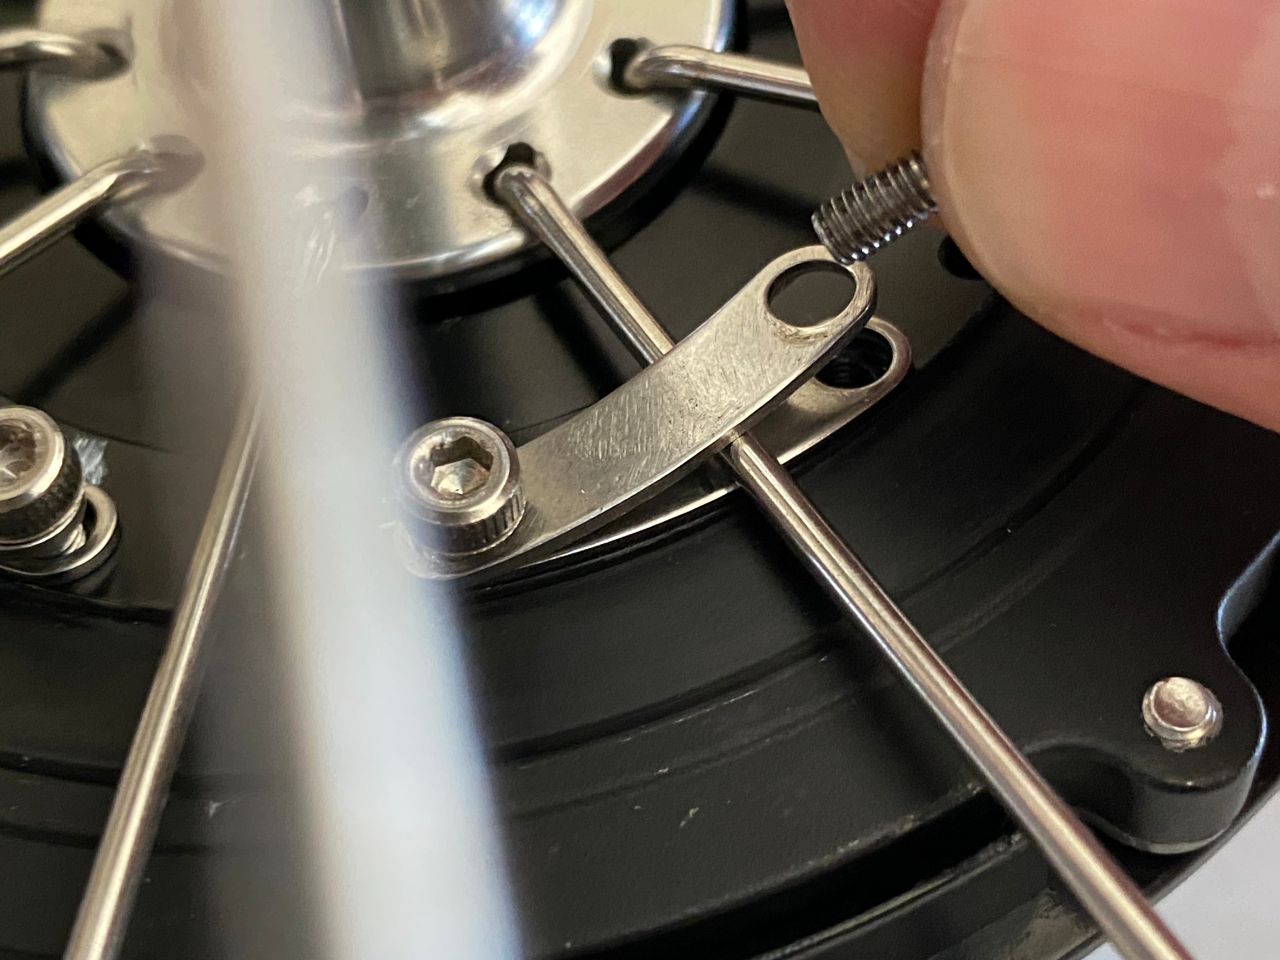
Step5. Decide which spokes to be mounted and mark the screw holes to be used. Inspect if there is any gap between the spoke and the Dynamo’s ring. If any, put the little metal stripes between them until the gap is filled. This is important as we will later press the spokes to the ring with quite some pressure. If there is any gap in between, the spoke will be deformed or even cut. The metal stripes underneath are to protect the spokes. Take note of how many metal stripes will be needed to fill up the gap. In my case, I need only one piece of stripe for each gap.
Step6. Unscrew the quick release skewer and remove the wheel. Fix the metal stripes on the dynamo’s ring with the screws provided as shown in the picture. Just insert the screws into the holes with a couple turns. Don’t fully tighten them yet. As observed in Step 5, I need one stripe under each spoke, and another one above the spoke. If you do this with the wheels on, you will find the stripes keep falling into the hole. It is easier to work with the stripes and the screws without the wheels.
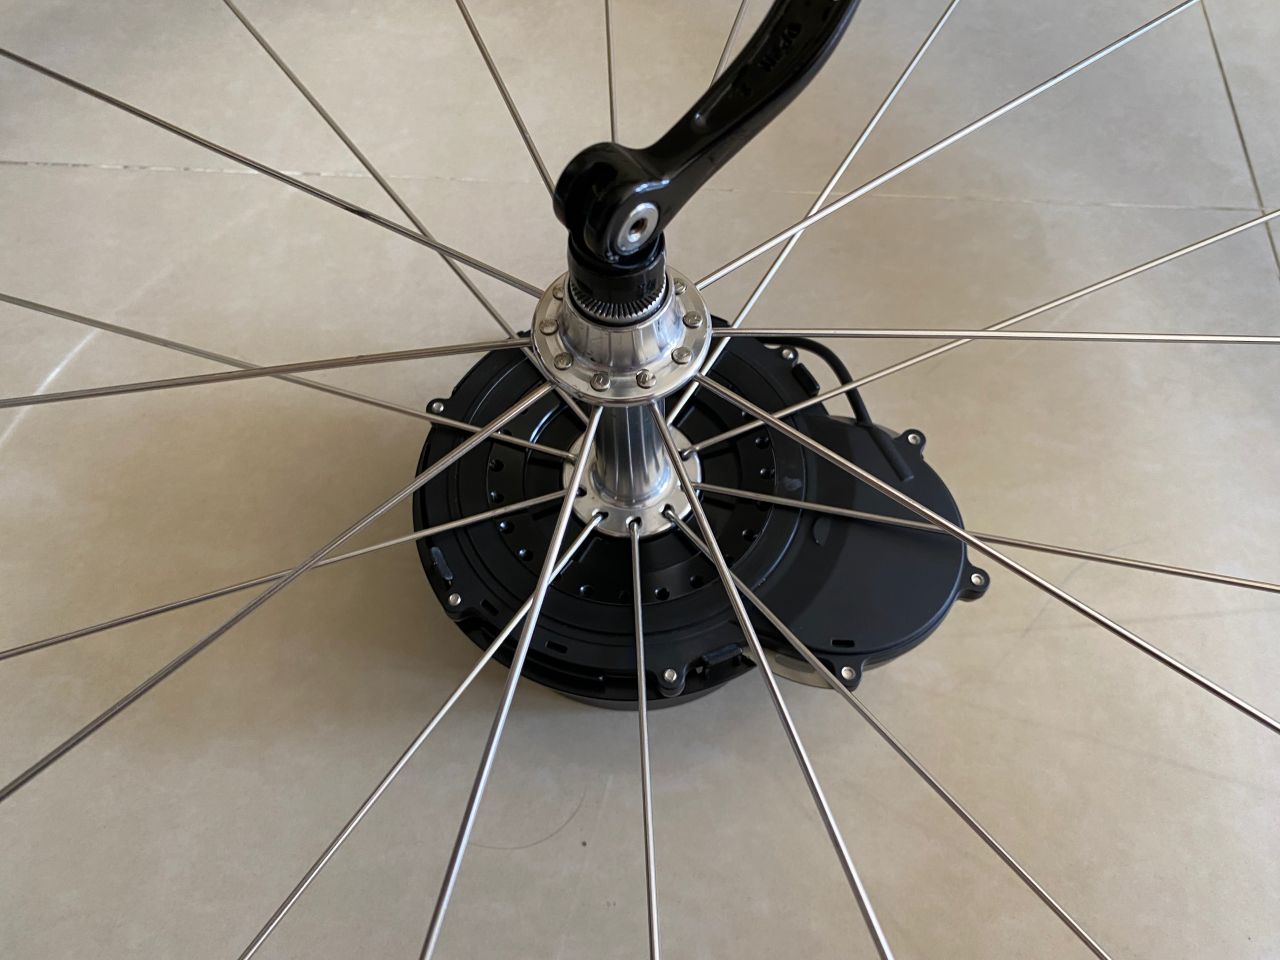
Step7. Put the wheel back on the Dynamo and screw the quick release skewer gently into the stand holder until the metal stripes underneath are pressed against the Dynamo’s ring. Make sure there is one spoke on each stripe.
Step8. Fix both ends of the top metal stripes to the Dynamo’s ring. Again insert just a couple turns of the screws.
Step9. The stripes are now held in place and ready to be tightened. We want the pressure evenly applied to the ring. So, tighten each screws only 2 – 3 turns and then switch to the next one. Then when it gets harder, make a quarter turn one by one.
How tight should it be? The metal stripes should be bended, forming a curve as shown in this picture. They are made with soft steel and are designed to be maneuvered like this.
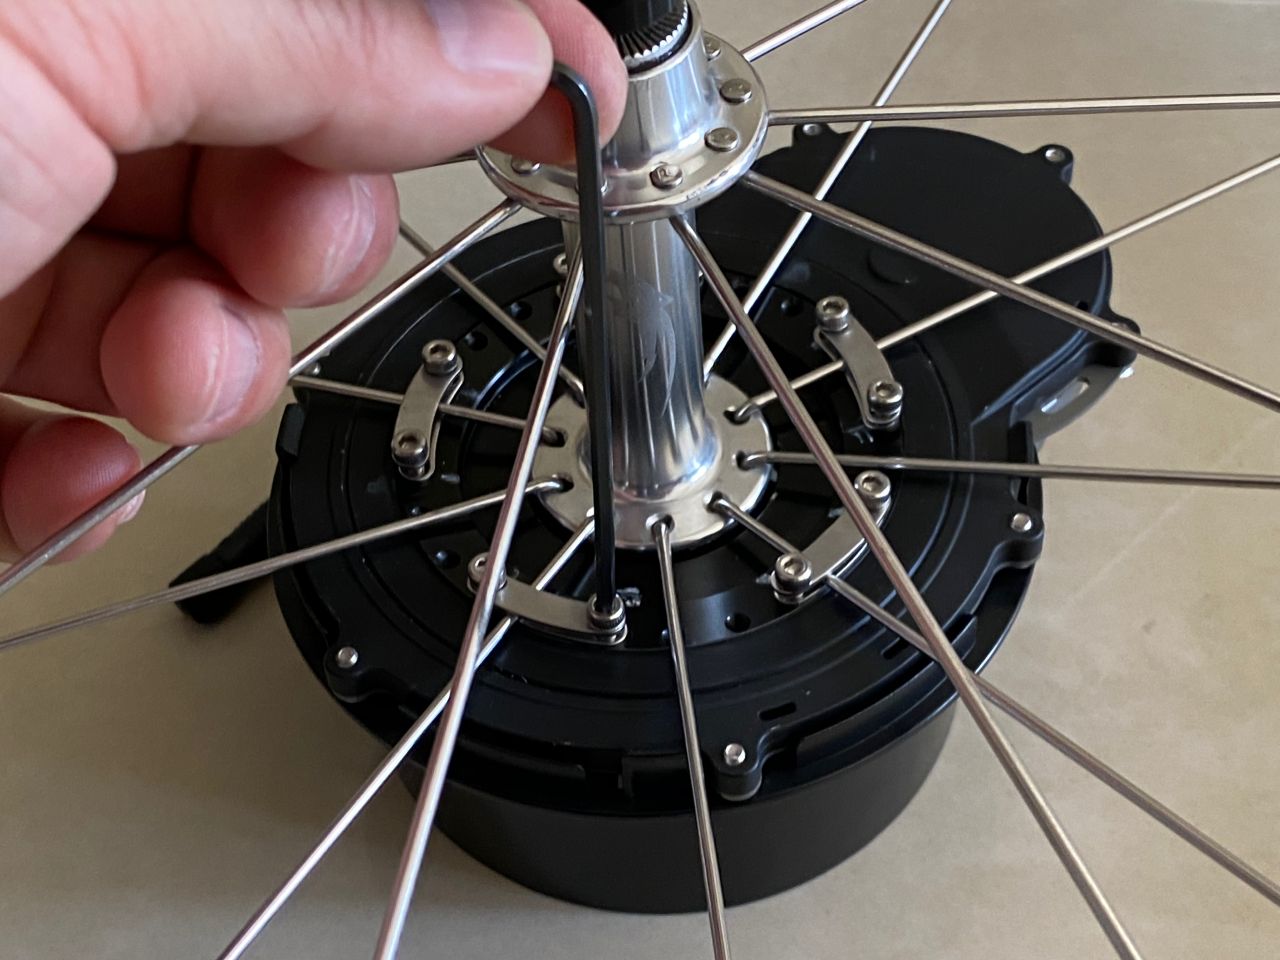
Step10. Remove the quick release skewer.
Step11. Remove the stand holder from the Dynamo. Remember: don’t grab the Dynamo and turn the wheel, and don’t hold the wheel by the Dynamo. Otherwise, it will be thrown off-center.
Step12. Put the quick release cap and the conical spring back on.
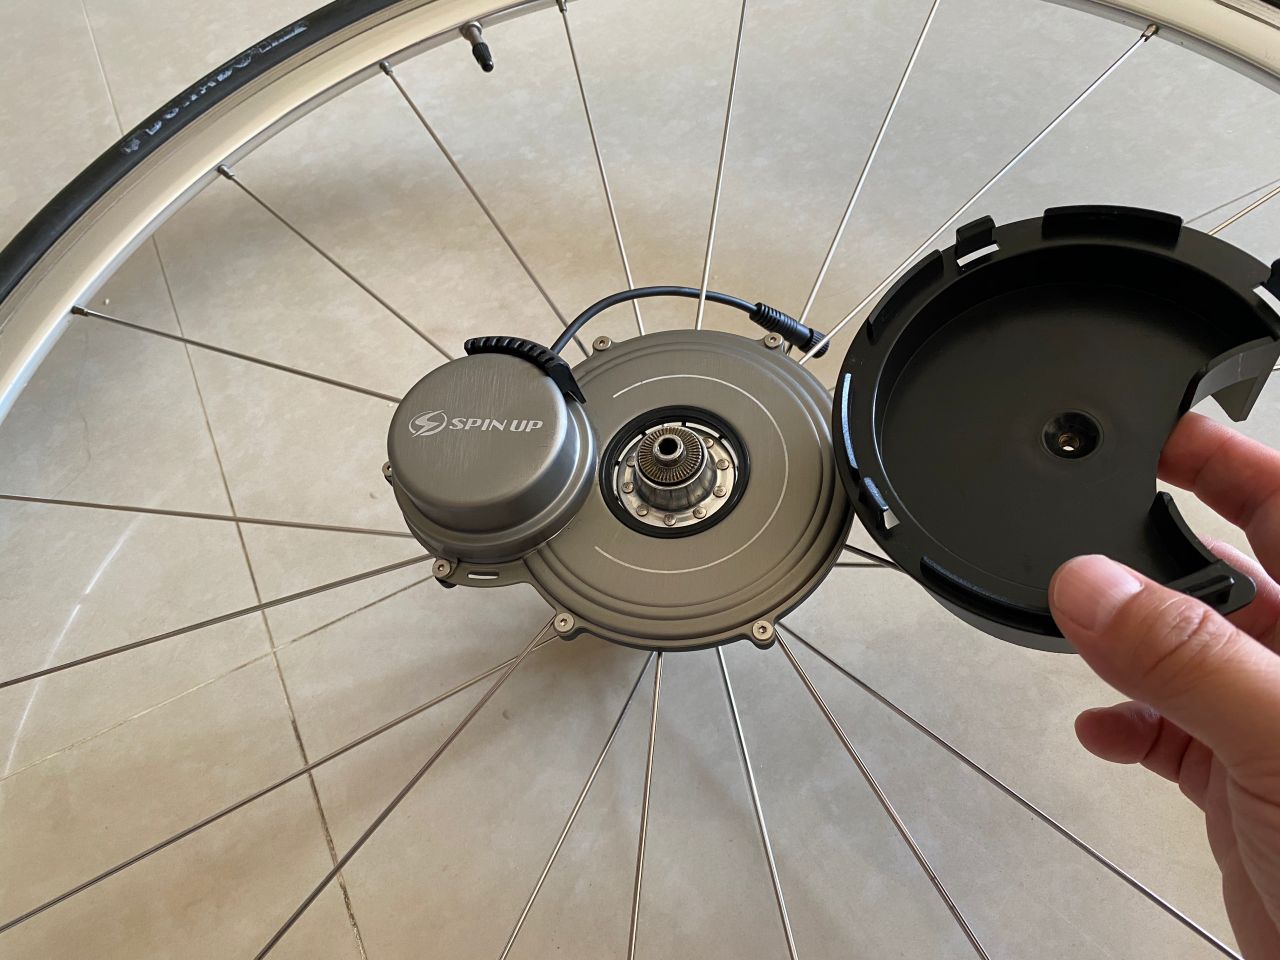
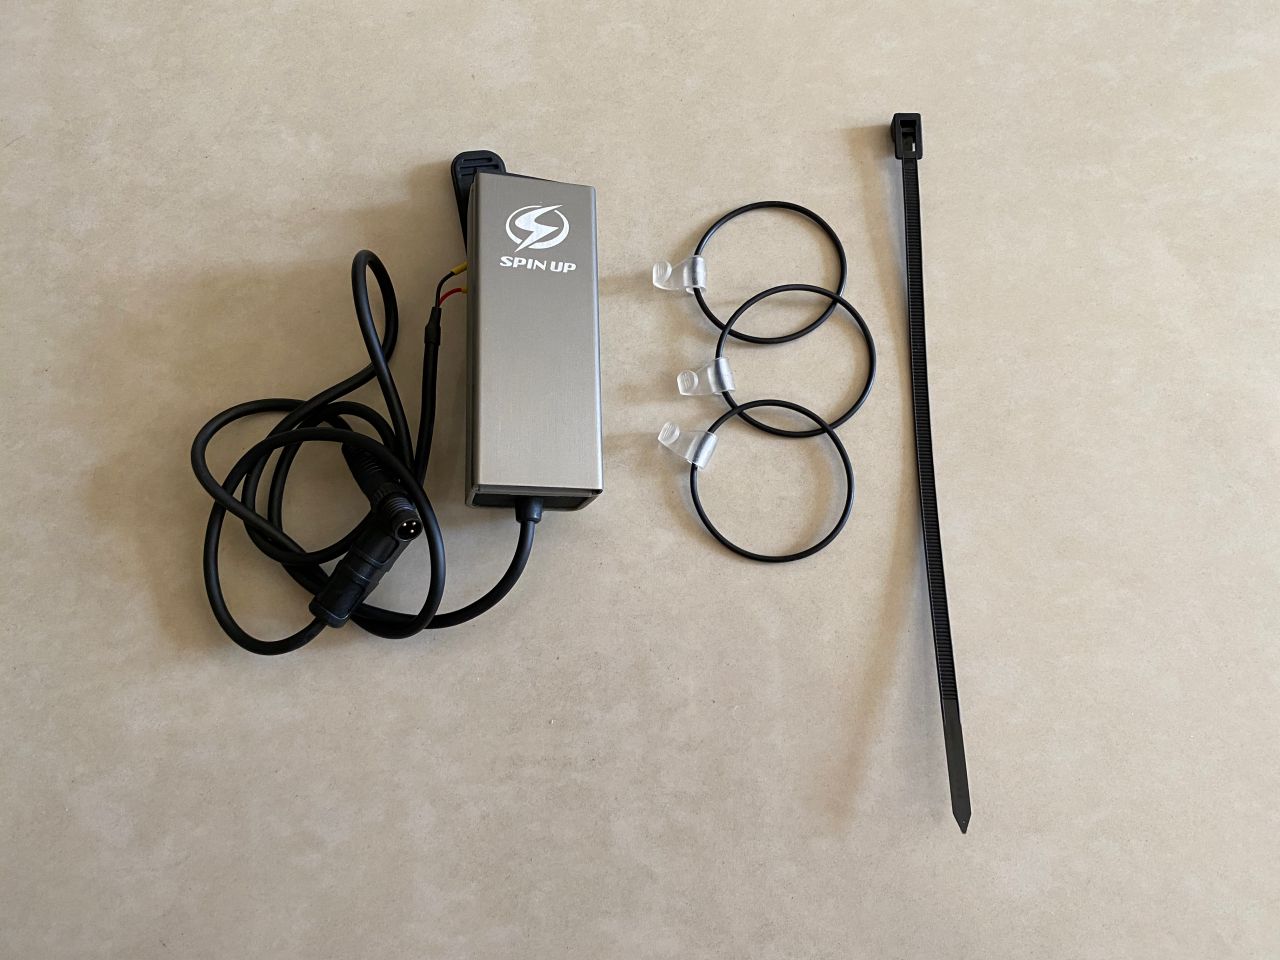
Voila! Now we have finished part one of the installation process, let’s get the USB charging unit ready and move on to part two. Here are the components included.
Step13. Put the front wheel back to your bike, the usual way.
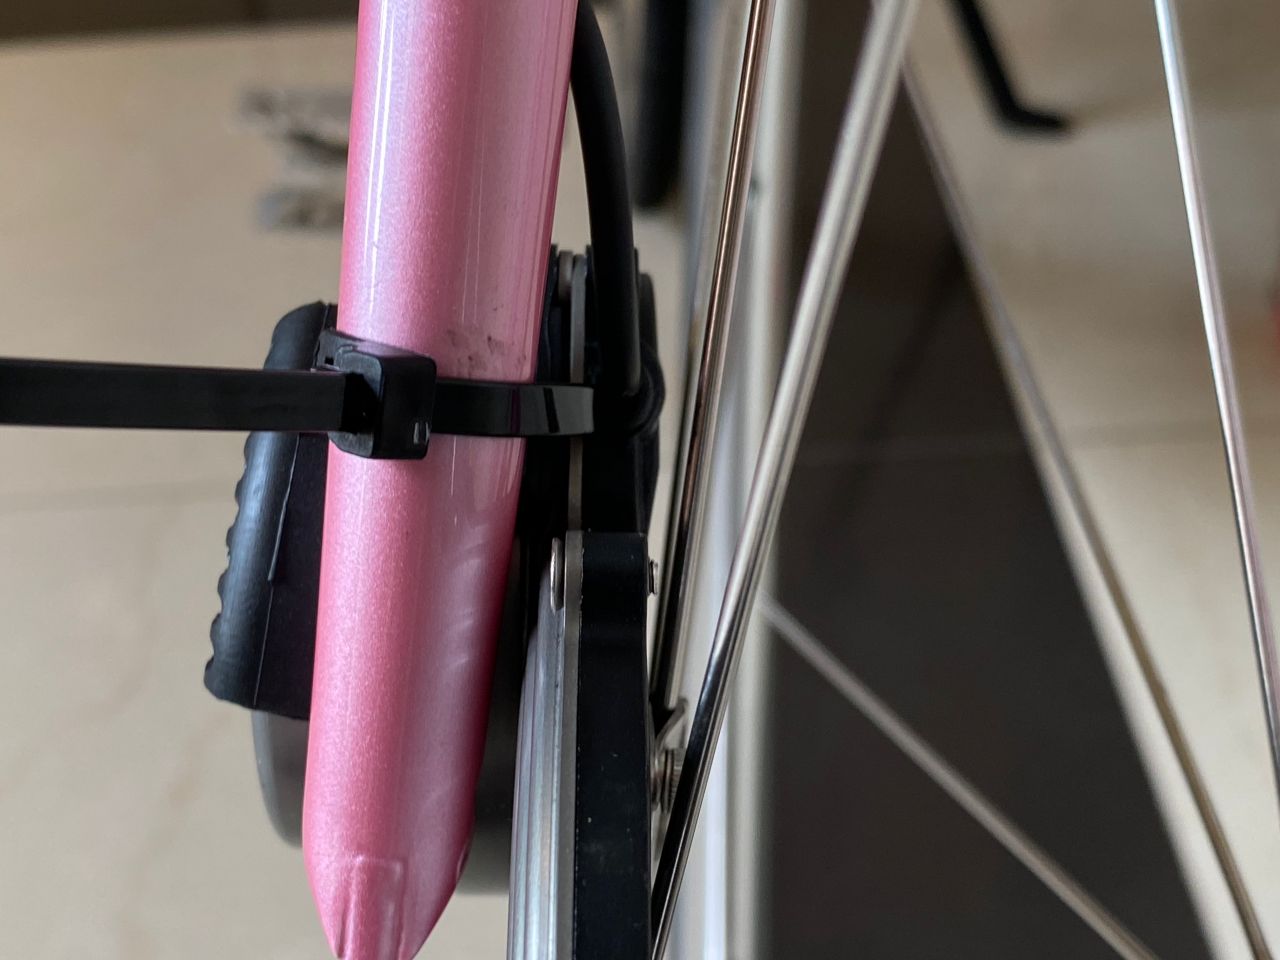
Step14. Use the cable tie to hold the Dynamo to the fork really tightly. So tightly that even when the bike rattles on uneven roads, the Dynamo rattle with fork as one. Do not tie the spoke to the fork. This is not impossible as the spokes may be very close to the fork. The cable tie is releasable and reusable, which is convenient when you need to remove the front wheel.
Step15. Connect the Dynamo to the USB charging unit. There are 3 pins.
Step16. Run the cable to the handle bar; use the rubber bands provided to secure the cables.
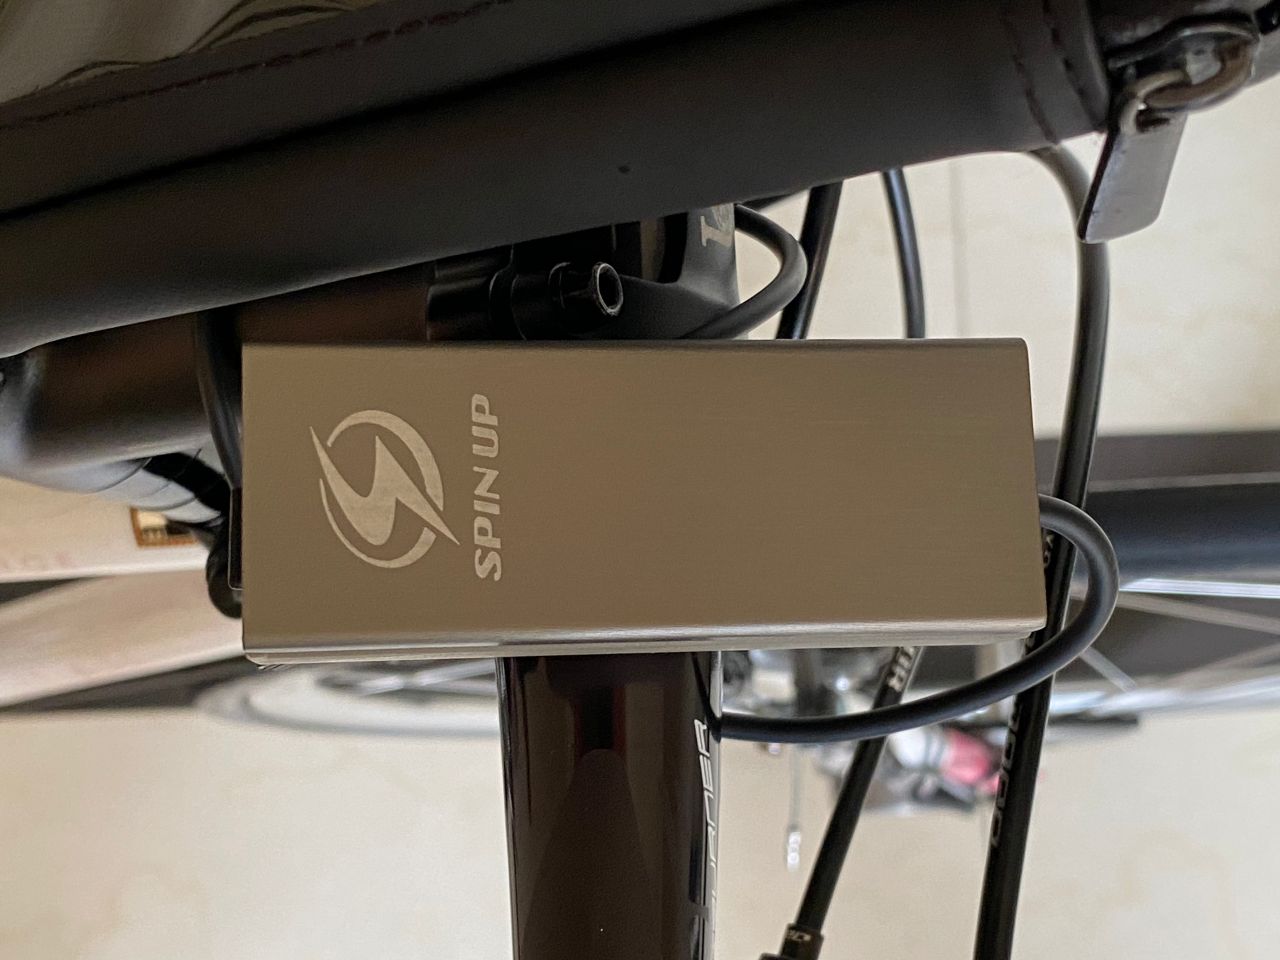
Step17. Fix the USB charging unit to any location you like. This is one possibility.
That’s it! Get your phone connected, start pedaling, and get it charged!
By the way, SPIN UP F12W-PRO is capable of powering the front and rear bike lights while charging your phone at the same time. The USB charger comes with a wiring branch (the yellow part shown in the photo above) for connecting the lights. A light set by Herrmans, H-flow and H-trace, can be bought separately on SPIN UP’s official site. I don’t have the need for powerful lights like this right now, as I don’t cycle much at night. A pair of rechargeable lights, which can be also be charged by the Dynamo, is good enough for me. I will write another post when I have the chance to try out the Herrmans light set.
For a complete visual guide, including connection to the lights, here’s a video clip from SPIN UP:
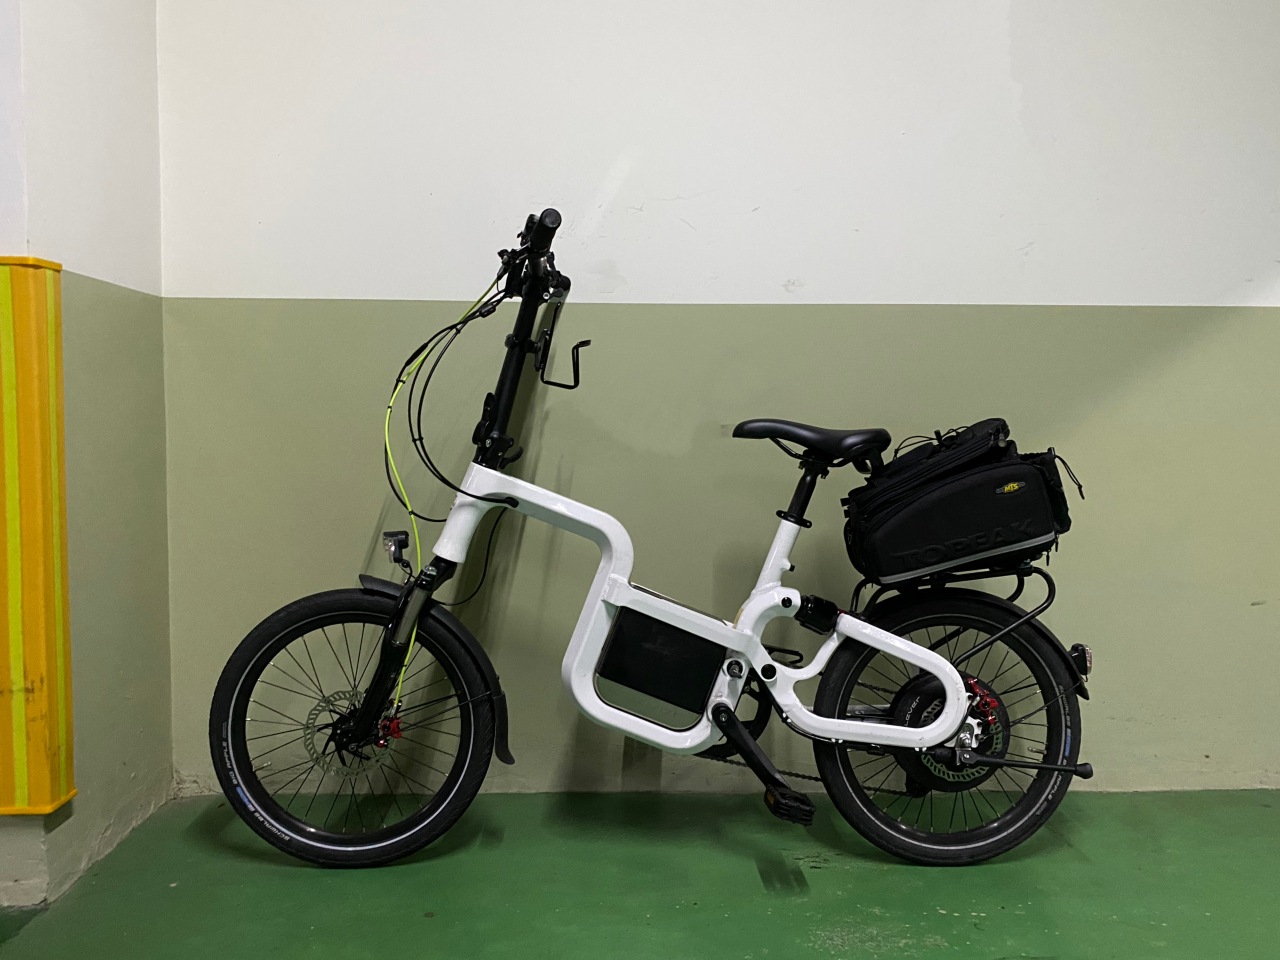
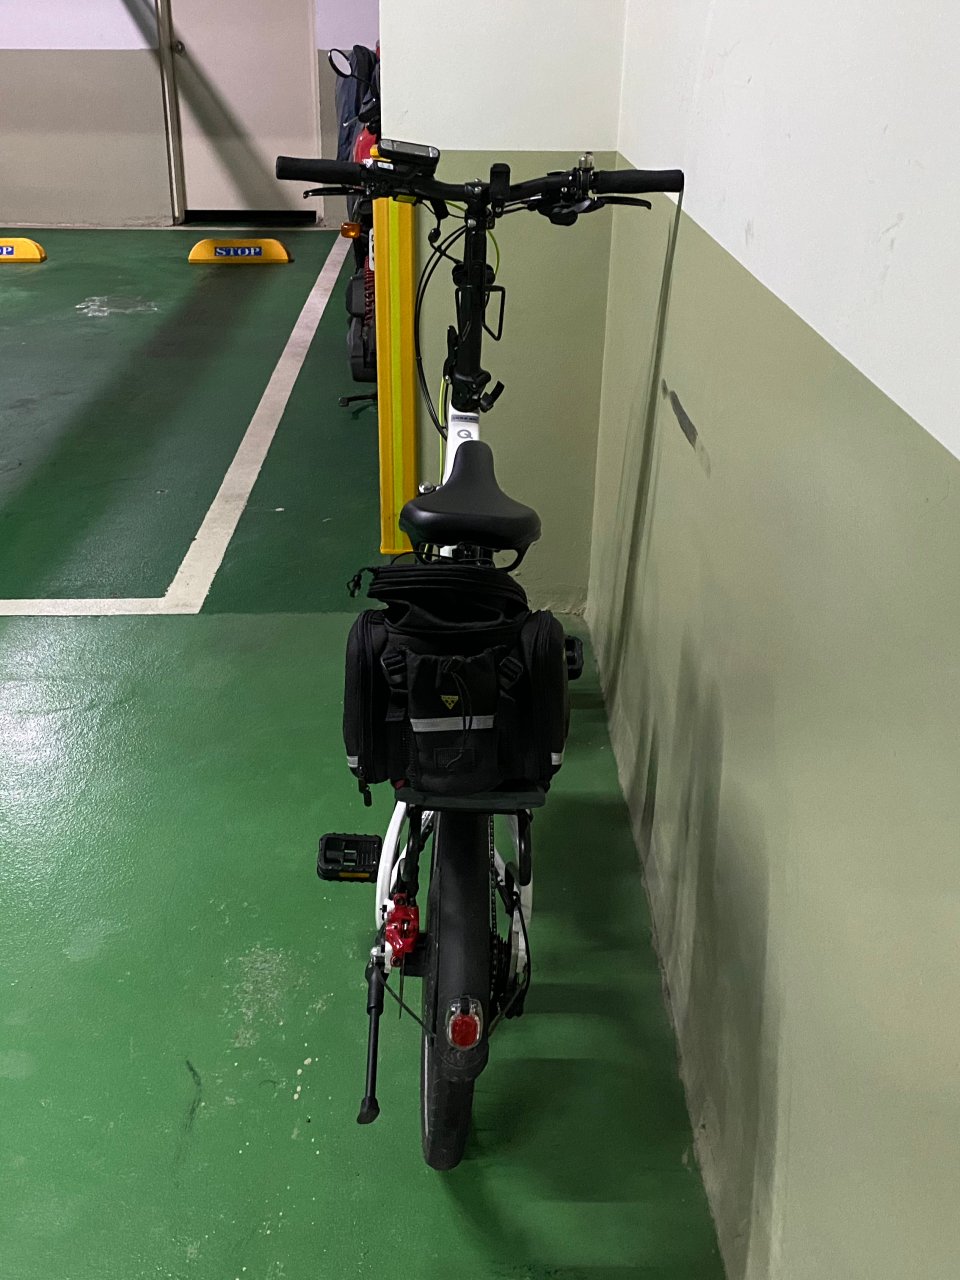
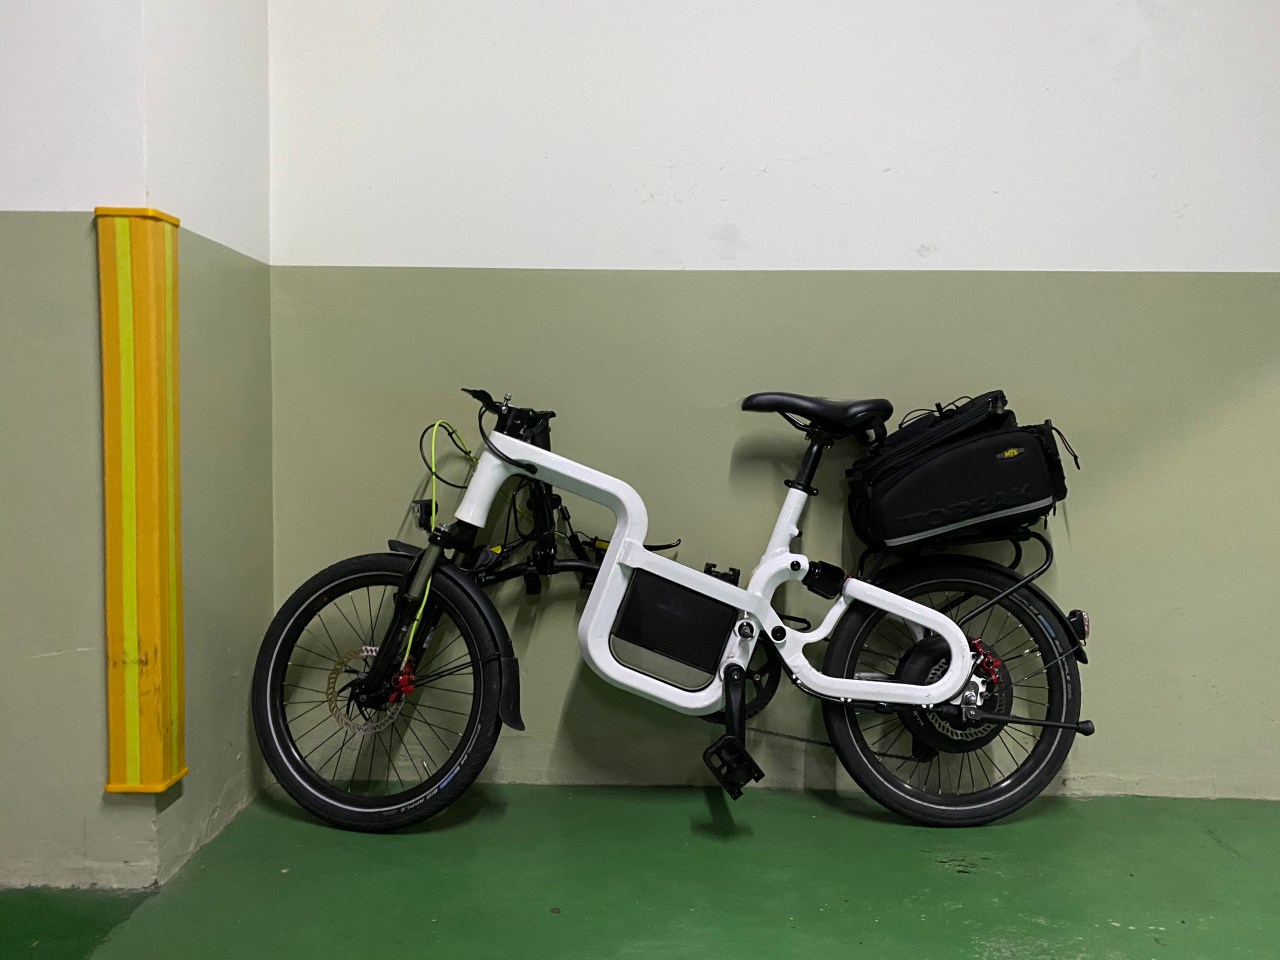
I have to confess that Klever had loaned us the Q Comfort for quite some months. It had been sitting idly at the narrow interspace between our car and the wall of our parking lot. Yes, we had other more pressing things to deal with and urgent projects to finish. But the honest reason is: we almost forgot about it because it took up so little space and hence drew so little attention. With its fork folded up, the handlebar is turned 90 degrees to align with the frame. It looks like there is not much “folding” involved, but it’s actually a clever and useful design. If I need to store some regular bike in our parking lot, I always need to remove the front wheel and turn the handlebar 90 degrees to make it flat enough for that narrow interspace. With the Q Comfort, all I need to do is fold up the fork and the pedals, and then voila: it’s out of sight (and out of mind).
This is how it’s like before the Q is folded.
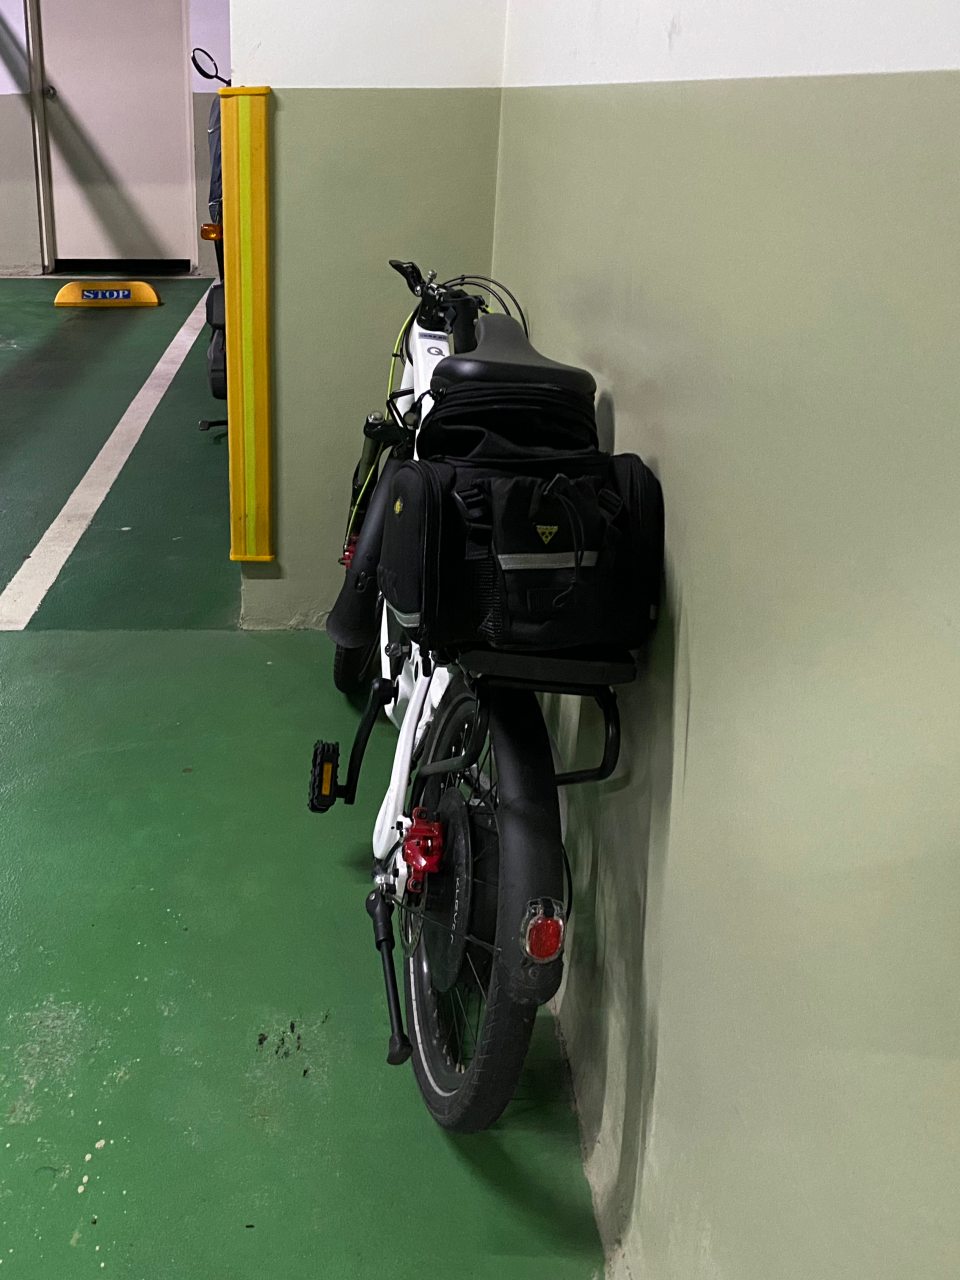
It’s folded and fit snuggly with the Audax Hercules in this tiny space.
But we couldn’t keep it forever, so it’s time for the test ride. In order to do a fair comparison between B Comfort and Q Comfort, I decided to use the Q on the same two routes – the hilly route and the long coastal route.
First Impression:
In terms of size and geometry, Klever’s Q Comfort fits me more than its B Comfort. For my height (1.72m), it is easier to handle and feels nimbler. I can make sharp turns easily and stably. For taller riders or someone who prefers a more upright cycling position, the fork can be extended around 10 cm further. Like the B comfort, when the power is off, the Q works perfectly like an ordinary bike, though heavier. The travel of its suspension system is shorter than that of B comfort. Together with a set of smaller wheels, Q Comfort is shakier on uneven roads. But it doesn’t seem like a big issue for me.
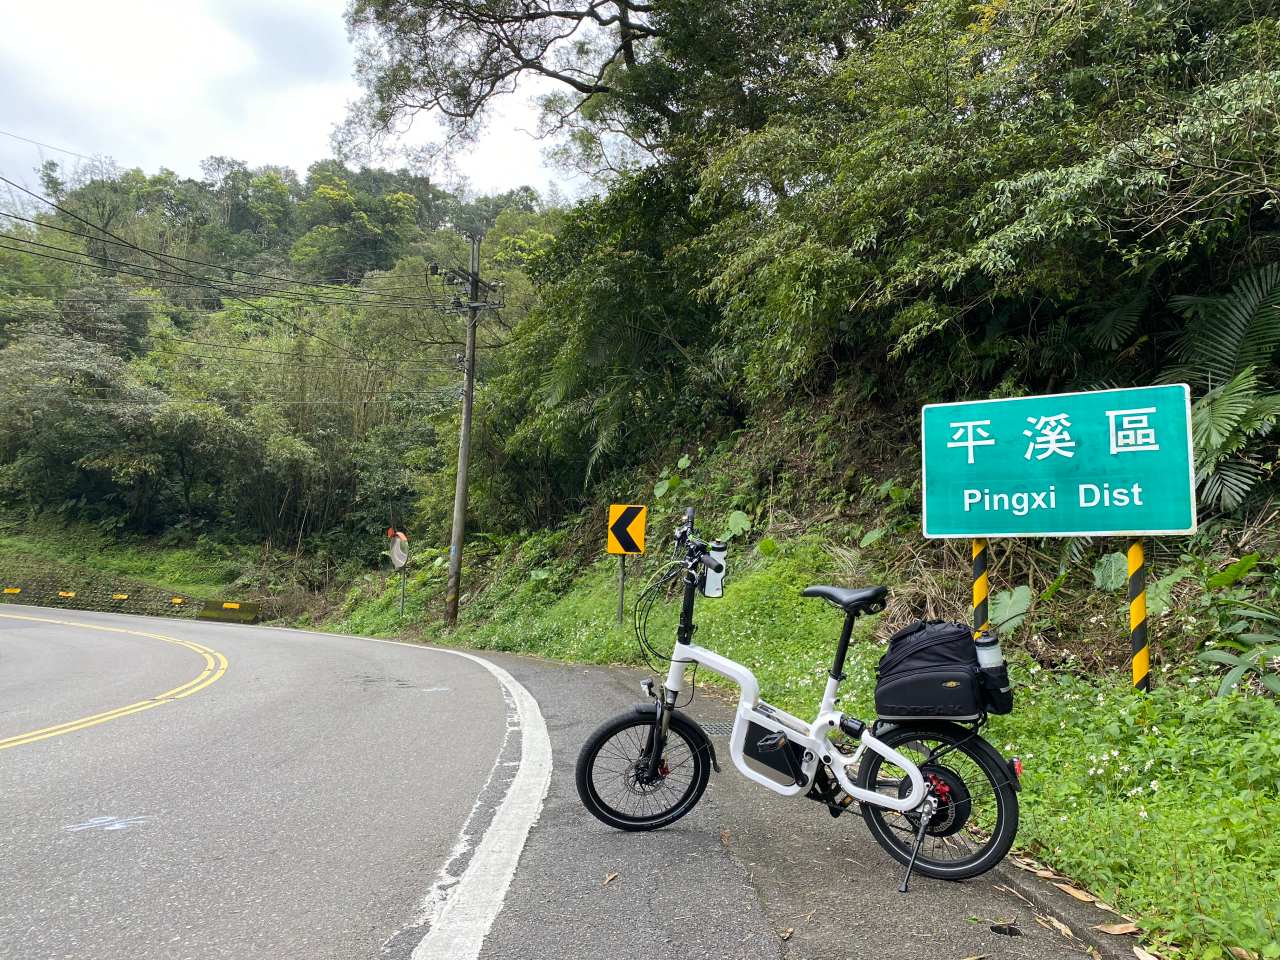
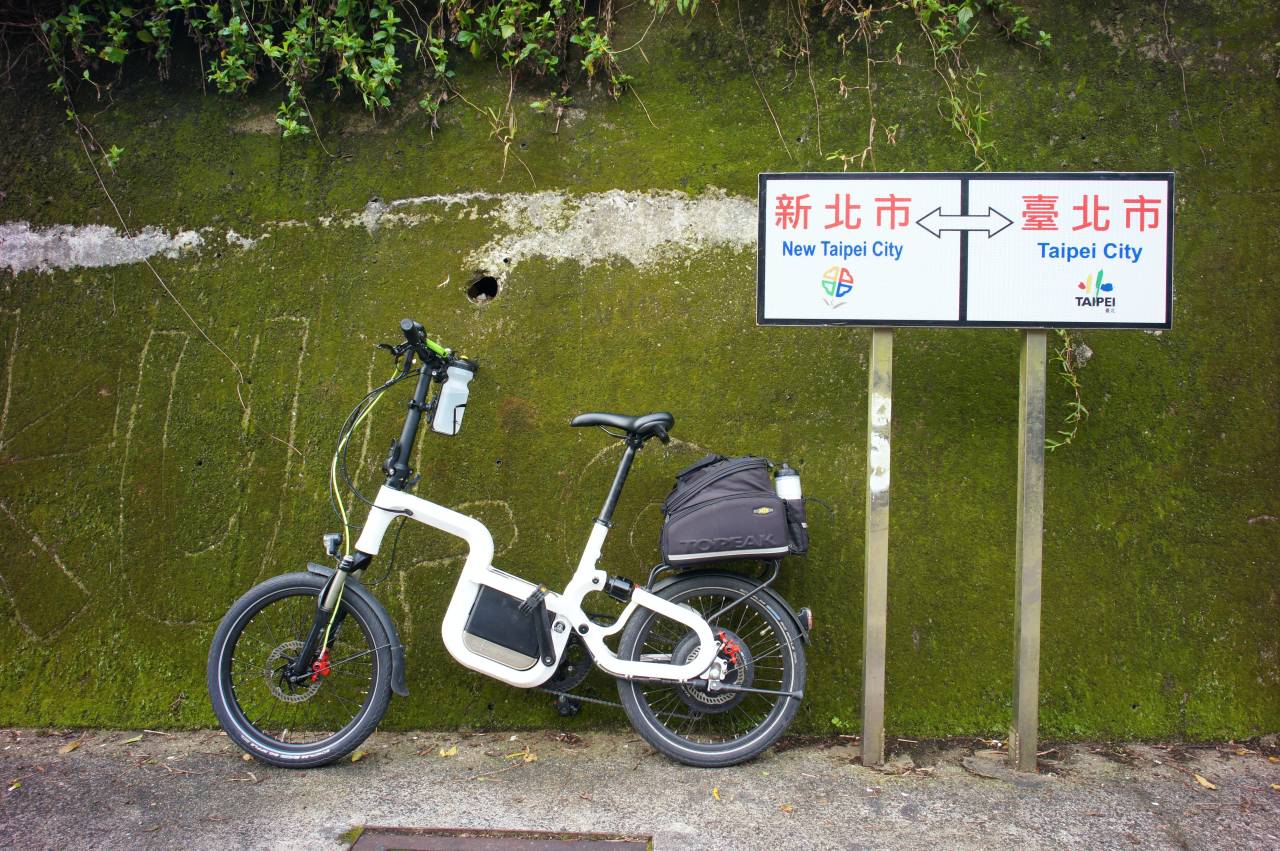
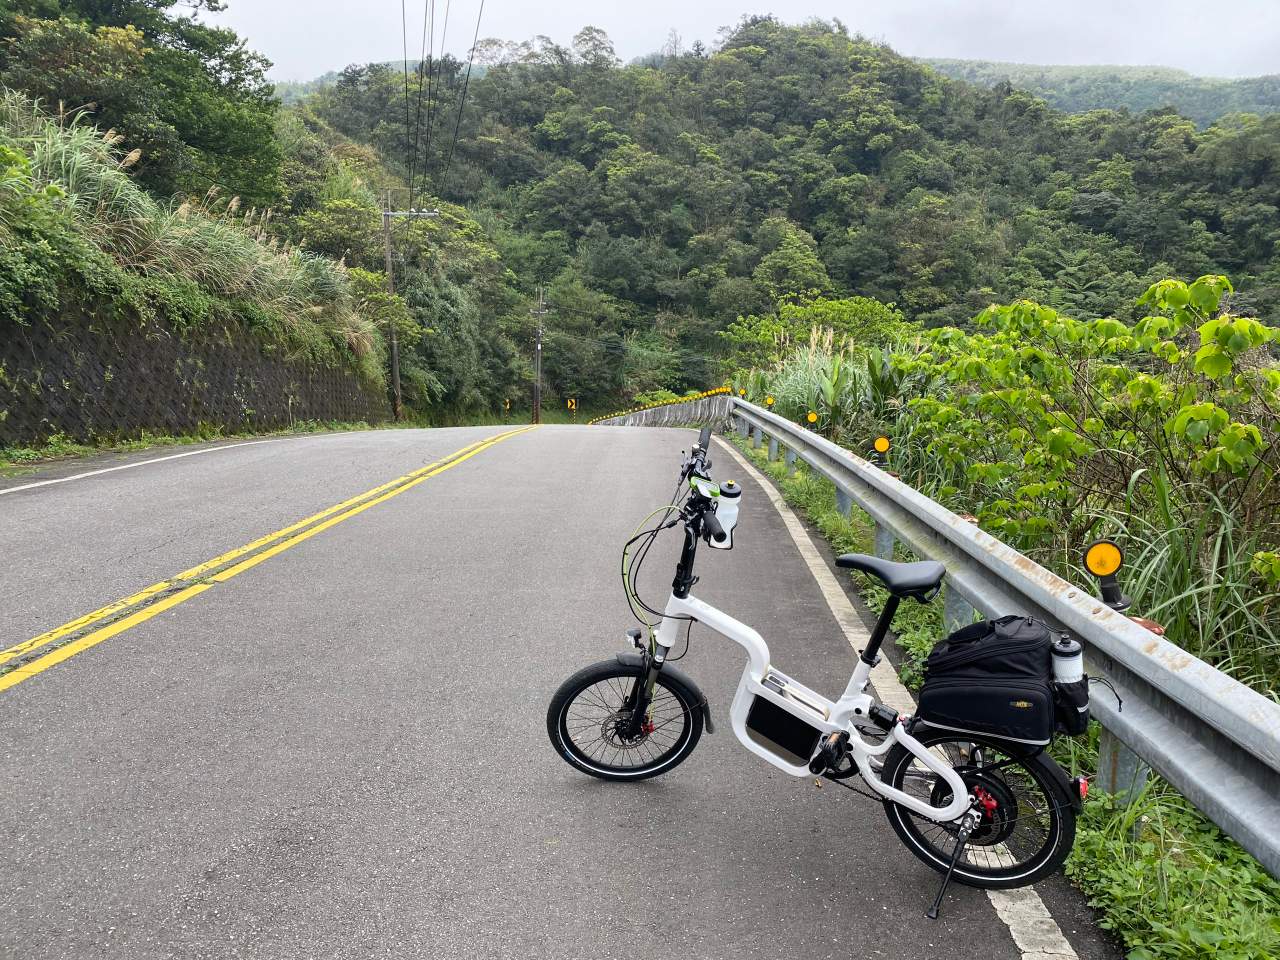
Our friends at Klever told us Q Comfort is good at climbing. So I went the hilly route first – from Nangang to Ruifang along County Highway 109 and 106, then took Provincial Highway 2D for the return leg (total Distance 77km; elevation gain 1,384m; maximum elevation 490m).
The climb to the first peak, 200m in 3.5km, was done easily. The push from the BIACTRON motor was more noticeable than that of B Comfort. Although the motors on the two models are both 350W with the maximum torque of 43Nm, the smaller wheels on Q Comfort transform the torque into bigger push. And because of this, you should try to avoid holding the handlebar with just one hand when the assist level is set to M or L. The strong push had almost thrown me off-balance the other day when I was riding with one hand. Please also be extra careful with your center of gravity when setting off uphill on a steep slope. The front wheel can tilt upward with the sudden thrash.
Top of the first climb
The descent followed was stable and enjoyable in general. I could control the e-bike with confidence even on sharp turns. When the regenerative coasting kicked in at 35km/h to use some of my kinetic energy to charge the battery, I could feel the drag but I was not slowed down.
Then when my speed reached around 45km/h, and when the Q rolled over a set of rumble strips 減速標線, which were raised across the road and painted white, it was rattled momentarily but violently. The battery was disconnected and the panel showed an error sign. I resolved the problem by re-installing the battery and carried on with my ride with no further issues. A couple days later our friends at Klever mailed me a small accessory to be attached to the battery, so that it can fit more tightly into the slot. They help. Apparently this is a bug that Klever has already worked on to solve. I also think I should take it easy when pumping the tyres. I had pumped them to their maximum pressure limit the day when I took the test ride.
Rumble strips
The next climb was a mild one. It took 13.5km to gain 240m to the peak of 290m. In fact, no serious effort was required from either me or the Q Comfort. And soon I was about to do the 3rd climb. After traveling for 5.8km and gaining 315m of altitude, I reached the peak of 488m. That was when the B Comfort had almost exhausted the first battery on my previous test ride. This time, with Q comfort, there were still 2 bars (out of 5) of energy remaining.
Top of the third climb
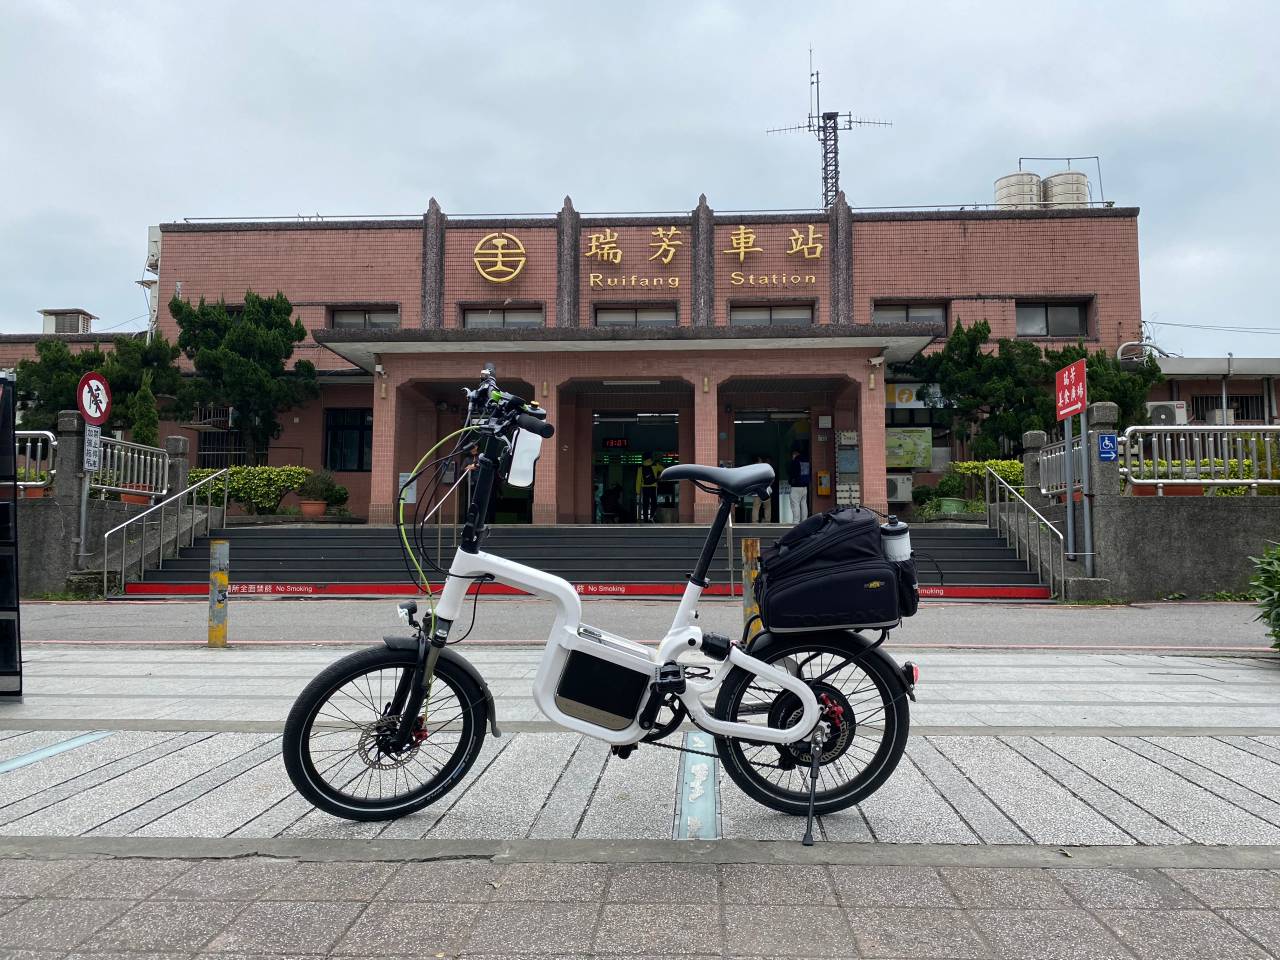
I descended to Ruifang and had my lunch before heading back home. The last bar of energy was blinking by then, signaling the battery was about to run out. But I made it home (about 10km’s ride) without having to swap in a fresh one.
Ruifang StationMy lunch
All in all, the Klever Q Comfort travelled 75km and climbed a cumulative 1341m with just one battery. It was impressive.
When Lois and I are cycling together, there is always a small issue that bothers us. As a rule, it is not safe to ride side by side. Then, as a less experienced and active cyclist, she usually can’t keep up with my speed. That means during our rides together, I am always taking the lead and have to glance back to check on her status from time to time, to make sure she has not fallen too far behind. After a long climb, I also can’t fully enjoy my much-deserved speedy descend in fear that she, who has a natural aversion for speed, will fail to catch up, miss a turn, etc.
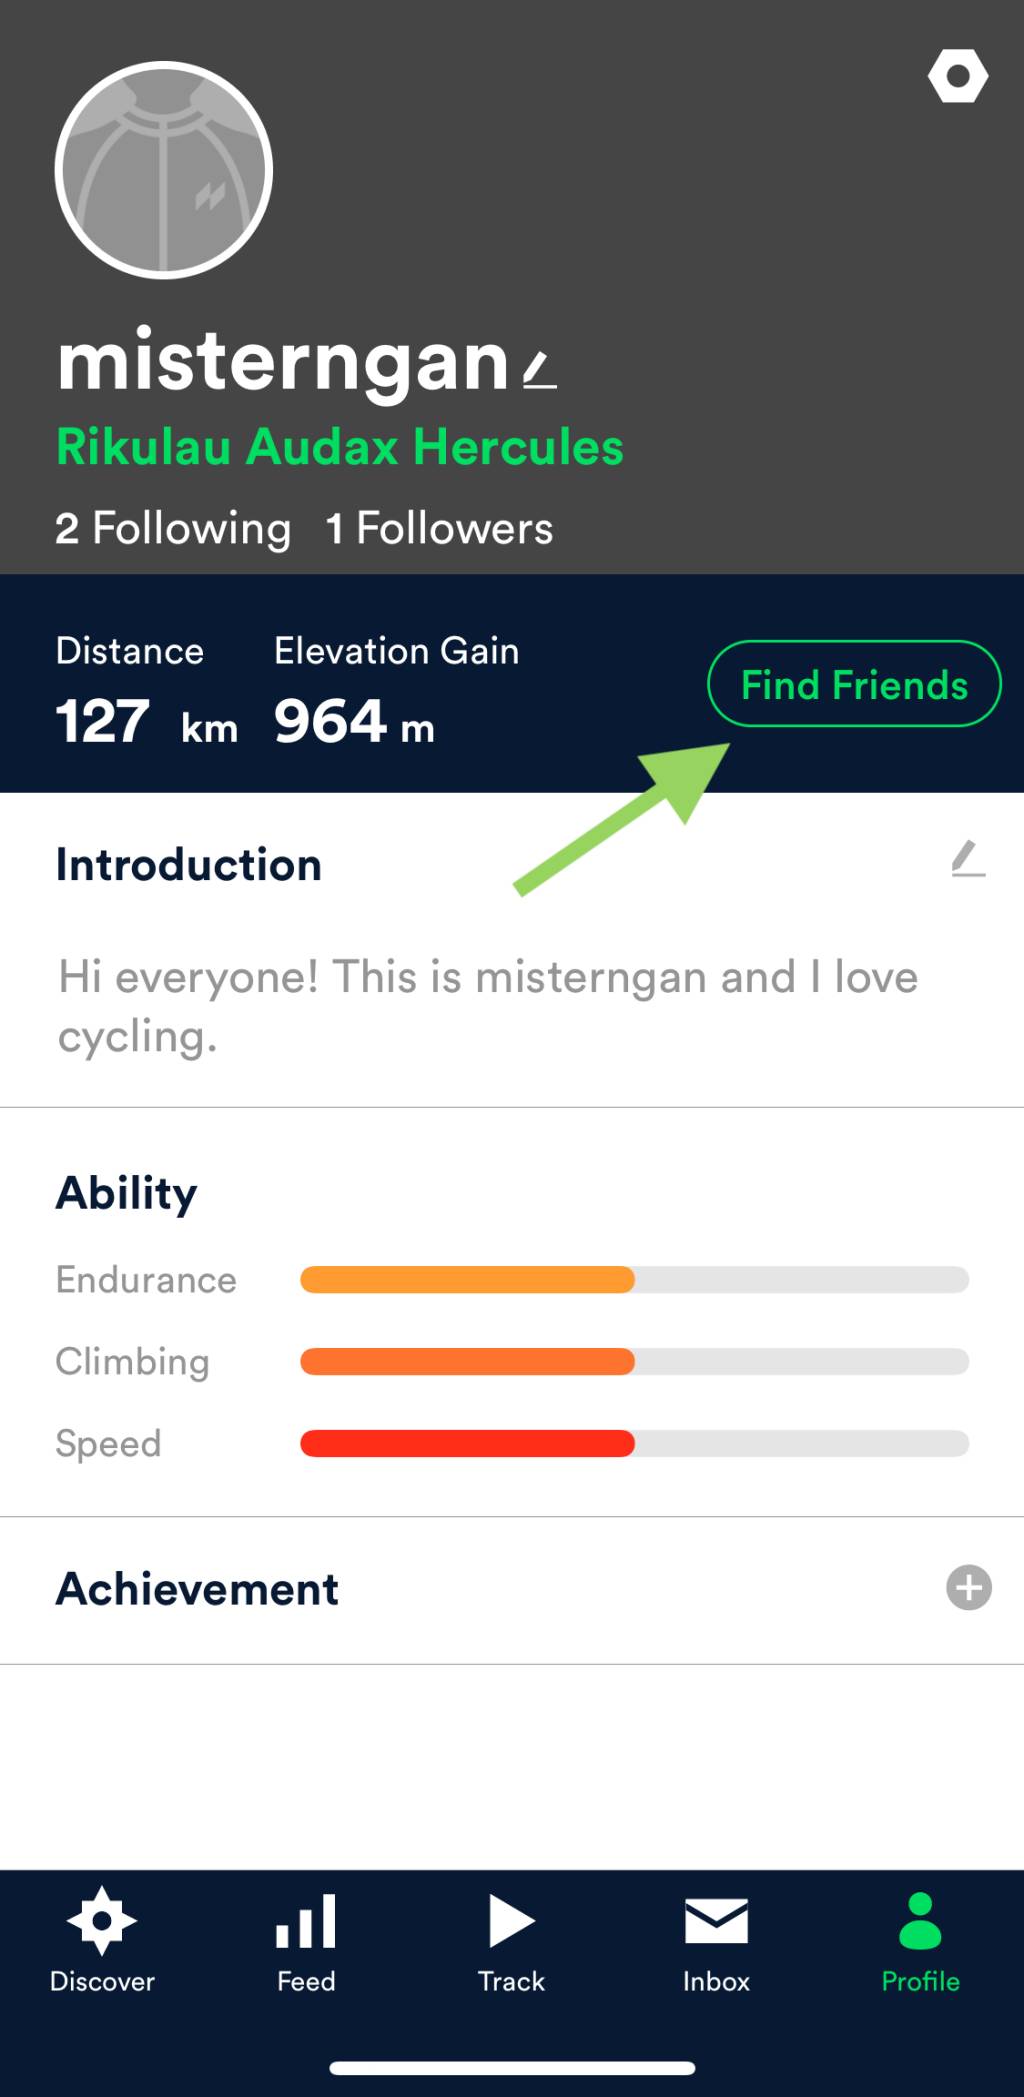
We have tried out the location-sharing features offered by Google Maps, WhatsApp and some other Apps, but yet to find one that suits our needs. That’s when we learned about Velodash, a cycling App specifically designed for group cycling. In addition to the usual route drawing and event planning functions offered by most other cycling/tracking Apps, it also boasts of a real-time location sharing feature that “allows you to see the current location of your friends” – exactly what I need when I go cycling with Lois.
It took us some time to locate this function after installing the App – which is a bit frustrating at first. Turned out this feature is only available for cyclists who have joined the same event created in the App. But once we got this figured out, we love it immediately. I can check on Lois’ location and status anytime just by glancing at the same navigation screen. After the climb, I can leave her behind for a moment and enjoy my speedy descend. She will know where I am heading, follow my trail easily, and know where to meet me when I have stopped to wait for her. Our rides together become so much smoother and more enjoyable, thanks to Velodash.
It seems there is not much information about this wonderful feature of Velodash out there. I am more than happy to share a step-to-step guide here.
How to share real-time location on Velodash when cycling
1. Install your Velodash App and create your account/profile
2. Search for your friend’s profile and follow each other
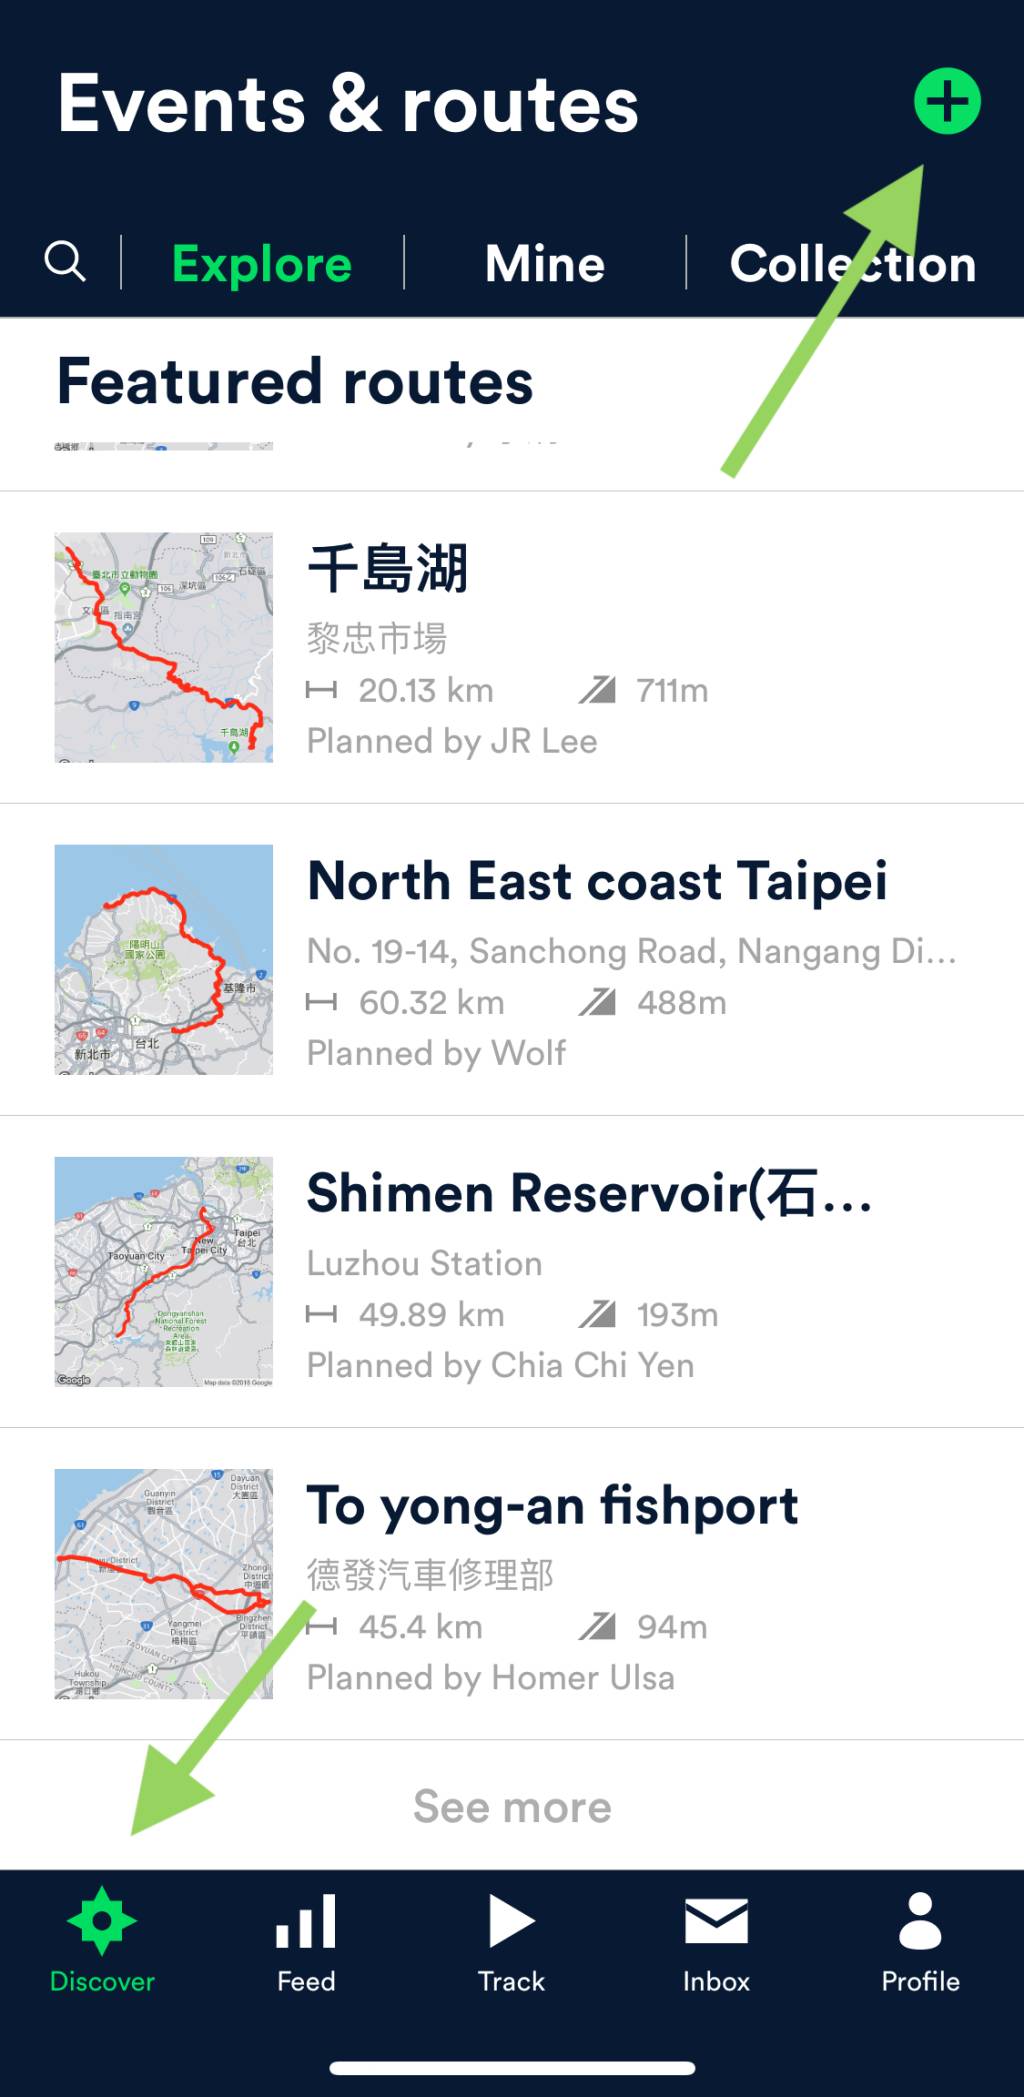
3. Go to the tab of Discover on the left bottom corner
4. Tap on the “+” sign at the top right corner to create an “Event”
Step 1 & 2: Set up your profile and find your friends on Velodash
Step 3 & 4: Create an event on Velodash
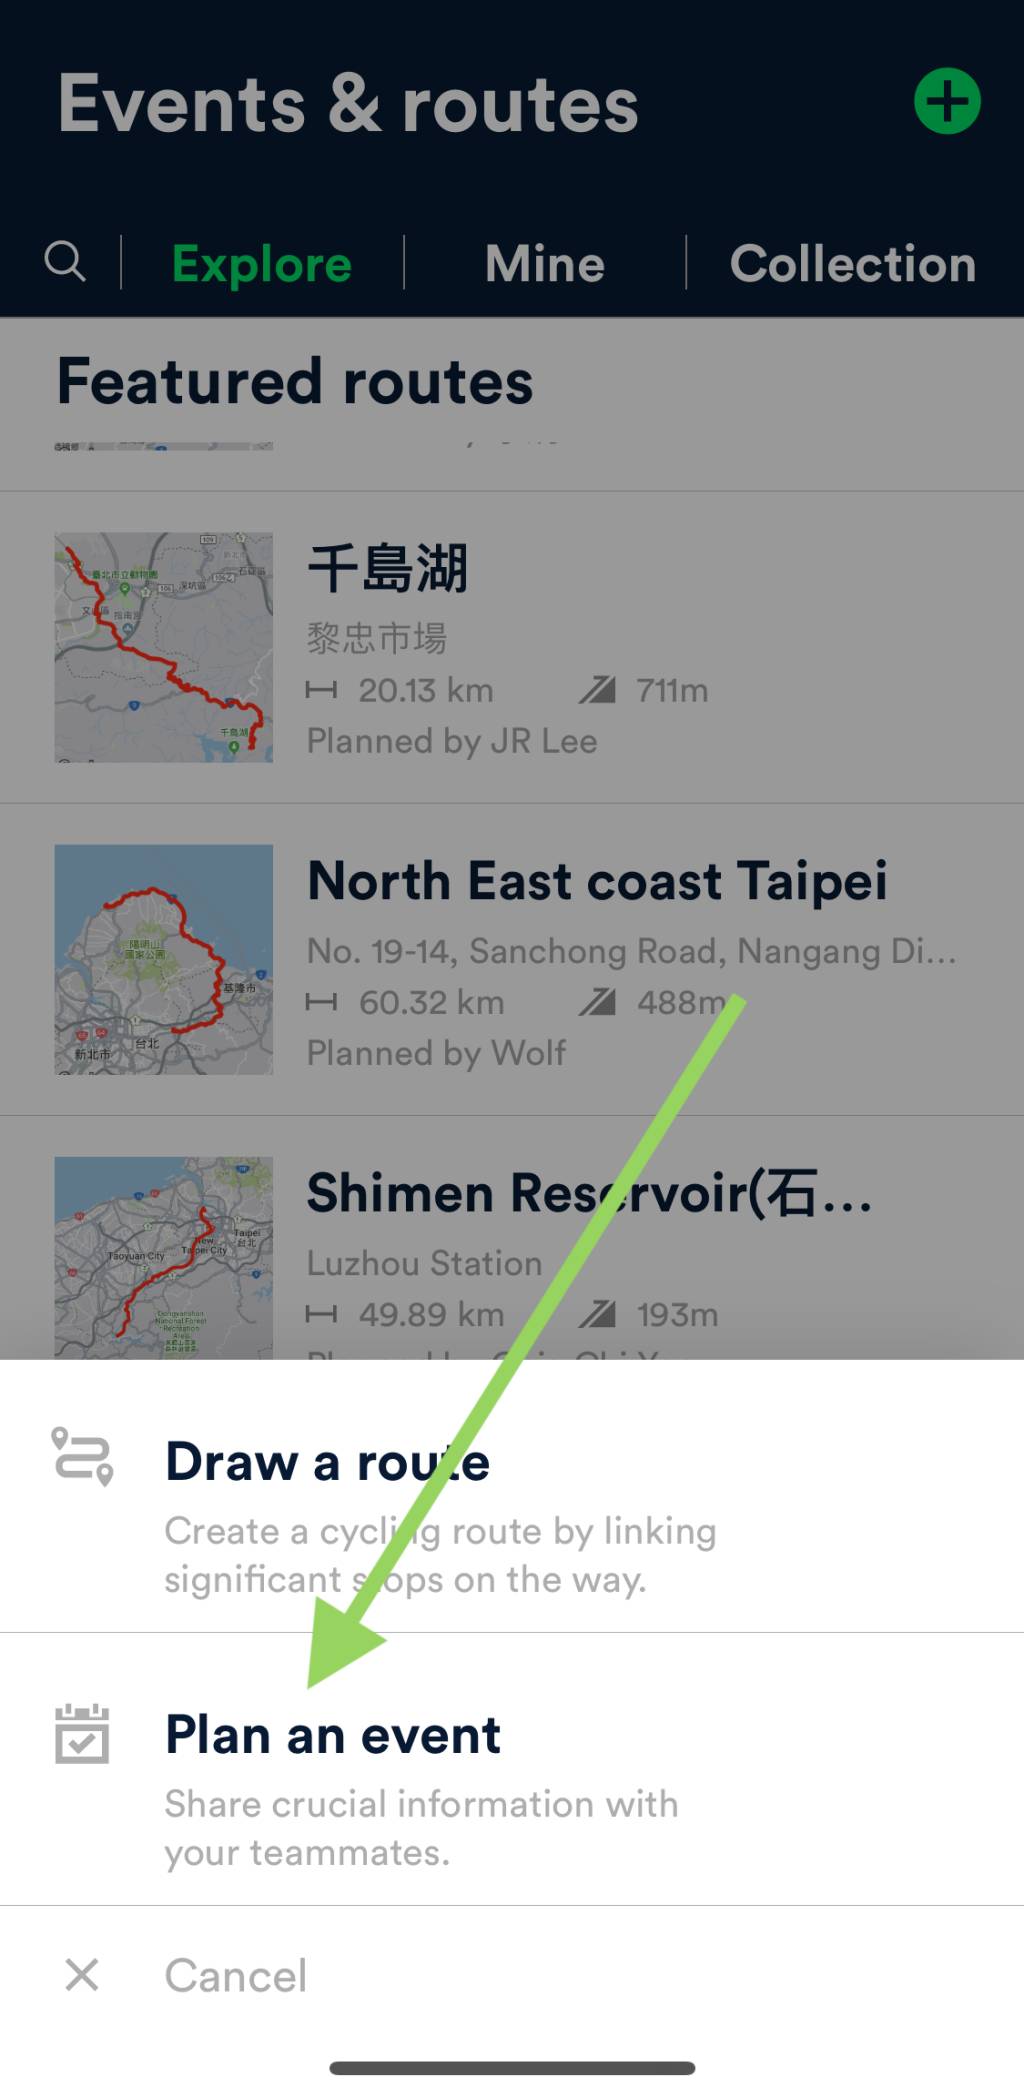
5. At the page bottom, select “Plan an Event”
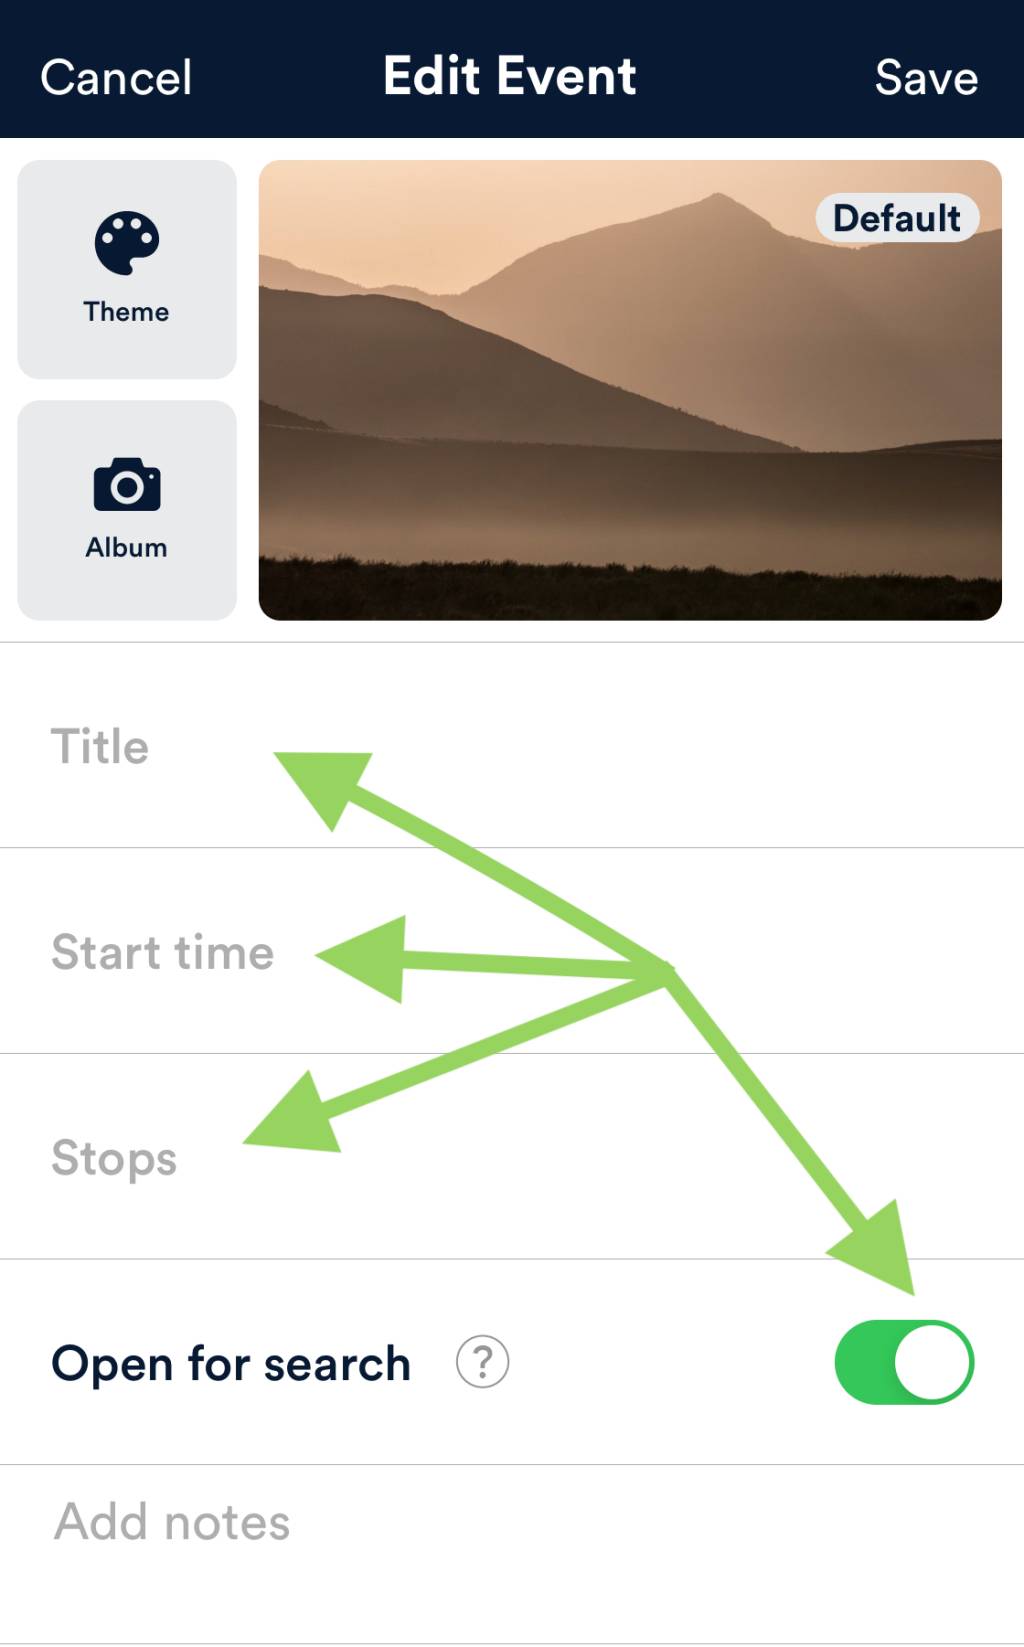
6. On the page of “Edit Event”, fill in info like “Title”, “Start time”, and “Stops”
7. Turn off “Open for search” if this is meant to be a private event
Step 5: Select “Plan an Event”
Step 6 & 7: Edit event details
8. “Stops”: This is how you plan a route for the event. There are four ways to do it: plan a new route on the fly; select from the routes you have saved; search for routes created by other Velodash users; and upload a GPX file
Step 8: Plan a route for your event
9. Save the “Event” page when you are done
10. On the “Event” page, add your friends to the “Participants”
11. Hit “Start” on the “Event” page
12. Voilà! All the participants will see each other’s status on the map after hitting “Start”. As you can see here, the Blue Dot is me, with Lois being right in front of me on Paused, waiting for me. The solid red line is what I have covered. The dotted route in black is the route planned and yet to travel
Step 9 – 11: Add your friends as participants and hit “Start”
Step 12: Real-time location sharing on Velodash
About the route planning function of Velodash
The built-in route planning function is simple and intuitive. You can just specify multiple stops on the map and the App will do the routing for you. However, with the aim to come up with the shortest path, in most cases, the route suggested is not the most ideal one for cycling. The dedicated bikeways are usually ignored. So, if you want to go by a very specific route, it’s better to plot it on a desktop with Strava or Xplova, and then export and upload the GPX file to Velodash.
However, we don’t always have access to our desktops and sometimes we just want to do a spontaneously ride. As mentioned earlier, in order to use the real-time location sharing feature, we must join a Velodash event. That means we have to have a route after all. In this case, I would just give the route planner the starting stop and end stop, and use the route it suggested for the event planner. You don’t really need to follow this suggested route. You are free to deviate from it while still seeing each other’s location and status.
Other Impressive Features of Velodash
There are lots of popular routes created and shared by fellow cyclists; they can be found in the Discover – Explore tab. You can save the ones you’re interested in to your own collection, and retrieve them when you are planning your event.
We can also explore other fellow cyclists’ events and join them if you are interested. I once created an event for testing and received a message from some guy asking if he could join me. Too bad I had to turn him down.
Velodash can also be connected to external sensors to improve accuracy. I have successfully connected a Garmin speed sensor to the App.
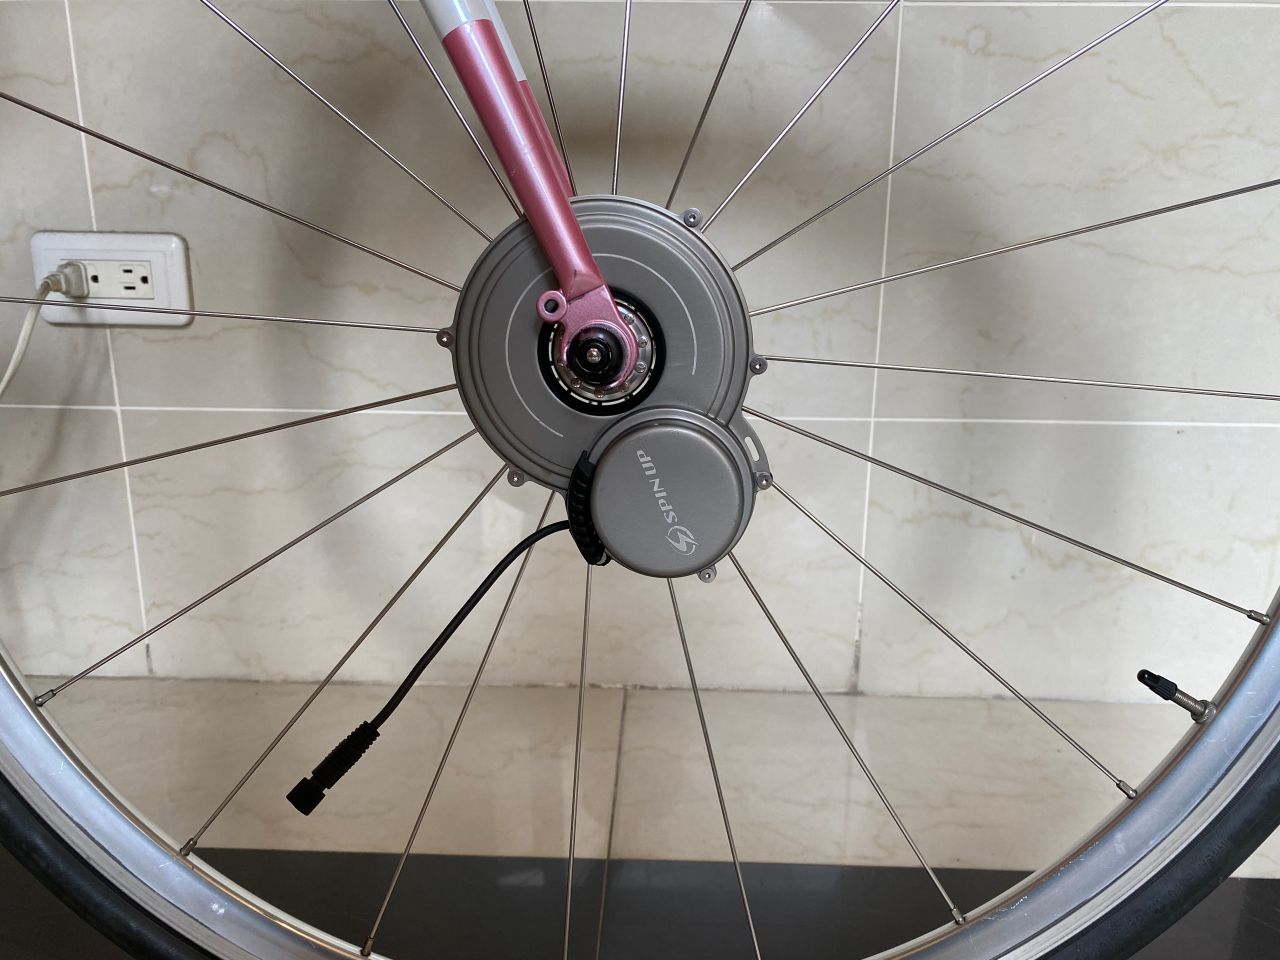
The Challenge of Making a Front-Mount Bicycle Dynamo
Before the release of F12W-PRO, two rear-mount bicycle dynamos (R12W and R03W) in the line of SPIN UP have been in the market for some time. Turned out it is quite challenging to develop a front-mount model. While there are many buffers, including the saddle, the pads on our cycling pants, and even our butt, to absorb the vibration coming from a rear-mount generator, for a front-mount one, the slightest vibration could easily find its way to our more sensitive fingers via the fork and the handle bar. On the other hand, any noise from the generator will become more noticeable from affront than from arrear, thanks to the structure of our ears. It may sound trivial, but all these small nuisances will turn into major annoyances during long rides. But a rear-mount bicycle dynamo may not be an ideal choice – I wouldn’t want a generator on the rear wheel because all my electronic devices are on my handle bar. I don’t want to run a long wire from the rear wheel to the front.
Therefore, in seeing the need of a front-mount model, Mr. Yang and his team had been working on minimising the noise and vibration of the generator in the past 3 years until F12W-PRO was all set and ready to meet its users.
How Intelligent Power Management System (IPMS) works
As mentioned earlier, SPIN UP F12W-PRO is the first bicycle dynamo with Intelligent Power Management System (IPMS). Depending on our riding speed and the level of power available in the built-in reservoir battery (a lithium ion battery), the IPMS operates in 4 different ways in order to maximise energy efficiency.
In the first scenario where the reservoir battery is empty or near-empty, and our speed is not fast enough to generate the required output of 5W, any energy generated from our cycling will go straight into the reservoir battery first. It means the charging will not start if you plug in your phone at times like this, not until there is enough energy stored in the reservoir battery.
In the second scenario where our speed is still not fast enough to generate the required output of 5W, but the energy level of the reservoir battery has passed the required minimum, the IPMS draws energy from both the built-in reservoir battery and the generator at the rate of 2.7W and 1.7W respectively, making up a total output of 4.4W, which will surpass the minimum requirement of most smartphones and thus kick start the charging process. Although it is not impossible to tap more power from the generator, the development team decided to limit it to 1.7W for better cycling experience. My guess on the technical reason behind it is that they don’t want the generator to create too much undesirable drag during climbs.
In the third scenario where we are cycling at a medium speed of 15-17km per hour, the generator will happily churn out electricity at the rate of 5W, which, after going through the rectifier and the voltage regulator, is converted into a stable supply of 5V1A that can be fed directly to the USB port and then to your phone or other electronic devices. The reservoir battery is left untouched.
In the fourth and last scenario where our bike is traveling faster than 18km per hour and the energy generated is more than 5W, while keeping on pushing out a stable 1A current to the USB port, the IPMS will direct any surplus energy to the reservoir battery for later use. But again, to avoid creating too much undesirable drag, the maximum energy output is limited to the rate of 6.6W.
To minimise the possible harm and annoyance caused by our electronic device being charged having to stop and resume charging within a short interval, say every time we stop to take a sip of water or in front of a traffic light, the reservoir battery will power the USB port solely for around one minute before it goes off.
When both the reservoir battery and our electronic device are fully charged, the generator will only generate enough energy to power the onboard computer and circuits and thus bring the drag level to minimum.
For those who is also in need of a powerful front light, the additional wire branching out from the upper end of the cable, which is ready to be connected to a front light, will be handy. A Dynamo LED light set that includes a front light and a rear light is also available on the SPIN UP official site.
What Makes SPIN UP F12W-PRO So Special
Most of the other bike dynamos available in the market only have 3W of rated power. It’s good enough to light the bike lamps, but they have to rely on a power bank to collect trickles of energy before it can be used to charge a smartphone, which usually requires a supply of 1A. This really made SPIN UP F12W-PRO, which can feed energy directly from the generator to your electronic device without having to route through the reservoir battery, stand out from the crowd. Apparently, the time it will take to charge your device will be a lot shorter and the energy loss that will inevitably occur during the charging process will be far less.
Mr. Yang and his team have substantial reasons to believe their F12W-PRO is so far the best.
There is a speed limit of 70km per hour set upon the use of SPIN UP F12W-Pro though. If your speed exceeds the limit, excessive high voltage will build up at the generator’s mother board and eventually break down its components permanently. And such limit is set for bikes with 700C wheels, for which 70km per hour is about 550 turns per minute. That means if you are mounting your F12W-PRO to a smaller wheel, the speed limit for you is lower.
It was a very enriching morning. Soon it would be lunch time. Before heading out for lunch together and me bringing a SPIN UP F12W-PRO home for more thorough trial, my conversation with Mr. Yang strayed to Nikola Tesla, the inventor of AC induction motor and the square root of three for the three phase electrical systems…
Would I Pay USD499 for the SPIN UP F12W-PRO
At the time of writing this post, I have been using the dynamo for more than 3 months. I will share my experience with it in more posts to come. All in all, it has been working very well. I have no intention of returning it to Mr. Yang. I will pay the hefty yet worthy USD499.
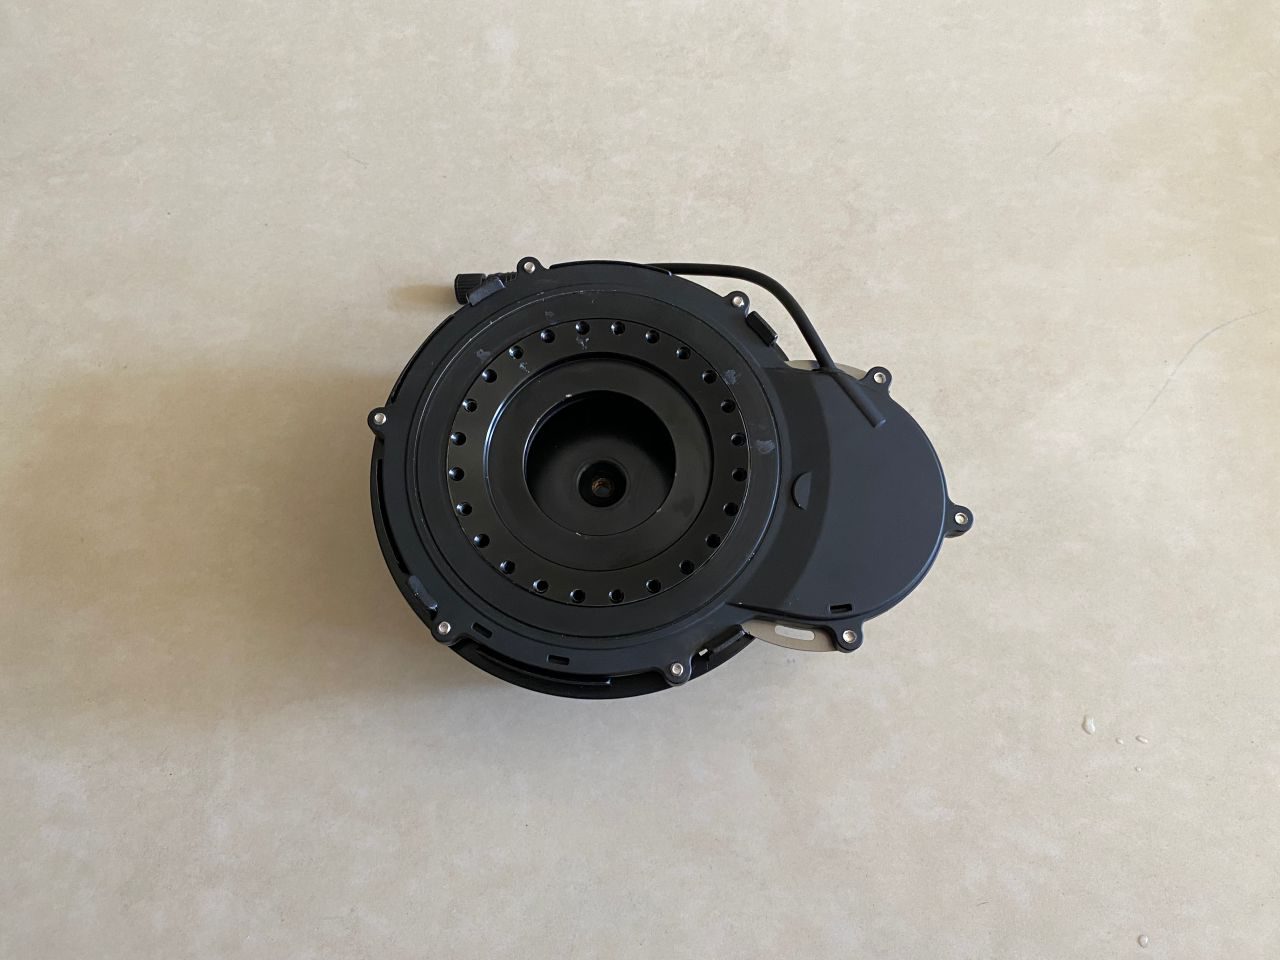
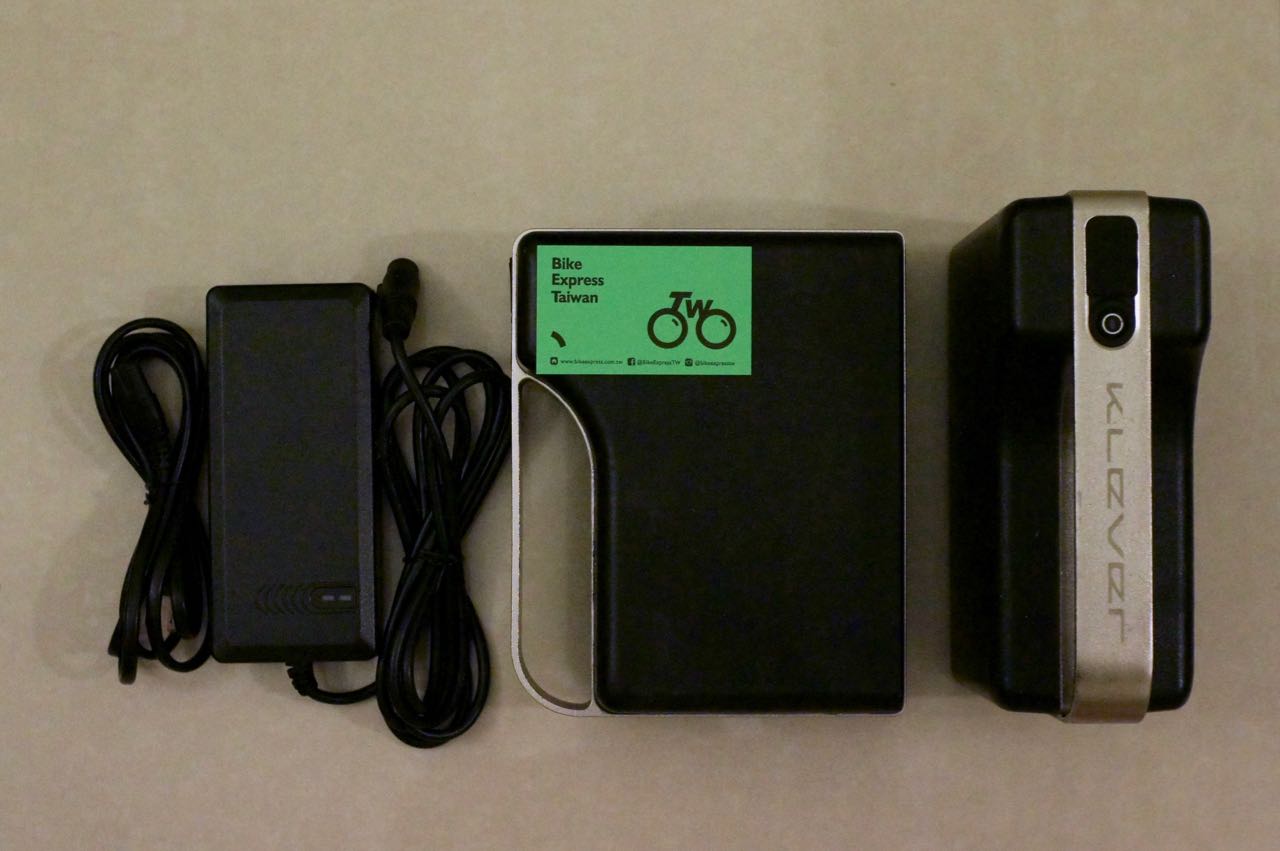
SPIN UP F12W-PRO, a new front-mount model added to SunUp Eco’s line of bike dynamos released to the market in late 2019, is a high-power low-drag 3-phase bicycle USB phone charger that promises to keep your smartphones and other electronic gadgets charged while you are pedaling along. Robust, durable, and efficient, it starts pumping out a stable current of 1A through its USB port as soon as your cycling speed reaches 15km per hour, without having to wait until a certain amount of energy has been accumulated in the reservoir battery.
The generator, weighing a portable 370g, is to be mounted on the spokes of the front wheel and will be driven directly by the wheel to achieve minimum mechanical drag. It works with both disc brake and rim brake, and is compatible with 26”, 700c, and 29er wheels. An assist kit is included to help make the installation easier, quicker, and more precise.
The most distinctive feature of F12W-PRO may be its adoption of Intelligent Power Management System (IPMS), which is the first among bicycle dynamos. It helps maximize energy efficiency, prevent unnecessary energy loss, prolong the life of the reservoir battery, and charge your phone as fast as possible.
The more adventurous touring cyclists will surely welcome the all-weather feature of F12W-PRO. Operative in a wide temperature range between -25 and 65 degree Celsius and with a water resistant rating of IPX4, which means it can stand water splashing from any direction with no harmful effect, F12W-PRO is your reliable source of power even in the toughest of times.
But, let’s be honest, the bundle of all these wonderful features does not come cheap. A hefty price tag of USD499 per set will make most who are interested in F12W-PRO think twice, if not stopping them at all. So, we try to find out if it is worth the price or not.
I have always wanted a bicycle dynamo to save me from my “range anxiety” for my smartphone. We all know how indispensable our smartphone is. When I’m on my bike, especially during cycling trips, I need it for photo-taking, navigation, ticket booking, searching of accommodations, checking of train schedule, communicating with my friends, and a bunch of other random tasks. There is not one phone with battery life long enough to sustain such extensive use, so I have been using power banks along with my iPhone. But the capacity and output power of power banks deteriorate as they age. When we are using old power banks, we may often find our phones stop charging soon after they are plugged in, while the power banks indicating they are still full of power. Without dwelling further into the technical explanations behind this, I should only say this does not help much in easing my range anxiety.
Besides, even though I don’t do multi-day cycling trips often and seldom go bike touring in the wild, and therefore don’t really have a pressing need for a bike dynamo, I still want one on my bike as I like the idea of being self-sufficient and untethered by electric outlets.
My First Try with SPIN UP F12W-PRO
I contacted SunUp Eco, the developer of F12W-PRO, to see if they can loan me a trial set. As a former electric engineering major, I am also very interested to meet them in person to learn more about the design and development their bike dynamos. It turned out they are friendly with Rikulau Taiwan, one of our partners, and have heard about us. The answer is: yes, they’re happy to loan us a set of F12W-PRO and happy to meet with us.
We were greeted warmly by Mr. Mark Yang, founder and President of SunUp Eco, in their workshop on the outskirt of Taoyuan County. Mr. Yang and his team wasted no time to show me how to install the dynamo on a bike. The demo bike happened to be a Rikulau in my size. Within 10 minutes, the generator was ready. I took the bike out right away for a test with my iPhone plugged in. At first, nothing happened. Then I started doing a long climb to the Shimen Reservoir at a speed of around 7km per hour. After 5 or 6 minutes, while I was still climbing, the screen of my iPhone lighted up to show that the charging started. It lasted for around 3 minutes and then stopped. I later learned that it is because my speed then was not fast enough to generate the amount of power that the system needs to accumulate in its reservoir battery before it can pump out the electricity at the required rate. After the climb, I rode for a little bit more on the top of the dam before descending back to the SunUp Eco workshop, with an average speed of over 15km per hour. Electricity was churned out steadily the whole time and my iPhone took in the energy automatically whenever it was available – in the case of some power banks I have used, once the charging has stopped, I have to unplug and re-plug the lightning cable in other to kick start the charging process.
Back in the workshop, I started grilling Mr. Yang and his team on the design and development of F12W-PRO Bicycle USB Charger Dynamo.
We have been receiving enquiries about e-bikes for hire from time to time. So we asked around and were introduced to an e-bike manufacturer, Klever Mobility, who generously loaned us an e-bike for a try.
An e-bike, or a so-called pedelec (from pedal electric cycle), can be compared to smartphones in its infancy. There used to be palmtop computer makers who tried to add the functions of a telephone to their PCs, and mobile phone makers who tried to make their phones run computer applications. This is what’s happening in the motorbike and bike manufacturing industries. Klever Mobility is a daughter company of Kymco, a well-established local manufacturer of scooters and motorcycles with more than 50 years’ experience, who has also been working on electric mobilities for more than 20 years. Founded in 2011 and carrying with it years of invaluable experience in building machine-powered bikes, Klever Mobility commits itself to designing and building the hybrid that can unlock the full potential of electric mobility and offer the best riding experience.
In terms of motor positioning, there are two major types of e-bikes at the moment: hub-drive and e-drive. Hub motors, which place the electric motor in the center of a bicycle wheel, are certainly the most common form of electric bicycle motors.
Mid-drive motors, which house the motor closer to the center of the bicycle and transfer the motor’s power to the rear wheel via the bicycle’s chain drive, have become much more common over the last 2-3 years, and are cutting significantly into the hub motor’s lead as the king of the e-bike motors. (1).
The Klever e-bike loaned to us is a member of the low step-through and full suspension B series, belonging to the hub-drive family. It comes with an in-house developed rear drive system called BIACTRON, which consists of a 350W gearless and brushless rear hub motor with torque sensors, capable of regenerative coasting and braking. The 470Wh battery is rectangular in shape, which makes it easy to be packed in most touring bags. When in use, it will be put inside a slot in front of the bottom bracket. It helps to keep the centre of gravity low.
Two Klever batteries and a travelling charger. Name card for size reference.
As to the non-electrical, human-powered system, it has a 48-tooth chainring and a set of Shimano Deore 10-speed cassette (11-32 Teeth). One may take note when doing the maths on the gear ratio that the size of the wheels are 24 inches. A standard mountain bike comes with 26 inches wheels.
When everything is fixed to the newly designed robust aluminum frame, must say it looks more like a scooter than a bike – it may not be a surprise when we consider its lineage. I had been quite skeptical about the effectiveness of the pedals of e-bikes, after seeing enough e-bike riders on the streets using their pedals as mere footrests. So, to see whether my skepticism is legitimate, I started the test ride without a battery. Turned out it ran very smoothly. The motor did not get in the way of my pedalling; it even managed to turn a small portion of my energy spent to power up the rear lamp. I found it a nice feature because it helps to keep us safe on the road even when the battery runs out. I cycled for a couple more kilometres. The extra weight from the robust frame and the motor had not slowed me down until I needed to do some climbing and when gravity came into play. Without a smaller chainring (e.g. 30 or 22 T), the gear ratio made it hard for me to climb some steeper slopes. Of course this is not really an issue, considering it is an e-bike and you are not supposed to ride an e-bike without a battery. But now I know its limitations and I know I have to make sure I have enough juice when I am going out for a hilly route.
Next, time for some more serious testing. Now that I have electrical power at my disposal, I could be more ambitious when I was planning my routes. We want to see if it’s good for bike-touring. Lois and I used to cycle for about 50km a day without much climbing when we were bike-touring. We are both not competitive riders and we stop (for breaks, for sightseeing, for coffee, for snacks…) a lot. We may be able to cover more ground with an e-bike. I planned two routes, but first, I need to learn how to replace a tube in case of a flat tire. The tires of the Klever e-bikes are so sturdy a flat tire or punctured tire is very rare indeed. But still. Klever Mobility is kind enough to arrange a demo session for me in their workshop. The procedure to change an inner tube is exactly the same as what needs to be done with an ordinary bike, except that the wheels are much heavier, especially the rear one, which has a heavy motor attached to it. The front wheel has a quick release but the rear one is fastened to the dropouts with bolts. The electric plug to the motor is locked with a star screw. So, in addition to the hex keys, a 19 mm socket wrench and a T25 star key are also needed. I will need to make sure I have all the tools with me when I go somewhere remote because, if there is a flat tire and I am not able to fix it, Lois, a licensed but incompetent driver, won’t be able to come save me.
A 19 mm socket wrench and a T25 star key, inner tubes as an insurance policy
The first route I rode is a hilly one from Nangang to Ruifan along the County Highway 109 and 106, just to test how well the e-bike can climb. Then I returned home from Ruifan via Provincial Highway 2D (shown on googlemaps as 2丁) and Provincial Highway 5 (total Distance 77km; elevation gain 1,384m; maximum elevation 490m). I weight around 78kg and I packed an extra battery, which make the total weight around 85kg. The BIACTRON motor system has sensors to detect my pedaling force and provides additional push accordingly. With pedal assist at the lowest level, I managed to climb the first 233m peak on the County Highway 109 by shifting the rear gears. It was quite a steep one; I gained 200m in 3.5km.
A simple control panel at the left hand side
As I was descending to the junction of the County Highway 106 (elevation 50m), the regenerative coasting was kicked started when the e-bike hit 35km/h. Then there came some steeper descends and I reached around 45km/h. The console beeped to warn me about exceeding the speed limit. Other than that, the e-bike worked quietly. You can hardly noticed any sound coming from the motor.
The next peak was 290m. It was a mild one because it took 13.5km to gain 240m of elevation. I paused frequently to take pictures of the villages in the outskirt, like Shiding, Jingtong, Pingxi and Shifen. It’s in general a very comfortable ride except I had to share the road with the roaring motorbikes. This is a very popular route for bikers, too.
Bai Shih Village where coal miners used to live.
Some abandoned excavators found on county highway 106
County High 106
The final climb came right after Shifen. I started at 173m of elevation and reached 488m. It was an elevation gain of 315m in 5.8km. At some points, I needed to push the assist level to the highest. The muscles on my legs were getting tired and the battery was coughing up its last bits of power. But we did it. We made it to the top without having to switch to a new battery. I was impressed by its endurance.
As I was descending to 55m of elevation, on a 10km ride towards Ruifang, the e-bike harnessed some power back to recharge the battery. And I recharged myself with a late lunch at Ruifang.
I started my return leg with my fellow old battery. I wanted to see how far it could go. There wouldn’t be any more climbing and I had set the pedal assist to the lowest level. It should be able to last for a bit longer. And that was when a mutiny happened – a cramping leg. Alright! Time to switch to luxury mode. I swapped in the fresh battery and headed home with pedal assist set to a higher. The second battery was still half full when I got home.
My second test with this E-bike was a longer trip with less climbing. I cycled to Keelung from Dahu Park because I was quite sure I could not board the train with the e-bike. From there, I travelled along the northern coast mostly on the Provincial Highway 2 to Tamsui, then headed home along the Riverside Bikeways. It was a 118km route, which felt mostly flat to me. But turned out the accumulated gain on elevation on those mild slopes added up to over 1,232 metres, according to my Strava record.
It was a cloudy day with occasional drizzles. Braking on the wet road was effective with the 2.15” tyre and the hydraulic disc brake. And luckily my pants and bags were well protected by the fenders of the two wheels. Without them, the dirt and the filthy water threw up by the rear wheel could have accumulated on my lower back and found their way to my under pants. Well, I don’t really mind cycling in the rain and got soaked – all my bikes do not have fenders. But for some reason, when I am riding an e-bike, I expect a certain level of comfort.
I made it to Keelung in under one hour. I could reach 25km/h easily in the head wind or when climbing a mild slope. This was amazing! One would probably need to spend the same amount of time with public transportation.
I left the main traffic and avoided a major climb by heading straight to Waimushan Fishing Harbour. Rain stopped there. I started my coastal cruise, passing through Wanli Fishing Harbour, Yehliu Geopark, Jinshan Old Street. I made it to Fuguijiao Lighthouse (65km of the 118km trip) after traveling for 5 hours with lots of short pauses in between to take pictures and a longer one for lunch. Then the battery was almost exhausted at 70km. I swapped in the fresh one and arrived at Tamsui Old Street in an hour. It was still early, around two o’clock. But I needed to be home for a shower and have dinner with the kids. Strong headwind at the Riverside Bikeways. No worries! My second battery was still fresh. We pierced into the wind with ease. The only problem was that my bottom started to hurt after sitting on the saddle for 7 hours. Again, when I was home, the second battery was still half full.
The bikeway entrance next to Wanli Fishing HarbourColourful rocks in WanliTo Keelung in the rain.Fuguijiao Lighthouse
The Klever B Power is a great e-bike for bike-touring. It can handle hilly roads and travel long distance, rain or shine. Consistently sensing my pedaling, the motor offers me help accordingly without me having to ask (or push buttons).
According to my two test rides, you will need a spare battery for day-long trips or multi-day bike touring. The traveling charger can refill an empty battery in 5 hours. Assuming you haven’t exhausted both batteries, which may not be wise, you can recharge the half-empty one first when you settle for the evening, and then plug in the empty one overnight.
Without the help from a gearing system, a hub motor has to drive the wheels directly and may get overheat when the slopes are too steep to climb. My friend from Klever told me that their BIACTRON system would protect the motor by cutting off the power when it becomes overheat. When it cools down, it works again.
A mid-drive e-bike is less likely to suffer from overheating, because it enjoys the benefits of its internal gears and the bike’s gearing system. However, the bike’s drive system is operating under greater stress because it pulls the chain together with the rider’s force. The cassette and chain set got worn out more quickly. And worse, the chain could snap on the way.
In the case of a rear hub motor, when it works, it removes some tension from the chain by driving the wheel directly.
Anyway, I am looking to try a mid-drive e-bike someday to do a comprehensive evaluation and a first-hand comparison of the two systems. Meanwhile, check this out for a thorough comparison of the two systems.
So, now we have got e-bikes suitable for bike-touring, is Taiwan a suitable place for bike-touring with e-bikes? Absolutely! Taiwan government has been building roads with slow vehicles, i.e. scooters and bicycles, in mind. One can always find designated lanes for slow vehicles on busy roads, bridges and tunnels. E-bike riders can also use the bikeways along the rivers that are commonly found in most cities and townships. The population density in Taiwan is just about right that you can find a hotel, hostel or homestay to stay each night and recharge your batteries with little difficulty. And according to our own experience, you hosts can usually find you a safe place to store your bikes.